Sunday, December 23, 2012


 Wrapping Up 2012
 
Hello, Gentle Viewers of my humble blog.  I wanted to take a few moments to show you what I am up to Right Now, as well as to give all of you a HUGE Shout Out!
 
I have seasoned a pork shoulder/butt roast, it has been seared in evoo and is now taking a hot tub in a delicious Mexican beer, garlic, oregano and sitting atop a bed of orange slices and red onion slices.  Next, I am on to seasoning, searing and braising beef short ribs for tacos.  Please see my photo above.  
 
I really want to THANK ALL of the viewers since the last day of May who have graciously taken the time to view my humble blog.  I appreciate that people have been kind, that you have realized - as I state in my opening post - that this is a fun activity for me, a learning activity for me, that I am doing this for the love of cooking;  the good, the bad and the ugly.  I appreciate that my viewers realize that I am not a professional chef or cook, NOR a professional photographer;  I am just a guy who loves to cook for his family and friends.    And STILL, you all have been gracious and kind.  THANK YOU!  I very much appreciate all of you, and I wish for ALL OF YOU, A VERY HAPPY HOLIDAY TIME!!!!
 
THANK YOU, AGAIN, 
 Martin
 
 P.S.  Much more to come very soon!!!!  Please stay tuned!!!!


Friday, December 7, 2012

Linguica and Escarole Cheesy Penne


Pasta is wonderful any day of the week or any time of day.  It is interesting, because, while I grew up loving my mother's spaghetti, I never really knew about nor "liked" other pastas.  My family was not "big" into pastas, therefore, we never frequented our local Italian restaurants.  As an adult, however, especially over the last eight years, I have become a pasta hound.  I LOVE pasta; ALL of them!  I love to shop for unusual, traditional pasta that most people have never heard of unless they grew up in an Italian family who used traditional pasta. I thoroughly enjoy learning about different pastas and how they "work", how they attract and allow sauces to "cling" to them, as well as how to serve them.  And unless I am careful to use whole wheat pastas, which I used for this dish, moderation is a must for me. 
 
Normally, if I were cooking for friends, I would have plated this dish 'familia' style, in a large serving bowl, but I was cooking for myself, for lunch today, as well as to freeze for future lunches at work next week, ergo the photo of the small plate.  Here's the starting line up:

1/2 large red onion, finely chopped
3 cloves garlic, finely chopped or grated, plus one clove, crushed, to flavor the evoo for saute'  
2 - 3 large links smoked Linguica, sliced into discs
1 head escarole, thoroughly washed, chopped
2 sprigs (about 12 large leaves) fresh basil, chopped or torn, halved into two parts
4 tablespoons Italian seasoning, separated
salt and pepper
*1 tiny pinch of Saffron threads  (smells Amazing!)
2 tablespoons dried oregano, halved  (or two sprigs fresh oregano, finely chopped, separated
4 tablespoons extra virgin olive oil, separated into two parts
4 tabs of butter, halved 
1 pound or box of whole wheat penne pasta (or, your favorite pasta)
1 28 ounce can crushed San Marzano tomatoes
2 14.5 ounce cans of fire roasted tomatoes (unless you make your own)
       *Because I was making a large batch for several individual servings, I added more tomato based products for the sauce than I would have if serving family style one time. 
 

Because I turned this into another one of my "bakes" for individual servings, I preheated the oven to 350-degrees.  If you plan to serve this family-style, you can skip that step and the steps for placing the pasta and sauce mixture in a baking pan with the extra cheeses. 

Add two tablespoons of extra virgin olive oil to a high-sided dutch oven or pot over medium-low heat.  Add the crushed clove of garlic to flavor the oil.  Slice the linguica and set aside.  On a separate cutting board and with another or a thoroughly cleaned sharp culinary knife, chop the escarole coarsely after pulling the unusable outer leaves.  Set aside in a large bowl.  Next, finely chop the halved red onion and finely chop or grate the remaining garlic cloves.  

Add the linguica to the pan and saute until a crust forms around the rounded edges. Add the onion to the pan when the linguica crusts a little, and saute for about five to seven minutes, until it begins to soften.  You could add salt to help the onions sweat, but the linguica has a high sodium content, however, so salt should not be necessary.  Add the garlic as the onions begin to sweat and saute for another few minutes until the onions start to look translucent.  

Add the tomato-based products (however much you decide, based on how you are serving this dish) and incorporate into the aromatics and linguica.  Bring to a simmer and add one part of the Italian seasoning, a tab or two of butter, fresh cracked black pepper (and, OK, If you have to, a pinch of salt), half of the fresh basil and crush half of the oregano between the palms of your hands for optimum flavor. In addition, Now is the time to add the Saffron!  About fifteen minutes before serving, repeat this step, less the Saffron,  to add even more amazing Italian flavor. 


Bring the water to a boil, in the meantime, to a large pot, adding salt liberally the water boils.  Add the pound of pasta and cook until al dente, about eight to twelve minutes ( see directions on the box or bag), stirring frequently to prevent the pasta from sticking to the bottom of the pot.  When done, save a good large cup of the pasta water, drain the pasta and let sit to drain for a moment.  

Back on the stove, over medium-high heat, add the cup of pasta water to the pot, the tab of butter, and the remaining evoo, and a pinch of salt.  Add the escarole to the pot to begin the wilting process.  Add the pasta to the pot over the escarole and let it sit for about two minutes. This allows insulates the escarole and begins the wilting process. Then stir, incorporating the mixture well.  Add the pasta to the sauce and thoroughly mix together. 

From here, it is up to you.  You can either plate now and add fresh grated parmigiano reggiano and sprinkle with basil, or maybe finely chopped fresh Italian flat-leafed parsley.  

If you are going to for the individual serving and saving the rest, save a couple of cups of sauce off to the side, and when you combine the pasta and escarole with the linguica and sauce, add a good handful of grated parm, a handful of mozzarella  and mix well.  Spray the bottom and sides of a high-sided  baking pan, add a the sauce you have set aside.  Pour the mixture over the sauce, spread evenly with a spatula or wooden spoon, sprinkle with more fresh grate parm, and bake for 30 minutes. 

Remove, let cool for about ten minutes, and serve.  When cooled a bit further, you can easily cut out squares to place in containers for freesing that will hold together pretty well.  

Either way, enjoy this flavorful dish!


Saturday, November 24, 2012


Taco Loaf


This recipe did not come out exactly the way I'd hoped it would.  It was supposed to be a lovely baked pastry roll, not a loaf.  But, while I live and learn from my mistakes, this loaf tastes pretty amazing, I have to say.  I was inspired to try this recipe based on a tv commercial using crescent roll pastry dough.  My mistake was that I overfilled it before rolling the dough.  Note to self:  don't be greedy, don't overfill before rolling the dough.  Check.

Mistakes aside, this was great as a snack.  Slice as thick or thinly as you please, just be ready for a Mexican flavor rush, and enjoy it hot or cold.  Here's the starting line up:


 Ingredients:
 1 small onion, finely chopped;  2 cloves garlic, finely chopped or grated; 2 serrano chilis, finely chopped; 1 four ounce can of diced, roasted green chili; 1 1/2 teaspoons cumin seeds, ground; 1 tablespoon coriander; 2 tablespoons paprika; 2 teaspoons oregano, ground or crushed in your palms; salt and pepper, pinch of each; the zest and juice of one lime; 2 packages of your favorite crescent roll pastry dough*; all purpose flour; your favorite grated cheese (I used a store-bough Mexican blend); 1 pound lean ground beef; 1 - 2 tablespoons extra virgin olive oil; a quarter cup of water.   

*You may be able to find crescent or pastry roll sheets that are not pre-cut, at many grocery stores.
*You can always make this recipe meatless, adding roasted peppers.

Preheat the oven to 375 degrees, center rack. 

In large skillet, add the evoo over medium-high heat.  When the oil begins to ripple, add the onions and a pinch of salt to help the onions sweat and soften.  After three-to-five minutes, add the garlic and saute for another five minutes.  Add the can of green chilis, the spices, the lime zest and juice, and saute another few minutes.  Once the onions are cooked, remove the first part of the filling to a bowl and set aside.  Add the ground beef, brown, and add back the ingredients from the bowl.  Add a pinch more salt and pepper, a quarter cup of water, and let simmer over low heat for about ten minutes, allowing all of the flavors to incorporate.

*In reality, you could start with the oil and beef, then add the onion, garlic and all, especially if you are in a hurry. 

Once the beef has fully cooked and the ingredients have incorporated well, remove from the heat and set aside to cool. 

On a cutting board or a granite counter top, add a dusting of all purpose flour.  Place the crescent roll dough on the flour, gently pull apart and roll it out.  Dust lightly with more flour, just a good pinch, and, using a rolling pin, flatten out the dough to about 1/4 to 1/8 inch thick.  Not making my mistake, add a dusting of grated cheese (I would use a finely grated blend of jack and cheddar, or thinly grated Mexican cheese blend), followed by a scattered layer of the taco filling.  Sprinkle more cheese over the dough and roll.

Place parchment paper or foil onto a baking pan and place the rolls/loaves, seam down, and bake for 18 - 30 minutes (depending on your oven).  Remove and let the loaves rest.  Slice and serve as you please!


Enjoy!

Friday, November 23, 2012


My Roasted Veggie and Linguica Pasta
 

Every chef I have ever read or seen has a roasted  vegetable pasta, all of which have been amazing.  Roasting vegetables has become a family favorite, particularly roasting broccoli and cauliflower with extra virgin olive oil, fresh grated garlic, and a little salt and pepper. Tremendous flavors!  In this recipe, I roasted cherry and grape tomatoes (red and yellow-orange, for color and flavor), broccoli, and green beans, all with evoo and grated fresh garlic, salt and pepper.  The aroma that fills the house with these vegetable combinations is amazing, and inspiring.  And while I have enjoyed several great vegetable pastas, I am a sucker for a spicy meat that stands out amidst the vegetable flavors.  I decided to use Linguica sausage, which did the trick perfectly.  

Here's my starting line-up:
2 cups fresh broccoli, sliced
1 or 2 cups prepped fresh green beans, halved
1 cup of finely sliced Linguica
1 small yellow, white or red onion, finely chopped
8 cloves garlic, grated, separated into fourths
2 pints of cherry and/or grape tomatoes 
2 tablespoons Italian seasoning
1 tablespoon Paprika
1 teaspoon dried oregano, crushed in the palms of your hands upon adding to the sauce)
1/2 cup fresh chopped basil (wash ahead of time, place in a cup of water, and chop just before you use it) 
Extra Virgin Olive Oil, 8 - 10 tablespoons, separated 
2 - 3 tabs of butter 
2 tablespoons Champagne vinegar or Red Wine vinegar
Zest and Juice of one lemon
1 cup (at least) of grated parmigiano-reggiano cheese
1 pound of your favorite pasta  (I used spaghetti)
1 tablespoon tomato paste
1 teaspoon anchovy paste (optional)


As the photos above indicate, roast the vegetables tossed in evoo, grated garlic and salt and pepper on a baking pan at 400 degrees for about fifteen minutes, or until you can smell the garlic.  I used two cloves of garlic per vegetable.  Trust me, it's a wonderfully memorable aroma.  The same applies to the tomatoes.  Roast them for ten minutes, just before they pop.  If they do pop, however, not to worry, as the juices become the sauce.  When the veggies are out of the oven, set them aside or place them all into a bowl to use shortly.

While the vegetables are roasting, add two tablespoons evoo to a high-sided pan over medium-high heat.  When the oil begins to ripple, add the Linguica and saute until a crust forms around the sides.  Add the onions and last part of the garlic.  Add a pinch of salt to the onions, but not a lot, as the Linguica has a bit of salt content.  When the onions start to soften and become a bit translucent, add all of the other vegetables.  Toss and add pepper, the Italian seasoning, the paprika, the lemon zest and juice, and the vinegar. Toss and saute over medium heat.  Once the fluids reduce half way, reduce the heat to medium-low, or low.  


While the sauce flavors are marrying, which will smell "out of this world Happy", add about four quarts of water to a large pot and bring the water to a boil.  Once the water boils, liberally salt the water.  Add the pasta, stir, and boil until just about al dente, or, just before done; that should be eight to then minutes. Tip:  While the pasta is cooking, this would be a good time to stack, roll and chop the basil leaves to add to both the sauce and as a flavorful garnish when you plate the pasta.  Save half or a whole cup of the pasta water and set aside for a moment.  Drain the pasta in a colander.  Add two tablespoons of evoo, or, two-three tabs of butter (you can now buy a whipped "Tuscan" butter, which I used for a glossy finish to the sauce), and add the pasta to the high-sided pan holding the vegetables.  Add half of the pasta water and turn the heat to high.  Add half of the fresh basil to the sauce.  Toss the pasta with the vegetables with tongs.  Mix the pasta and the vegetables well.  As the pasta water reduces, reduce the heat to low, or, just turn it off.  

Here's the great part:  add a quarter of the parmigian-reggiano to the pasta and sauce and toss.  Repeat until you have used the next two quarters of cheese.  Save a quarter of the cup of cheese  to top the pasta service.  So good!  When you are ready to plate, whether it is served family style or singularly, top with the parm and basil and enjoy!


Saturday, November 17, 2012


Mexican Meatloaves with Poblano Pesto, Potato Stacks, and Marinated Lamb Chops

My son will be very upset with me, but I am not a big fan of meat loaf.  He is, particularly with savory barbeque sauce.  I wanted to make mini personal  meat loaves, but with a whole new flavor makeover.  I decided to make a Poblano Pesto, based on a creamy sauce I saw on Rachael Ray, just minus the cream sauce base.  The pesto can be used for just about anything, it is that versatile.  Here's how I made it:
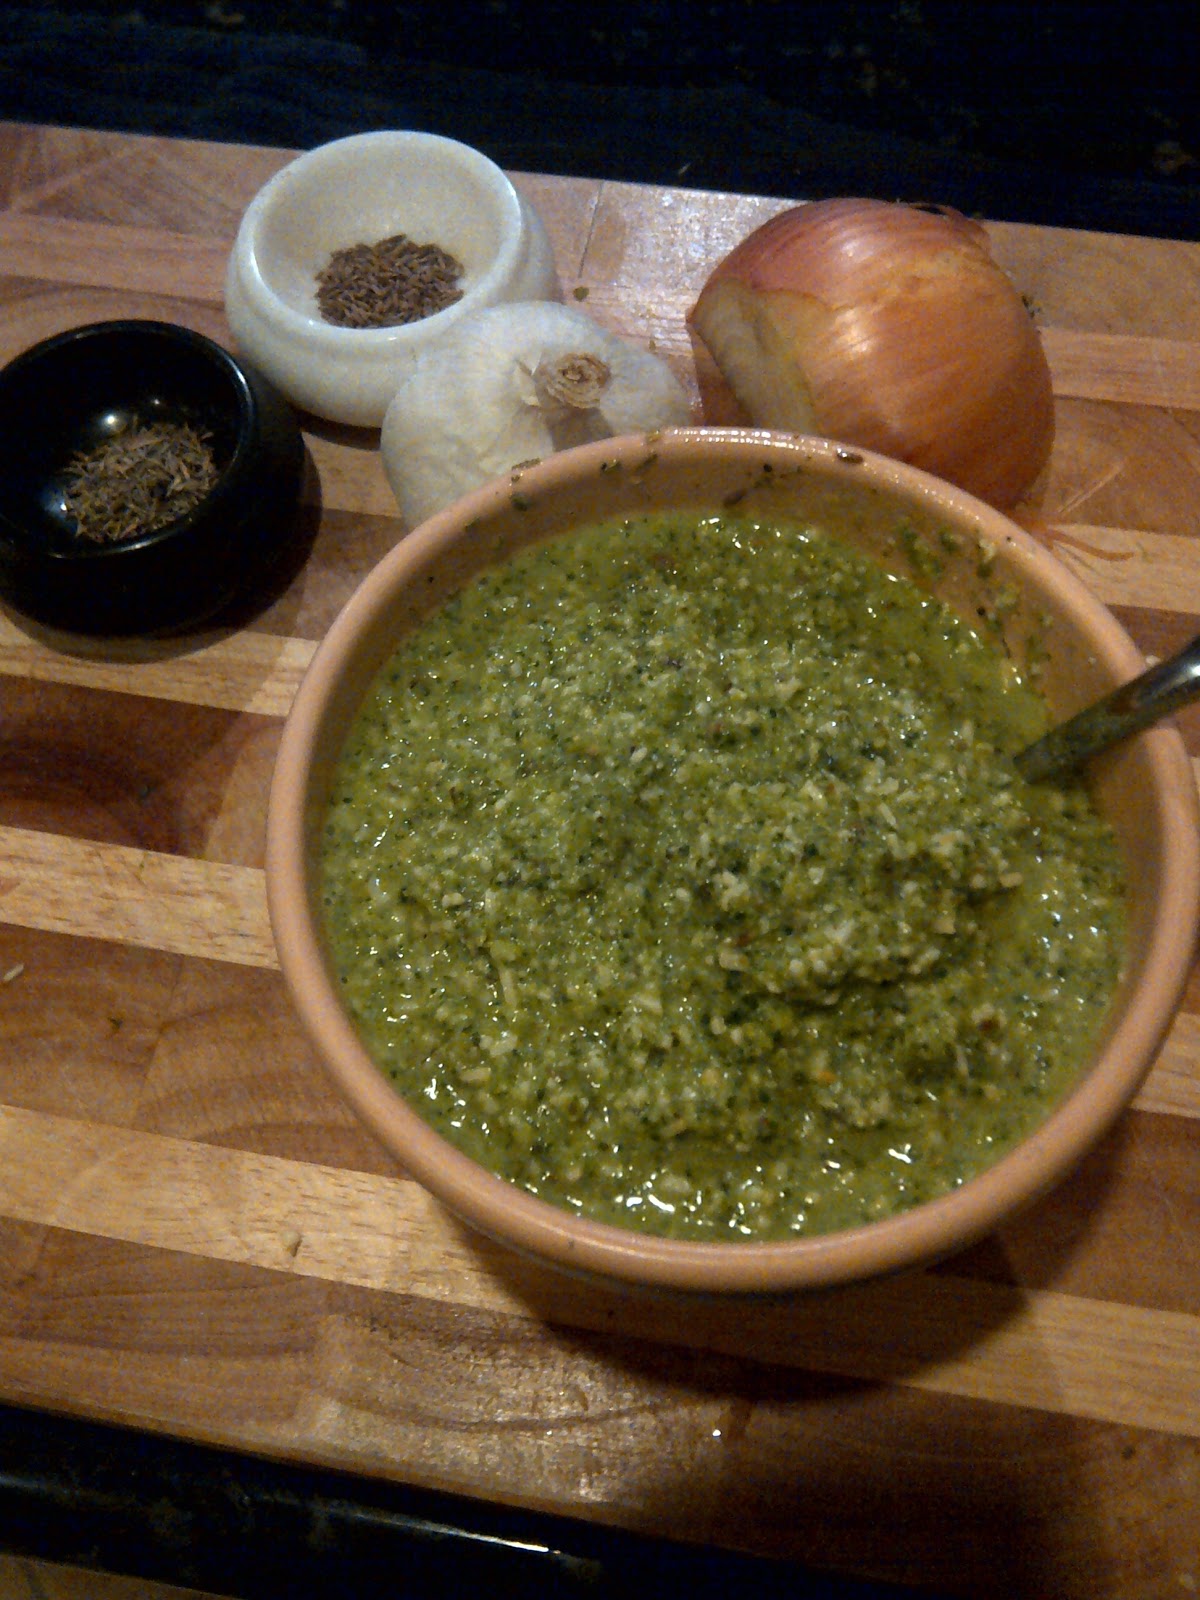
Poblano Pesto
1/2 an onion (I used a yellow onion)
3 garlic cloves, finely diced
2 Poblano/Pasilla  peppers
1 teaspoon cumin seeds and 1 teaspoon thyme, ground in a small mortar and pestle
The juice of one lime
1/3 cup extra virgin olive oil
1 - 2 teaspoons red wine vinegar (or the juice of a second lime, or lemon)
salt and pepper

Seed and de-rib, and coarsely chop the Poblano/Pasilla peppers, chop the onion and finely dice the garlic on a chopping block.  Place all of the vegetable ingredients and the seeds into a food processor or blender with the lime juice.  Pulse until the vegetables have been broken down.  Begin drizzling in the evoo until it becomes a thick, smooth texture.  Taste before adding the red wine vinegar (if you do) and add salt and pepper to taste.  Keep in  mind, this is not going to taste like basil pesto.  It will have the same consistency, but not the same flavor. But people, it is goooooood!

Place the pesto in a bowl and place in the refrigerator, allowing the flavors to fully marry. 


Mexican Meatloaves

What you will need from the store:
1.5 pound package of hamburger  (sirloin and chuck mix)
1/2 onion
1/4 cup chopped cilantro
3 garlic cloves, finely chopped or grated
1/2 cup of the Poblano Pesto
2/3 cup of bread crumbs
1 egg
1 tablespoon cumin seed
1/2 palm full of Smoked Paprika
1 teaspoon ground mustard (for the fun of it)
Salt and Pepper
3 tablespoons Worcestershire Sauce
1/2 cup diced  Oaxaca Cheese and 1+ cup Mexican Blend preshredded, packaged cheese

Add the meat to a large bowl.  Add the cumin seeds, paprika, mustard, salt and pepper (pinch of S&P), Worcestershire sauce, onion, garlic, cilantro, bread crumbs and egg to the meat.  Mix thoroughly but without overdoing it.  Score the meat into four equal parts with your hand.  Let the meat sit for about ten minutes to allow the flavors to marry.  In the meantime, set your oven to 400 degrees. 

I chose to use a cast iron skillet for this, instead of a deep sided pan, or broiler pan.  I decided to allow the meat loaves to render in their own juices to keep the meat moist.  That turned out to be a good idea;  more on that at the end of this recipe. 

Take one quarter of the meat and shape it into a torpedo, then, using your fingers, hollow out the center of the torpedo and curl up the sides.  (Sorry, I forgot to have a picture of that taken, but I do have a stuffed example).  Place cubes or slices of the Oaxaca cheese and the Mexican Blend cheese into the center, along with a couple of teaspoons of the Poblano Pesto. Pinch the top of the meat loaf together.  Tip:  Do not leave the shape of the meat loaf like a torpedo, but round it.  


Place the meat loaves in the skillet, or whatever you decide to cook them in, and bake for 15 minutes at 400 degrees.  Top with some of the shredded cheese and a couple of teaspoons of the pesto and place back into the oven for 15 - 20 minutes.  Remove and place the meat loaves on cooling racks and allow them to rest for a few minutes before serving.  

Tips:  As I mentioned earlier, round the sides of the meatloaves, rather than keep it in a torpedo shape.  Otherwise, the ends will be dry, but the center moist and flavorful.  We want the whole loaf moist and flavorful!  


What about sides for this dish?  I have just the thing!  My bacon, garlic, rosemary, cheesy potato stacks! 


 These amazing potato stacks are simple as can be.  I cannot take credit for inventing them, by any means. I have seen several chefs make versions of this tasty, savory side. Some have used russet potatoes shaped by cut outs, some have used baby Yukon Golds, and I used red New Potatoes.  Wash, dry and slice the potatoes about an eighth of an inch thick.  Spray the cups of a regular sized muffin tin with non-stick cooking spray.  In a large bowl, add 1 cup of your favorite shredded white cheese (I used more of the Mexican Blend), along with a large sprig of rosemary, finely diced, two cloves or garlic, grated, three or four strips of bacon, fried or baked extra crispy, and 1/2 cup of shredded or grated parmesan cheese. Mix thoroughly.  Place one of the larger potato rounds on the bottom of the muffin cup.  Add some of the cheesy, bacon mixture. Top with another potato round, more cheese, and repeat until you have used about five potato rounds topped with cheese.  Bake at 400 degrees until the top of the stacks are golden brown.  Remove the tin and allow them to cool, which allows the cheese to gently firm up the stacks, holding them together. 

Serve with the meat loaves, or any other dish you plan to serve.  That might include my next dish, my Marinated Lamb Chops!


My Rosemary, Garlic and Herb Marinated Lamb Chops

Ingredients:
1 package lamb chops (however many people you are feeding)
1 large sprig of fresh rosemary, finely chopped
3 cloves garlic, finely chopped or grated
4- 6 tablespoons evoo (extra virgin olive oil)
1/2 teaspoon thyme
1/2 teaspoon cumin seeds, crushed
Pinch of salt and pepper, each
Juice of one lime

Add all of the ingredients to either a large gallon sized zip-lock plastic bag, or to a shallow square baking dish.  I add all of the ingredients, less the chops, to a bowl, mix it thoroughly, add half of the marinade to the bag or dish, add the chops, and cover the rest with the marinade.  I allowed my chops to marinate for thirty minutes in the refrigerator, and another fifteen minutes out of the refrigerator, so as not to shock the meat when cooking.  


Add 2 - 3 tablespoons of evoo (two or three rounds around the fry pan or skillet) over medium-high heat.  When the oil ripples, add the chops.  You should hear sizzling immediately.  That is what you want! Cook the chops until medium or medium-well.  Serve with the potato stacks or a favorite side dish you enjoy!


I hope you will enjoy some or all of these recipes.  I sure had great fun making them all last night (had friends over), and learning what worked well, what I could have done better, so as to improve next time, and oh, my gentle readers, there will be a next time!!! 

Saturday, November 3, 2012

Bacon Cheese 'n Egg Bistro Burger
 

Sometimes, when I am a bit stressed or down, I crave an amazing burger to take my mind off of things.  It's comfort food!  I came up with this late last night to comfort my busy mind, and extended the idea, minus the burger, to a breakfast sammy which I will feature next.  First, let's talk about this fantastic, tasty burger. 

In the Line-up:
1/2  of a red onion, finely chopped
2-3 cloves garlic, grated or finely chopped
1 red jalapeno, seeded, and finely chopped
1 serrano pepper, seeded and finely chopped
2 teaspoons cumin seeds
1 tablespoon smoked paprika
1 tablespoon Chipotle or Pasilla Chili Powder, separated
Ground black pepper
2 - 3 tablespoons Worcestershire Sauce
2 slices Jalapeno White Cheddar Cheese slices
4-6 slices bacon, halved (four halves for each burger: and you have to have some for snacking on!)
4 eggs (2 per burger;  I made two)
1.5 pound package ground beef  (80/20 fat ratio)
Sandwich spread and Spicy Whole Grain Mustard  (or whatever favorite condiments you wish) 
Your favorite hamburger buns (I used cheesy dutch crunch buns)

You will need one large fry skillet, two sharp culinary knives, a chopping block and cutting board (one for veggies, one for the bacon), a large bowl for mixing the meat,  teaspoon and tablespoon measuring spoons (unless you are able to eyeball it, as I do much of the time), a garbage bowl, a large flat spatula to flip the burgers, and about an hour. 

On the cutting board, using one of the knives, cut the bacon in to halves and fry them or bake them until just crispy, about fifteen minutes (at 400 if you are baking on a rack over a baking sided sheet in the oven).  I like to sprinkle some of the chili powder over the bacon to spice it up a little.  In the meantime, finely chop the half red onion, the garlic, and seed and finely chop the two peppers.  Add the meat to the large bowl, along with the peppers and aromatics.  Sprinkle the paprika and the rest of the Chipotle or Pasilla chili poweder to the meat, and add the Worcestershire Sauce. Using your hands (your best kitchen tools) mix the meat thoroughly with the other ingredients.  Score the meat in to fourths, and you will be able to make 6 large burgers, or 8 medium-sized burgers.  Yes, I made six.  What else did you expect.  Four?  Hmmm......

Form your patties, and make sure to dent the top of each burger patty. 

Because I had planned on (unhealthily) frying the burgers in some of the bacon fat, I did not add salt to any part of this burger.  The bacon fat had more than enough. 
 
The rest is easy street.  Place the bacon on a paper towel to soak up the extra grease until you're ready to use it.  Remove half to three-fourths of the bacon fat and dispose of properly.  Or, like my Grandma P, save it for future use!  Place the burgers in the skillet or fry pan over medium-high heat, let cook and form a bacony crust for about five or six minutes.  Flip and reduce the heat to medium heat.  Place on slice of the Jalapeno White Cheddar cheese to the burger.  

Meanwhile, toast up your buns. I added the spicy whole grain mustard to the bun, placed another slice of the cheese over that, and let it wait for the burgers.  

In a medium skillet, add a teaspoon or two of saved bacon fat, or, a couple of tabs of butter. Crack your eggs into the skillet when the butter is foamy or when the bacon grease runs smoothly over the surface of the pan.  Sprinkle the eggs with a pinch of the chili powder and fry to your liking. Place four bacon halves over the bun and cheese, the egg over the bacon and a finished burger, cheese-side over the bacon.  I spread some tangy sandwich spread over the bun bottom and, voi la, I was ready to chow!


Of course, you can change this up in Any form you wish.  Comfort food is about making something you love, something to make you feel better, so make it Yours.  I hope you enjoy this labor of love!

Stay tuned!  Search below the page break (which is an accident, but a useful one) to find how I made an extremely tasty and spicy breakfast sammy with all of the above, and then some, minus the burger!


Sunday, October 28, 2012

Burger Love

My Double Chili, Double Cheese Bacon Burger

I LOVE hamburgers.  Plain and simple.  Although I think chocolate, pizza, tacos, and steak should be food groups, I am an even firmer believer that hamburgers should be, too.  Ok, not that extreme.  I just named off some of my favorite foods, except for Japanese and Chinese dishes, but I would fetch or roll over for a hamburger.  A REALLY GOOD hamburger. 

I have a million of them.  Well, alright, dozens.  With burger joints like Hodad's in San Diego cranking out A-Mazing burgers, along with Rachael Ray being the self-proclaimed "Queen of Burgers", I have non-stop inspiration.  Being that I am a lover of ethnic cuisine, I have unlimited burger ideas flying around my inside my brain all day and all night.  Here is one of them. 


My recipe is very simple, very easy.  Since this was a "What's in your pantry and freezer?" meal, there are not many ingredients, but here's the line-up:

1.3 pounds ground beef  (but you could use turkey or chicken or pork, which would be great!)
1/2 of an onion, grated (I used a yellow onion, which is all I had on hand)
2 cloves garlic, grated
2 tablespoons Worcestershire Sauce
1 tablespoon Tapatio Sauce  (You can use whatever your favorite hot sauce is!)
1 teaspoon ground cumin seed (or powder, whatever you have on hand!)
1 good pinch of Chipotle powder

1/2 cup cheese (I used a Mexican cheese, but that is what I had on hand)

2 cans fire roasted green chiles whole
1 can fire roasted green chiles, diced

4 hamburger buns (I had whole wheat buns on hand)

Remember, for me, this was a whatever was in the pantry and freezer recipe;  it can be altered Any way you choose!

First, or last, whatever is better for you, fry up or bake up 8 - 16 bacon strips. 

In a large bowl, I added the ground beef.  Over that, I added the grated onion and garlic, and all of the other ingredients except the chiles and cheese.  I mixed the meat, but not too much.  I scored it into four parts.  I separated each of the four parts in to two halves.  I made two patties per burger:  a top and a bottom part. 

I added a teaspoonful of the diced green chiles and a pinch (about 2 teaspoonfuls) of cheese to the center of one patty, and placed the other atop it, and joined the two all around.  I repeated the process until I had four burgers total. 

I added the burgers to my cast iron skillet which had been heating up over medium-high heat.  I let the burgers brown for about four minutes and attempted to flip.  You must let the meat brown and release its sugars and juices so it gets a good crust going before you flip it so it does not stick to the bottom of the pan. Four or five minutes per side is adequate. After four or so minutes, after you have flipped the burger, add a half a palm full of cheese to the top of each burger.  Squirt beef or chicken stock (or water, which is what I used) to the hot pan, place the lid over the top; the hot steam helps the cheese melt uniformly over the burgers.  Now, I was being a cheese maniac, so I repeated the process so that the burgers were dripping with cheese. 

Once the cheese has melted in to gooey goodness, remove the burgers and place them on a plate to rest.  Top each burger with a whole roasted green chile.  Place two - four bacon cooked bacon strips atop the burger.  Place the burgers on toasted buns, add your condiments, and have at it!!!

Note:  I made a garlic, chipotle aiolii as my burger bun spread.  Simply add 4 tablespoons mayo and 1 tablespoon spicy brown mustard to a bowl.  Add one or two cloves grated garlic to the mayo, a teaspoon or two of grated onion, a splash of hot sauce or Worcestershire Sauce (I used both), and good pinch of Chipotle powder.  Stir thoroughly, and allow the mixture to set in the refrigerator for thirty minutes.  (I would have added lime juice to it, had I had any on hand).  

Here is delish center view!


And here to tempt you with a full burger view, again.....


Well!  Go make a burger!!!  Share with me YOUR burger ideas!!!  Have Fun!!!


Thursday, October 11, 2012


Another Episode of "What I've Been Up To"

Originally, I was not going to blog this recipe, but it turned out so well, I felt the need to share.  The chicken part of the meal is a Rachael Ray recipe, and    IT    IS   GOOD!  It is easy and very tasty.  I added a garlic, cheesy herb potato mash (there's a whole short story behind this one) and garlic cheesy bread to the meal.  The chicken can either be bone-in or boneless skinless chicken thighs, marinated in garlic, extra virgin olive, and fresh, chopped rosemary, with a pinch of salt and pepper.  I love fried sage, so I added fresh, chopped sage to that marinade. 

Major tip, unless you purchase large deli sliced prosciutto, you may need to purchase two packages of store-sold prosciutto, as they are smaller than deli or butcher slices.  I learned that last night.  So to marinate, in a large bowl or large plastic zip-lock bag, add about a third of a cup of extra virgin olive oil, two cloves garlic, coarsely chopped, fresh rosemary, chopped, and I added fresh sage leaves, chopped.  I love the woodsy combination of rosemary and sage.  The aroma is amazing.  After about fifteen minutes of marinating, lay a slice or two of prosciutto on a cutting board, place the chicken thigh over the prosciutto (I used boneless, skinless chicken thighs), place a sprig of fresh rosemary in the center (and I also added a large fresh sage leaf to that) and wrap the thigh with the prosciutto.  Repeat until you have rolled each thigh.  


In the meantime, heat about two tablespoons of extra virgin olive oil to a large fry skillet.  Rachael Ray, however, grilled her chicken thighs, so they can be grilled indoors or outdoors, whatever your preference is.  Place the prosciutto wrapped chicken seam-side down.  As it cooks, the prosciutto seam will close and shrink, securing the thigh, which is especially  important if you are using boneless-skinless chicken thighs.  Cook, without moving the thighs, about six-to-eight minutes over medium heat.  Turn, and repeat.  I browned the sides, as well.  That's just me.  


I like using boneless-skinless chicken thighs because the meat is softer and juicier than breast meat, but you could use chicken tenders or thinly sliced chicken breasts, too, if you like.  

For my potatoes, I wedge-cut and boiled two pounds of red and white potatoes in salted water with three crushed garlic cloves.  My goal was the boil until they were just fork tender, and then I was going to saute' them until crispy, but, I boiled them too much, so my friend, Anne, decided to turn them in to a mash.  As it turns out, Anne's idea proved to be a great one.  I drained the potatoes in a colander and let them rest for a bit.  I added butter, evoo, fresh, finely chopped garlic, rosemary and sage to the pot over medium heat.  I added about two-thirds of a large yellow onion to the mix, added a little salt, and sauteed the onions in the mix until about translucent.  The aroma was so wonderful, I got a little dizzy.  I then returned the potatoes to the pot.  Afterwards, I added Italian cream cheese to the mix (cream cheese with Italian seasonings in it) along with a three-cheese Italian blend (Asiago, Mozzarella, and Parmesan), about half a cup of each, and stirred.  Again, the potaotes were too overcooked to crisp up, so the added cream cheese and Italian blend was perfect for a mash.  Anne started mashing and the room brightened up.  

I had purchased a garlic loaf, and spread Tuscan butter over it, sprinkled fresh rosemary and sage over it, in keeping with the theme, added paprika and the Italian Cheese, and baked it in the oven until the cheeses had thoroughly melted.  I sliced the bread and served.  Great meal. 

Thank You for the inspiration, Rachael Ray! 


Enjoy, everyone!  

Thanks for viewing!

Monday, October 8, 2012


Fried Apple Fritters with Lemon Glaze


I was in the mood for something sweet and tangy.  Having just returned from vacation Saturday, I did not have much in my refrigerator, except a small bag of home-grown apples.  I reflected on the corn and zucchini fritters I'd made previously (see earlier posts, please) with Maria, and decided I could use apples to make a similar fritter.  Well, gentle readers, I think I "done good".  My "Fried Apple Fritters" is an exceptionally simple and quick way to use some of those autumn apples you will inevitably buy or receive within the next few weeks during apple season.  Let's get right to it.  

The Starting Line-Up:  
4 Granny Smith Apples  (they are sturdy, but you could use whatever apples you like)
1 1/4 cups Bisquick or All-Purpose Flour
2 tablespoons powdered sugar and....
1 cup powdered sugar
1 tablespoon ground cinnamon
Zest of two lemons, separated
Juice of two lemons, in one bowl
2 eggs
1/4 cup oil, vegetable or canola (I used canola oil)


What you will need in your kitchen
1 large cutting board
1 sharp culinary knife
1 cheese grater
1 microplane
1 small bowl
1 medium bowl
1 whisk
1 large bowl
1 ice cream scooper (recommended)
1 fry skillet
1 spatula
1 cooling rack or baking sheet lined with paper towels

What to do
Place your cutting board on a non-skid place.  You might notice a towel under my mom's cutting board (I made these at her house).  Her counter top is slippery and the plastic cutting board is not stable;  for safety, your cutting board must be stable.  Just sayin'.   

Using your hand-held grater, or microplane, or the smallest grate of the cheese grater, zest the washed lemons.  Separate the zest, placing one part in to the small bowl, and one part into the large bowl.  Juice the lemons, and squeeze the juice in to the small bowl.  

Wash the apples and begin grating them.  This is the longest part of this entire recipe, so you can imagine how quickly this whole thing will go.  Place the grated apples, apple-by-apple, onto the large baking sheet lined with paper towels to soak up the apple's moisture.  Sprinkle a little lemon juice from the small bowl over the apples to keep them from browning. When you are done grating, discard the cores, and, using another double-ply sheet or two of paper towels, mop up the extra moisture from the apples.  

Place the grated apples in to the large bowl that has half of the lemon zest in it already.  Add three tablespoons of your lemon juice to the large bowl.  That should leave you with about three tablespoons in the small bowl.  Now, add two tablespoons of powdered sugar to the apples.  Stir together.  Add the cinnamon and stir.  Afterwards, add half of the flour or Bisquick, and stir.  Add the rest and combine, thoroughly, so it makes a dough.  Note:  Monitor the flour, adding little-by-little, as you may not need the whole amount, depending on the size and yield of your grated apples. 

Set the large bowl in the refrigerator to cool and set.  In the meantime, you can get to work on the sugary lemon glaze.  Add the remaining juice and zest to the medium bowl and get your whisk.  Add 1 cup of powdered sugar, in increments, to the juice, whisking as you add.  When the glaze is a bit thick and a light, yelllow-white, your glaze should be right.  Taste to make sure it is still not overly lemony.  If it is, add a little more powdered sugar.  Whisk thoroughly.  When your glaze is about right, set that into the refrigerator, as well.  


 Add the oil to your skillet over medium-high heat, and get your ice cream scooper ready.  Using the same baking sheet from earlier, re-line it with two layers of paper towels to soak up the excess oil from frying the fritters.  If you have a cooling rack, you can place that over the baking sheet, placing the paper towels on the rack. 

 The oil should be good and ready by now. If it is rippling in the pan, it is ready for frying.  This is a thin sheen of oil across the skillet; we are not deep-frying.  Using the ice cream scoop, scoop out a ball of the apple dough and carefully drop it into the oil.  Repeat, leaving about two inches between each fritter.  You do not want to crowd them to ensure thorough cooking.  After about three minutes, the fritter should be golden-brown on the frying side. Flip the fritters and, using your spatula, gently press down.  When the next side is


 Tip:  Use an ice cream scooper to get fairly uniform sized fritters.


When the fritters are golden brown, flip them, and gently press with your spatula. 

Place the fritters on two sheets of paper towels in the baking sheet.

When the fritters have finished frying, take out the glaze and drizzle the aromatic, decadent glaze over the plated fritters, and serve.  Whether your want it for a snack, an appetizer, or a meal, this takes little time and effort, and will throw a party on your taste buds and in your tummy on a chilly autumn day. 

Enjoy!


Thanks for viewing!!!


One Skillet Hoisin Chicken Stir Fry Over Noodles

  One Skillet Hoisin Chicken Stir Fry      Over Noodles This is one of those "people who know me Know I am obsessed over Chinese food&q...