Sunday, October 28, 2012

Burger Love

My Double Chili, Double Cheese Bacon Burger

I LOVE hamburgers.  Plain and simple.  Although I think chocolate, pizza, tacos, and steak should be food groups, I am an even firmer believer that hamburgers should be, too.  Ok, not that extreme.  I just named off some of my favorite foods, except for Japanese and Chinese dishes, but I would fetch or roll over for a hamburger.  A REALLY GOOD hamburger. 

I have a million of them.  Well, alright, dozens.  With burger joints like Hodad's in San Diego cranking out A-Mazing burgers, along with Rachael Ray being the self-proclaimed "Queen of Burgers", I have non-stop inspiration.  Being that I am a lover of ethnic cuisine, I have unlimited burger ideas flying around my inside my brain all day and all night.  Here is one of them. 


My recipe is very simple, very easy.  Since this was a "What's in your pantry and freezer?" meal, there are not many ingredients, but here's the line-up:

1.3 pounds ground beef  (but you could use turkey or chicken or pork, which would be great!)
1/2 of an onion, grated (I used a yellow onion, which is all I had on hand)
2 cloves garlic, grated
2 tablespoons Worcestershire Sauce
1 tablespoon Tapatio Sauce  (You can use whatever your favorite hot sauce is!)
1 teaspoon ground cumin seed (or powder, whatever you have on hand!)
1 good pinch of Chipotle powder

1/2 cup cheese (I used a Mexican cheese, but that is what I had on hand)

2 cans fire roasted green chiles whole
1 can fire roasted green chiles, diced

4 hamburger buns (I had whole wheat buns on hand)

Remember, for me, this was a whatever was in the pantry and freezer recipe;  it can be altered Any way you choose!

First, or last, whatever is better for you, fry up or bake up 8 - 16 bacon strips. 

In a large bowl, I added the ground beef.  Over that, I added the grated onion and garlic, and all of the other ingredients except the chiles and cheese.  I mixed the meat, but not too much.  I scored it into four parts.  I separated each of the four parts in to two halves.  I made two patties per burger:  a top and a bottom part. 

I added a teaspoonful of the diced green chiles and a pinch (about 2 teaspoonfuls) of cheese to the center of one patty, and placed the other atop it, and joined the two all around.  I repeated the process until I had four burgers total. 

I added the burgers to my cast iron skillet which had been heating up over medium-high heat.  I let the burgers brown for about four minutes and attempted to flip.  You must let the meat brown and release its sugars and juices so it gets a good crust going before you flip it so it does not stick to the bottom of the pan. Four or five minutes per side is adequate. After four or so minutes, after you have flipped the burger, add a half a palm full of cheese to the top of each burger.  Squirt beef or chicken stock (or water, which is what I used) to the hot pan, place the lid over the top; the hot steam helps the cheese melt uniformly over the burgers.  Now, I was being a cheese maniac, so I repeated the process so that the burgers were dripping with cheese. 

Once the cheese has melted in to gooey goodness, remove the burgers and place them on a plate to rest.  Top each burger with a whole roasted green chile.  Place two - four bacon cooked bacon strips atop the burger.  Place the burgers on toasted buns, add your condiments, and have at it!!!

Note:  I made a garlic, chipotle aiolii as my burger bun spread.  Simply add 4 tablespoons mayo and 1 tablespoon spicy brown mustard to a bowl.  Add one or two cloves grated garlic to the mayo, a teaspoon or two of grated onion, a splash of hot sauce or Worcestershire Sauce (I used both), and good pinch of Chipotle powder.  Stir thoroughly, and allow the mixture to set in the refrigerator for thirty minutes.  (I would have added lime juice to it, had I had any on hand).  

Here is delish center view!


And here to tempt you with a full burger view, again.....


Well!  Go make a burger!!!  Share with me YOUR burger ideas!!!  Have Fun!!!


Thursday, October 11, 2012


Another Episode of "What I've Been Up To"

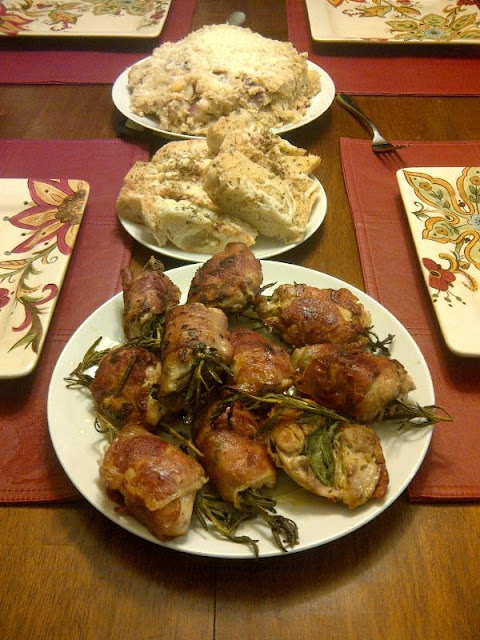
Originally, I was not going to blog this recipe, but it turned out so well, I felt the need to share.  The chicken part of the meal is a Rachael Ray recipe, and    IT    IS   GOOD!  It is easy and very tasty.  I added a garlic, cheesy herb potato mash (there's a whole short story behind this one) and garlic cheesy bread to the meal.  The chicken can either be bone-in or boneless skinless chicken thighs, marinated in garlic, extra virgin olive, and fresh, chopped rosemary, with a pinch of salt and pepper.  I love fried sage, so I added fresh, chopped sage to that marinade. 

Major tip, unless you purchase large deli sliced prosciutto, you may need to purchase two packages of store-sold prosciutto, as they are smaller than deli or butcher slices.  I learned that last night.  So to marinate, in a large bowl or large plastic zip-lock bag, add about a third of a cup of extra virgin olive oil, two cloves garlic, coarsely chopped, fresh rosemary, chopped, and I added fresh sage leaves, chopped.  I love the woodsy combination of rosemary and sage.  The aroma is amazing.  After about fifteen minutes of marinating, lay a slice or two of prosciutto on a cutting board, place the chicken thigh over the prosciutto (I used boneless, skinless chicken thighs), place a sprig of fresh rosemary in the center (and I also added a large fresh sage leaf to that) and wrap the thigh with the prosciutto.  Repeat until you have rolled each thigh.  


In the meantime, heat about two tablespoons of extra virgin olive oil to a large fry skillet.  Rachael Ray, however, grilled her chicken thighs, so they can be grilled indoors or outdoors, whatever your preference is.  Place the prosciutto wrapped chicken seam-side down.  As it cooks, the prosciutto seam will close and shrink, securing the thigh, which is especially  important if you are using boneless-skinless chicken thighs.  Cook, without moving the thighs, about six-to-eight minutes over medium heat.  Turn, and repeat.  I browned the sides, as well.  That's just me.  


I like using boneless-skinless chicken thighs because the meat is softer and juicier than breast meat, but you could use chicken tenders or thinly sliced chicken breasts, too, if you like.  

For my potatoes, I wedge-cut and boiled two pounds of red and white potatoes in salted water with three crushed garlic cloves.  My goal was the boil until they were just fork tender, and then I was going to saute' them until crispy, but, I boiled them too much, so my friend, Anne, decided to turn them in to a mash.  As it turns out, Anne's idea proved to be a great one.  I drained the potatoes in a colander and let them rest for a bit.  I added butter, evoo, fresh, finely chopped garlic, rosemary and sage to the pot over medium heat.  I added about two-thirds of a large yellow onion to the mix, added a little salt, and sauteed the onions in the mix until about translucent.  The aroma was so wonderful, I got a little dizzy.  I then returned the potatoes to the pot.  Afterwards, I added Italian cream cheese to the mix (cream cheese with Italian seasonings in it) along with a three-cheese Italian blend (Asiago, Mozzarella, and Parmesan), about half a cup of each, and stirred.  Again, the potaotes were too overcooked to crisp up, so the added cream cheese and Italian blend was perfect for a mash.  Anne started mashing and the room brightened up.  

I had purchased a garlic loaf, and spread Tuscan butter over it, sprinkled fresh rosemary and sage over it, in keeping with the theme, added paprika and the Italian Cheese, and baked it in the oven until the cheeses had thoroughly melted.  I sliced the bread and served.  Great meal. 

Thank You for the inspiration, Rachael Ray! 


Enjoy, everyone!  

Thanks for viewing!

Monday, October 8, 2012


Fried Apple Fritters with Lemon Glaze


I was in the mood for something sweet and tangy.  Having just returned from vacation Saturday, I did not have much in my refrigerator, except a small bag of home-grown apples.  I reflected on the corn and zucchini fritters I'd made previously (see earlier posts, please) with Maria, and decided I could use apples to make a similar fritter.  Well, gentle readers, I think I "done good".  My "Fried Apple Fritters" is an exceptionally simple and quick way to use some of those autumn apples you will inevitably buy or receive within the next few weeks during apple season.  Let's get right to it.  

The Starting Line-Up:  
4 Granny Smith Apples  (they are sturdy, but you could use whatever apples you like)
1 1/4 cups Bisquick or All-Purpose Flour
2 tablespoons powdered sugar and....
1 cup powdered sugar
1 tablespoon ground cinnamon
Zest of two lemons, separated
Juice of two lemons, in one bowl
2 eggs
1/4 cup oil, vegetable or canola (I used canola oil)


What you will need in your kitchen
1 large cutting board
1 sharp culinary knife
1 cheese grater
1 microplane
1 small bowl
1 medium bowl
1 whisk
1 large bowl
1 ice cream scooper (recommended)
1 fry skillet
1 spatula
1 cooling rack or baking sheet lined with paper towels

What to do
Place your cutting board on a non-skid place.  You might notice a towel under my mom's cutting board (I made these at her house).  Her counter top is slippery and the plastic cutting board is not stable;  for safety, your cutting board must be stable.  Just sayin'.   

Using your hand-held grater, or microplane, or the smallest grate of the cheese grater, zest the washed lemons.  Separate the zest, placing one part in to the small bowl, and one part into the large bowl.  Juice the lemons, and squeeze the juice in to the small bowl.  

Wash the apples and begin grating them.  This is the longest part of this entire recipe, so you can imagine how quickly this whole thing will go.  Place the grated apples, apple-by-apple, onto the large baking sheet lined with paper towels to soak up the apple's moisture.  Sprinkle a little lemon juice from the small bowl over the apples to keep them from browning. When you are done grating, discard the cores, and, using another double-ply sheet or two of paper towels, mop up the extra moisture from the apples.  

Place the grated apples in to the large bowl that has half of the lemon zest in it already.  Add three tablespoons of your lemon juice to the large bowl.  That should leave you with about three tablespoons in the small bowl.  Now, add two tablespoons of powdered sugar to the apples.  Stir together.  Add the cinnamon and stir.  Afterwards, add half of the flour or Bisquick, and stir.  Add the rest and combine, thoroughly, so it makes a dough.  Note:  Monitor the flour, adding little-by-little, as you may not need the whole amount, depending on the size and yield of your grated apples. 

Set the large bowl in the refrigerator to cool and set.  In the meantime, you can get to work on the sugary lemon glaze.  Add the remaining juice and zest to the medium bowl and get your whisk.  Add 1 cup of powdered sugar, in increments, to the juice, whisking as you add.  When the glaze is a bit thick and a light, yelllow-white, your glaze should be right.  Taste to make sure it is still not overly lemony.  If it is, add a little more powdered sugar.  Whisk thoroughly.  When your glaze is about right, set that into the refrigerator, as well.  


 Add the oil to your skillet over medium-high heat, and get your ice cream scooper ready.  Using the same baking sheet from earlier, re-line it with two layers of paper towels to soak up the excess oil from frying the fritters.  If you have a cooling rack, you can place that over the baking sheet, placing the paper towels on the rack. 

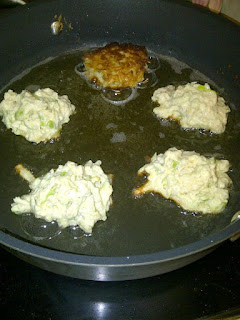
 The oil should be good and ready by now. If it is rippling in the pan, it is ready for frying.  This is a thin sheen of oil across the skillet; we are not deep-frying.  Using the ice cream scoop, scoop out a ball of the apple dough and carefully drop it into the oil.  Repeat, leaving about two inches between each fritter.  You do not want to crowd them to ensure thorough cooking.  After about three minutes, the fritter should be golden-brown on the frying side. Flip the fritters and, using your spatula, gently press down.  When the next side is


 Tip:  Use an ice cream scooper to get fairly uniform sized fritters.


When the fritters are golden brown, flip them, and gently press with your spatula. 

Place the fritters on two sheets of paper towels in the baking sheet.

When the fritters have finished frying, take out the glaze and drizzle the aromatic, decadent glaze over the plated fritters, and serve.  Whether your want it for a snack, an appetizer, or a meal, this takes little time and effort, and will throw a party on your taste buds and in your tummy on a chilly autumn day. 

Enjoy!


Thanks for viewing!!!


Wednesday, October 3, 2012


My Herb Crusted Braised Lamb Ribs with Marsala Sauce and Pantry Pesto


Gentle Readers, I have to be honest, September was Not a happy month for me.  My food choices were very much dictated by my very small food budget for that month.  Being on a small food budget is tough, but not impossible. I was able to create a fun, delicious, easy dish and remain productive at the same time.  Here's how I made this herb crusted lamb rib dish with a Marsala sauce and a pesto made from my home-grown basil and pantry items.  Let's start with the easy pesto, first. 

Pantry Pesto
2 cups of fresh basil leaves  (I used my own basil, which I grow at home, but it is widely found in about all grocery stores on the earth planet).
1/3 cup EVOO (extra virgin olive oil)
1 - 3 cloves garlic, halved
1/4 to 1/2 cup of Parmesan cheese
Pinch or two of salt and pepper (to taste)
1/4 cup pine nuts or slivered almonds  (ok, I used slivered almonds)

Note:  Since I made lamb, I traditionally should have made a mint pesto or sauce, but, as I have been on a tight budget, I used what I had on hand, ergo the pantry basil pesto.  

Combine the basil, garlic, and nuts into a food processor or blender.  Add a round of evoo and pulse.  Add the cheese and drizzle more of the evoo into the mix as you pulse.  Finally, blend into a thick, rich sauce.  Salt and Pepper to taste.  Place into a bowl or container that can be wrapped or sealed and store in the refrigerator. 

Herb Crusted Lamb Ribs
My spice rub:  pinch salt and pepper, 1 tablespoon garlic powder, 1 tablespoon paprika, 1 tablespoon ground coriander seeds, 1 tablespoon ground cumin seeds, 1 tablespoon mustard seed, 1 tablespoon dried rosemary and thyme, both. 

Slice two onions into one-half inch rings and set aside.   Coarsely chop three garlic cloves, set aside. You will need three tablespoons of extra virgin olive oil.  Preheat the oven to 375 degrees.

I mixed the rub with a tablespoon of spicy ground mustard and rubbed the entire pair of ribs and let it sit for thirty minutes.  In a high-sided sauce pan, I added three tablespoons of evoo over medium-high heat.  When the oil began to ripple, I added the ribs, thick, fatty side down and seared until golden brown, about three-to- five minutes.  I flipped it over (and since the rib slab was pretty flat, it was easy to sear that side, too) for three minutes.  I removed the pan from the heat.  I removed the rib slabs and set the thick onion rings in the bottom of the pan, sprinkled the fresh coarsely chopped garlic over the onions, and placed the ribs atop those rings, meaty side down.  I added a box of low sodium beef broth and a cup of water to the pan. This does not cover the ribs, but goes up about half way. I call this a "gentle" braise.  I brought the mixture to a boil and covered the pot.  I turned off the heat and placed the pot into the oven I had preheated to 375 degrees.  You Must make sure that the pot or high-sided pan you use is oven safe, otherwise, you can do this on the stove, over low heat, as long as the liquid simmers gently.

 Searing the rib slab

Placing the rib slap (one of two) over the onion rings and garlic


After an hour I turned the ribs over, ribs side down, and braised them for forty minutes.  After nearly the second hour, I removed the ribs to let them rest.  the ribs will be very soft and may fall off the bones. I drained as much of the fat in the pan that I could, brought the remaining liquid to a boil, added a teaspoon of flour, added a tablespoon of Worcestershire sauce and a cup of Marsala wine to the liquid, and reduced the mixture by half.  I should have strained the liquid, but didn't. That was my lesson learned. 


I cut the ribs, plated them, drizzled the Marsala Onion sauce over the ribs and placed a dollop of my homemade pantry pesto as a side.  The ribs were fantastic with either.  

Hope you enjoy this!  Thank you for your time and for reading and viewing!


Ancient Family Secret

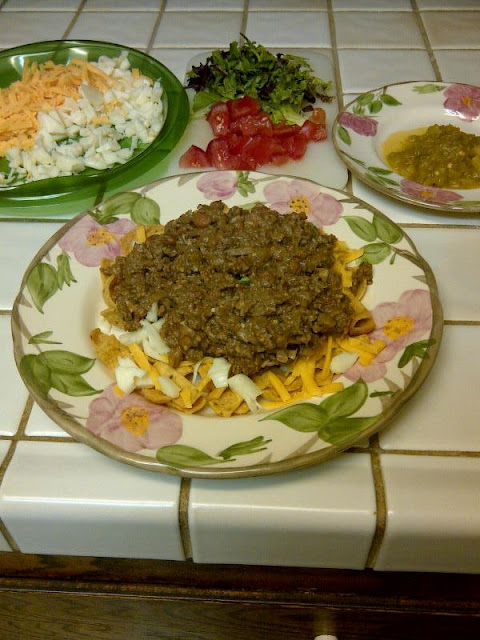
All families have secrets.  Some are about nutty Aunt Gerty, some about crazy Uncle Fred, some are about the wild exploits of certain peculiar family members, and some, thankfully, are about food.  Let's go with the food, shall we?  My so-called "ancient family secret" is an extremely simple pantry go-to recipe when you have that mid-week or late-week slump and you just have to put something together based on the staples you have in your pantry.  You May need to go to the store to get some of the fresh ingredients, but most families have many of the fresh items in their refrigerator as staples.  There are also various items you can substitute, rather than what I have shown in my starting line up.  You can make this your own, of course, adding or deleting what you wish. That's what it's all about!

Here's the starting line up: 

1 pound ground beef
1 onion, chopped
1 - 3 cloves garlic, finely chopped (I like three, and it is my own addition to the mix)1
1  four ounce can of chopped green chiles(divided into three, if you're feeding two)
*You could always roast your own Anaheim Green Chilis over an open flame or oven roast them
1 can vegetarian low sodium refried beans (You can also use refried black beans)
1 teaspoon crushed dried Mexican oregano
1/4 - 1 teaspoon chili powder (your favorite)
1/4 teaspoon ground coriander
1/2 teaspoon ground cumin or ground cumin seeds 
6 ounces chopped lettuce or spring mix
1 tomato, chopped
1/2 cup fresh cilantro, chopped
 *If I am not using fresh cilantro, I add a 1/4 teaspoon crushed, dried cilantro)
1 cup sharp cheddar cheese, grated
1 cup Oaxaca or Queso Fresco or Anejo, grated  (I used Oaxaca this time, my favorite)
1 large bag of Frito Lay chips
3 tablespoons EVOO or Vegetable/Canola oil
Salt and Pepper


 What you will need in your kitchen:
 1 cheese grater
1 large plate (for the cheese)
1 large skillet
1 large wooden spoon
1 - 2 cutting boards
1 sharp culinary knife
Can opener

What to do:
Utilizing your cutting board and knife, smash and peel and finely chop the garlic, chop the onion, tomato and lettuce.   Grate the cheeses over a large plate using the grater.  (Note:  when using Oaxaca, if it does not come in a ball, you may need to use your knife to thinly slice the cheese strings Oaxaca often comes in).  

Meanwhile, have the oil heating up in the skillet over medium heat.  Add the onion and saute' until it softens, adding a little salt to draw out the onions' moisture.   When the onions become slightly translucent, add the garlic and the beef.  Add salt and pepper, and the other spices, and break up the beef as it browns.  

Open the cans of refried beans and green chiles for easy use.  

When the beef and veggies have almost thoroughly cooked, add the refried beans and one-third of the green chiles.  Over medium heat, fold the bean mixture into the beef completely.  Let simmer over low heat for ten minutes.  

To plate, add one - two cups of Fritos to each plate.  Sprinkle a small mixture of cheese over the chips.  I like this.  If you don't, then don't.  It's about what you want!  Plop a thick heaping spoonful of the hot beef/spices/beans mixture over the chips.  


 Next, you can do what you wish:  top with cheese, then lettuce and tomato and green chiles, or, swap and place the cheese above the lettuce and tomatoes.  Up to you!  Personally, I am not a fan of lettuce atop hot meals, so I leave the lettuce off altogether.  However, I will top with fresh chopped cilantro or scallions instead of lettuce.  I love to top with green chiles and tomatoes.  The contrasting flavors mix so well with the mix.  

Drizzle your favorite hot sauce or salsa over that.  My mom likes to top it with, wait for iiiiiiiiiiiiiiiit.......and ew.........ranch dressing.  But, to each their own, right?  Right.  I like spicy and tangy, so I will squeeze lime juice over the top, or, more so, I will drizzle Tapatio sauce over the top.  But again, whatever make You happy, gentle readers!

Hope you enjoy this easy, thirty minutes or less go-to recipe when you need something easy to put together for your family or friends.  Not fancy, not dramatic or beautiful, but loaded with flavor!

Enjoy!


Thank you for your time and viewing, readers!  I appreciate it!


One Skillet Hoisin Chicken Stir Fry Over Noodles

  One Skillet Hoisin Chicken Stir Fry      Over Noodles This is one of those "people who know me Know I am obsessed over Chinese food&q...