Saturday, August 24, 2013

Lime Thyme Garlic Pollo Pita Pizza

Not long ago, a Foodie Friend whom I follow on Twitter shared a fantastic college food idea: Pita Pizza.  Therefore, I must recommend that you look up and follow my friends, Johnny and Nicole, @2CollegeFoodies on Twitter.  They have amazing ideas concerning all things college food and a love of food, in general, not to mention how funny and enthusiastic they are.  They're awesome.  Look them up! 
 
 Now that my son has moved away to attend a university in a city north of our little Big wine town, I have charged myself with coming up with college food ideas that are healthy and above all, easy and nearly effortless for my son to make.  Johnny's pita pizzas is one of those ideas that is a must-share with you in my college food series blog posts.  I have to say that  while the pita pizzas he and I made today do take some effort, there are many ways in which they can be put together practically effortlessly in less than thirty minutes, and I will share those ideas with you at the end of this post.  
 
With that said, and credit due given to Johnny (and Nicole), as is due, here is what I put together for our pita pizzas today:  one package of six boneless, skinless chicken thighs seasoned simply with salt and pepper, and marinated in a large zip lock bag with a quarter cup of extra virgin olive oil, the juice of 4-6 limes, two cloves garlic, crushed and sliced and a heaping tablespoon of dried thyme (or several sprigs of fresh, bruised thyme).  I allowed the chicken to marinate for an hour. 


Meanwhile,  I preheated the oven to 400 degrees.  Using a cutting board and a good, sharp culinary knife, I had my son seed, rib and sliver one large Italian Sweet Chili pepper (freshly picked from my potted patio garden!), and sliver three whole, fire roasted green Anaheim chiles. I love those!  I, meanwhile, finely chopped three more cloves of garlic, set that aside, and mixed it with a tablespoon of crushed, dried oregano. I Love oregano!  It is one of my favorite herbs, fresh or dried.

After an hour, I added garlic infused olive oil to my oval grill pan over medium-high heat and, when the oil began to ripple, I added the marinating chicken.  One thing I have learned about grilling, you must never try to force or turn over items like chicken or pork until they are ready to release from the pan. Be patient with it!  
 
 
I sauteed the Italian Sweet chiles for several minutes in a little more olive oil until nearly tender and set that aside in a bowl with the roasted green chiles. 
 
THAT, folks, was the hard part.  Ready for the fun part?  
 
While the chicken (pollo) grilled away, I had my son add a teaspoon of garlic infused extra virgin olive oil to two pocketless pitas.  I had him spread it around.  I had him add a tablespoon and a half of our favorite store-bought pesto with a spoon and spread it around.  I had him add some of the chiles and some of the extra finely chopped garlic and oregano mixture to the pita pizzas.  When the chicken (pollo) was done, I had him remove them, set them on a plate, and allow them to rest.  Like any protein that has been grilled or cooked, allowing it to "rest" allows the juices to redistribute, keeping the meat tender and juicy; in that way, the juice stays in the meat and does not flow all over your cutting board. I had him sliced the chicken in to bite-sized morsels. I cannot even begin to tell you how wonderful his kitchen smelled with that marinated chicken grilling away.  Just amazing.  I had him toss some of the lime thyme garlic pollo onto the pita pizzas, had him wash up and sprinkle some mozzarella cheese atop that, and sprinkle both a little more thyme as well as a pinch of smoked sweet paprika over the top.  DeLish.  I had him place the baking sheet lined with foil we'd placed the pitas on into the oven.  


When they came out, about ten minutes later, I added fresh torn basil atop the pizzas. After a couple of minutes, to allow the basil to wilt, I had my son cut them into four perfect servings.  The marriage of the lime, thyme and garlic, along with the subtle underlying flavor of the pesto made for an awesome taste experience. 
I realize that you may be shaking your head thinking:  "That is not really easy for time-deprived college students to make!"  You are correct. This might be for a day when the student is casually having study buddies or friends over.  An easier way of utilizing chicken is to purchase a rotisserie chicken at the grocery store, shred it or cube it and store it for later use (freezing). I also recommend using favorite lunch meats, leftovers, pre-sliced favorites such as salami, pepperoni or sausage or other ready-to-use items.  You can use tomato-based pizza sauce, herb-infused olive oil, pre-shredded cheeses, and again, the bake time at 400-degrees is about ten minutes. The possibilities are pretty endless, if you ask me.

Equally flavorful, the other two pita pizzas I had my son make employed thinly sliced oven roasted
Andouille sausage. The pita pizzas were put together exactly the same way as the others, but we used the sausage instead of the pollo/chicken. The spicy, salty bite of the sausage against the gentle pesto and mozzarella flavors was college foodie heaven. The basil atop all of the pita pizzas added beautiful color and also a gentle, warming flavor. This was one of my all-time favorite, college foodies or not!  Thanks, Johnny!


Below:  Adding Basil to the Andouille sausage pita pizza.


I hope that you have enjoyed this second installment of the College Foodie Blog Series. I appreciate that you have taken the time to visit my humble blog!  Thank You!
Enjoy!

Once more, big Shout Out and Thank You to Johnny and Nicole of @2collegefoodies on Twitter!


Wednesday, August 21, 2013

Bacon Wrapped Two-Way Chili Cheese Dogs


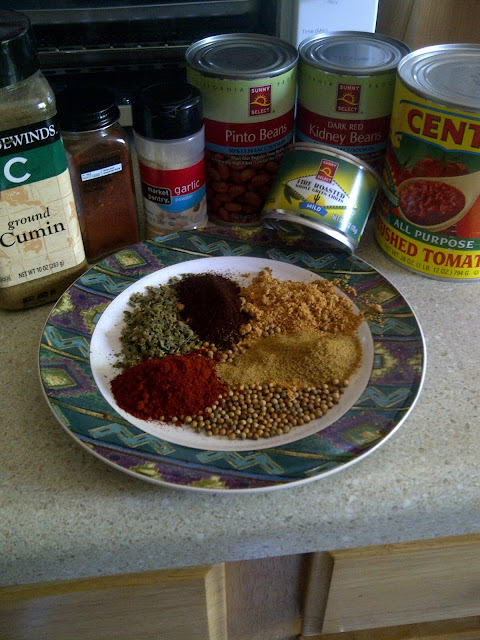
Ok, so I know it is not the prettiest plate of food ever, but hey, we are talking about college food in this series of blogs posts and recipes, and if you know anything about college kids, cleanliness is not necessarily part of their vocabulary.  I went up to my son's apartment last evening and taught him how to make this mouth-watering, flavorful, slightly spicy chili you can serve two ways, ergo the title.  The mystery shall be revealed later in this post.  In the meantime, here's this fast and incredibly easy recipe.  There is virtually no chopping or dicing, it is that easy!  Ready College Foodies?  Here we go:

The starting line up for the chili:(Note:  measuring is fairly optional, and using your hands is easier than measuring spoons! Just, please, wash your hands first!!!)

2 tablespoons (one palm-full of) smoked paprika + two teaspoons, set aside
2 tablespoons granulated onion
half a palm-full of garlic powder + two teaspoons (quarter palm-full), set aside
1 tablespoon (half palm-full) ground cumin
2 tablespoons smoked, ground pasilla chili 
1 teaspoon Chipotle powder
1 tablespoon coriander seeds (crushed between palms before adding)
1-2 tablespoons dried oregano (also crushed between palms before adding)
1-2 teaspoons salt, added in layers
1 28-ounce can of crushed tomatoes  (I use Cento)
1 15 or 16-ounce can drained dark kidney beans (optional)
1 15 or 16-ounce can drained white kidney or pinto beans (optional)
 1-2 cups water
1/2 cup ketchup
1 can diced green chilis
1 pound ground beef or sirloin
1 package bun-sized hot dogs
1 package hot dog buns
1 package thinly sliced bacon
extra virgin olive oil (two tablespoons)
Juice of one or two limes 


Easy, right?  Most all of the above spices  - except, perhaps, the Chipotle powder  - can be purchased at any 99-Cent Store, as well as all of the other ingredients, for those who are on strict budgets.  

What you will need in your kitchen:
1 large pot
1 large wooden spoon (doesn't have to be wooded, although it breaks up the meat easier than plastic)
1 cutting board/chopping block
1 sharp knife (to open the bacon packaging)
1 baking pan with a rack
Aluminum foil
1 measuring cup 
1 pair of tongs 
Can opener

What to do:
Preheat the oven to 350-degrees. 

Over medium-high heat on the stove top, add the extra virgin olive oil (evoo) to the large pot.  Add two or three of the crushed coriander seeds to the oil.  When it begins to bubble and pop, add the ground beef or sirloin. I did spring for ground sirloin for this meal because of the flavor factor, but a nice package of lean ground beef (80/20% or leaner) will work just fine. 


Using the large wooden spoon, break up the ground beef and caramelize.  This may take about eight or so minutes. Add a pinch of salt and black pepper.  Do not worry about the beef sticking to the bottom of the pot, but you will need to use the spoon to scrape it up as best as possible.  You will add liquids soon, which will enable you to scrape up those brown bits of flavor goodness soon!  

While the meat is caramelizing, line the baking sheet with foil and place the rack atop that.  Set aside. 

Next, add the can of crushed tomatoes, the half cup of ketchup and half of the water.  Stir until incorporated. Work the bottom of the pot to scrape up the browned, burned on bit of beef.  That is flavor!!!  

Add the spices and thoroughly stir until all of the flavors have incorporated into the chili.  Bring to a boil.  Add the rest of the water, salt and pepper, reduce the heat to low and partially cover the pot.  Allow the chili to simmer for thirty minutes.  


 Now for the fun part!  Using the sharp small knife, carefully open the package of bacon and the hot dogs.  Take one hot dog and one strip of bacon and, holding the thicker end of the bacon on the left side of the hot dog, wrap the hot dog with the bacon.  Set the bacon wrapped hot dog on the baking sheet rack.  Repeat until all of the hot dogs have been wrapped.  Sprinkle the hot dogs with pinches of the garlic powder and paprika you set aside earlier. Place the baking sheet, then, in the oven and bake for eighteen to twenty minutes.  The bacon will cook, shrink, as will the hot dogs, and they will brown up.  The smell will fill your place with an unbelievable aroma!

 
 When the hot dogs have browned and are ready, remove from the oven.  Using the tongs, remove the hot dogs from the baking rack, place the hot dog buns (I used whole wheat buns;  hey, something had to be healthy!) on the rack, and bake them until browned, about eight minutes. 


Here's the mouthwatering, easy part:  Add a hot dog to a bun, add your favorite cheese, and spoon heaping spoon fulls of your chili atop that.  Now, here's the mystery of the two-way chili.  You can have the chili with the beans, or without the beans.  My son likes his chili without beans, I like it with the beans, so you can serve it one or two ways, ergo, how I named the chili.  My bad!  Serve with chips, your favorite vegetables, and your favorite toppings. We went simple and easy:  cheese and chili. 


I hope you will try this incredibly simple recipe and enjoy it!


Thursday, August 15, 2013

Varsity Blues
 
My youngest son is heading off to college this weekend, and I am having what I am calling the "varsity blues".  Just sounds fitting, although he is not quite an athlete. In any event, I have decided to dedicate the next series of blogs to college-bound students and their tummies.  I will be preparing meals that college students will have time for, will devour ravenously as only they can, and love the easily obtainable flavors without the worry of cost to mom and dad! I know that college students are always on the go and often skimp out on the food scene, but the recipes I have in the works can be easily thrown together and parents will appreciate the nutritional values!  And mom and dad, YOU can probably help by prepping some parts of the meals ahead of time, freeze them, and send them with your bundles of college-aged joy upon their next visit!  I am talking vegetable pasta sauces, simple and easy chili for chili dogs and those cold winter nights, sweet potato fries (to be baked, not fried) and more.  Stay tuned!  
 
 
Thank you!

One Skillet Hoisin Chicken Stir Fry Over Noodles

  One Skillet Hoisin Chicken Stir Fry      Over Noodles This is one of those "people who know me Know I am obsessed over Chinese food&q...