Monday, June 30, 2014


Grilled Nectarine Pizza with Lemon Scented Mascarpone
When you get a craving for something sweet this summer, perhaps grilling fresh fruit and making a torte or a pizza would satisfy that sweet tooth. I just had a craving for either peaches or nectarines, and while I love peaches, I have not had much culinary experience with nectarines -- okay, none whatsoever -- which is why I decided to work with them.  They were pretty solid, so I felt grilling them would bring out their sugars, caramelize them and bring out their tangy flavors.  Wow, was I right about that!  You will just have to find out for yourself, so, without further ado, let's get to my recipe!

Ingredients: 
2 pounds solid nectarines  (If they are soft, they will not grill well, they will grill into mush).
1 cup mascarpone cheese
1 teaspoon or, the zest of half a lemon
2 teaspoons lemon juice, or, juice of half a lemon
2 tablespoons brown sugar
1 teaspoon honey
2 tabs softened butter (rub onto grill prior to heating the grill)
1 ball of fresh whole wheat pizza dough
non-stick spray
half cup or so of flour (to work the pizza dough)

Wash and cut each nectarine into wedges.  If you have an apple corer, try to use that.  Cannot be sure of its effectiveness, but worth a try, maybe?  Just a thought.  Set aside in a bowl with the lemon juice, and toss the wedges in the juice. This will begin to soften them, slightly, bring out their sugars and keep the wedges fresh until you are ready to use them. 

Roll out the pizza dough on a pastry stone, your stone counter top or a large wooden cutting board.  Dust generously with flour to work and roll out the dough. Try to shape it into a circle.  I enjoy making pizza in my cast iron skillet (my Grandma P used to make tortes and cobblers in her cast iron skillet quite often).  They were so good, how could it be wrong?

Lightly spray the cast iron skillet with non-stick spray and preheat the oven to 425 degrees.  

Place the dough into the skillet.  

Heat up your indoor grill plate or outdoor grill. Using a paper towel, rub the butter onto the grill plate.  Butter helps the caramelizing process.  Place the wedges onto the grill and leave for three to five minutes; they will probably be on there for five minutes each side.  Use a pair of tongs or hashi to check the wedges.  You want to turn them over when they have great grill marks.  

While the nectarines are grilling, in a small bowl, add the mascarpone cheese and the lemon juice from the nectarines bowl.  Add the lemon zest, honey and the brown sugar and mix well.  Allow to sit for fifteen minutes and then spread it on the bottom part of the pizza dough in the cast iron skillet. 


Upon finishing up grilling the nectarines (they will smell so good!), place them in a circular pattern on the bottom of the pizza dough.  Sprinkle the top with turbinado sugar and place the skillet into the oven.  Bake for eighteen minutes.  Your nose will tell you when it is done before the timer goes off. The aroma will be heavenly.  


 And when it is done.......


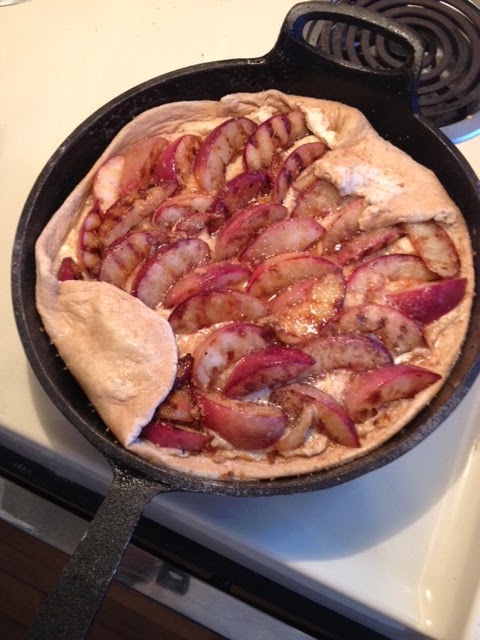
 Because the cast iron skillet retains heat, remove the skillet from all heat sources.  After five minutes (and my mistake was leaving it in the skillet for fifteen minutes, thus causing the crust to continue cooking, so it was a bit stiffer than I'd wanted it to be) remove the pizza from the skillet and allow to cool fifteen minutes. You want the mascarpone to cool and the juices to settle and set before cutting.  

This is your final product!


 And to tease you about a near future post.......


 My Calzone, which I made that same day, is photo-bombing the Nectarine Pizza.  Next post.....Calzone!!!!


Wednesday, June 18, 2014


Cheese and Herb Stuffed Chicken Bundles
With Polenta Cakes, Cheesy Herb Potato Stacks and Marinated, Cubed Salad on Parmesan Crisps


Normally, I try to not remake an old favorite, but rather try new and amazing dishes.  I had a craving, however, for my chicken bundles, of which I believe I have two differing versions previously posted, one of which is my bacon belted chicken bundle, and wanted to serve it with different sides.  I realize that I tend to stick with my tried and true favorites, all the same way, so I decided to be adventurous and try something decidedly new.  And hopefully improved. 
The best part about this meal, as a whole, is that it was simple and quick to prepare. My partner in culinary crime, Miss Maria, helped with this dish, and was invaluable.  Without her input, I would not have realized what improvements could be implemented.  

Let's get to it.  Time for all of that soon.  

Here is my starting line-up:

1 package of boneless, skinless chicken thighs  (I prefer chicken thighs over chicken breasts because thighs are more tender and moist, and they are easier to use than chicken breasts)
1 - 2 packages (12 slices) prosciutto
salt and pepper
3 sprigs rosemary and several sprigs thyme, leaves stripped from the stems and finely chopped, one quarter separated
6 full leaves sage
6 leaves fresh basil, chiffonade
3 cloves garlic, finely chopped or grated and separated
1 cup ricotta cheese
1 cup your favorite Italian cheeses (I used a combination of mozzarella, parmigiano, and fontina, as well) + 1/3 cup of the cheese  blend
Polenta mix
water
1 cup grated parmesan cheese
1 cucumber, cubed
2 roma tomatoes, seeded and cubed
1/2 red onion, finely chopped
3 tablespoons + 2 tablespoons extra virgin olive oil
3 tablespoons  red wine vinegar (or, your favorite vinegar)
3-4 new red potatoes, round as possible, to fit into a muffin tin

Preheat the oven to 375 degrees. 

First, in a medium bowl, add the ricotta and all but 1/3 cup of the other cheeses.  Set that third cup of cheese aside for the potato stacks.  
Add all but one quarter of the fresh finely chopped rosemary, thyme and basil and incorporate into the cheese mixture.  Add half of the finely chopped garlic along with salt and black pepper to the cheese mixture and incorporate thoroughly.  Set the mixture into the refrigerator.  

Unpackage the chicken thighs and set on a clean plastic or wooden cutting board separated from all of the other ingredients.  Cleanliness first!  

Lay out the chicken thighs.  Salt and pepper both sides and then lay the thighs smooth side down.  Using a teaspoon, if possible, add two teaspoons of filling to the center of each thigh and spread the mixture.  Place each thigh over two strips of prosciutto that have been placed on the cutting board, slightly overlapping.  Roll the chicken thighs in the prosciutto and place a sage leaf on top of each bundle.  *My tribute to Saltimbocca, in a way.  Also, it looks nice and adds a distinct flavor to the prosciutto. Finish all six bundles and set aside.  


Have a baking sheet lined with foil and with a cooling rack placed atop the pan.  Spray the rack with non-stick spray.  You will be searing the chicken bundles and finish cooking them in the oven at 375 degrees.  

Next, thinly slice the potatoes into discs.  A mandolin is ok, but know that the slices may be too thin and bake into chips rather than become cohesive with the cheese, garlic and herbs.  With that said, add the remaining fresh garlic and herbs to the cheese mixture and toss.  Spray six spaces in a muffin tin.  Place a potato disc into each sprayed space and sprinkle a little cheese over disc.  Add another potato disc, sprinkle more cheese and repeat until the discs become stacks.  Top with parmesan cheese, which will crisp up and brown as they bake.  Place the muffin tin into the oven and bake 25 minutes.  Your nose will tell you when they are done, as you will smell the parmesan and the garlic and herbs throughout your kitchen. 

While the potatoes are baking, make a vinaigrette.  Add the remaining evoo, red wine vinegar, salt and pepper, garlic, stone ground mustard and whisk vigorously to incorporate all of the ingredients.  Add the onions, tomatoes and cucumber to the vinaigrette and store in the refrigerator until you are ready to serve.  

Now, follow the directions for your Polenta.  I like to add a little extra virgin olive oil and/or butter and toast the corn meal before adding the liquid.  Add the garlic and herbs just as you are ending the toasting process to release their oils and then add the fluid, whether that is water or chicken or vegetable stock. Also stir in some parmesan cheese to give it a little added salty bite.  So good! When the polenta thickens and is ready, spread it out in a shallow baking pan lined with parchment paper.  Set it aside to cool.  You will be using it later.  

While the polenta is cooling and the potato stacks are baking, line a shallow baking sheet or pan with parchment.  Make a mound with half of the parmesan on one side of the pan in the center and repeat on the other side.  You will be melting the parm mounds until they flatten out and are bubbly, about six minutes.  Remove the pan and allow the parmesan discs, which I call crisps, to cool a few minutes.  Remove them, too, and set aside on a small plate.  

Back to the chicken!  In a large skillet, add the 2 tablespoons of extra virgin olive oil and heat over medium-high heat.  When the oil begins to ripple, add the chicken thighs, sage leaf side down first.  Do not crowd the bundles; perhaps three or four at a time.  You are going to sear the bundles about three or four minutes per side, until the prosciutto begins to caramelize and crisp up.  Do not be alarmed, some of the cheese may drip out into the skillet.  It happens.  Remove the bundles once seared and place them on the rack covered baking pan.  When the potato stacks are done, remove those and place the chicken to the oven to finish off cooking.  About 12 - 15 minutes.  Again, cheese will probably drip out onto the baking pan.  Don't sweat it. There is plenty of cheesy goodness left inside. 

While the chicken is finishing baking, use a biscuit cutter to cut discs out of the polenta, thus making polenta cakes. I roasted some cherry tomatoes I'd sprinkled salt and pepper and dried basil over and so added them to the top of the polenta cakes, along with a sprinkle of fresh basil ribbons.  Next, I used a knife to gently remove the cooling potato stacks from the muffin tin and placed them on my serving plates.  Repeat with the polenta cakes.  When the chicken is done, gently lean a chicken bundle against the polenta cake.  Finally, place a parmesan crisp onto your serving plates, and using a slotted spoon or fork, top that with the cubed marinated salad.  

You are ready to serve your meal!
Following are some photos. Enjoy them!


My learning tip for this is that using two strips of prosciutto adds quite a salt factor to the chicken bundles.  If you can use just one, and perhaps secure it with a toothpick, you will lessen the saltiness tremendously.  In my previous post, I wrapped it with one thin slice of bacon.  That would do the trick, as well.  I say make it your own and wrap it with whatever you like!

Thank You for your time and consideration!  


Friday, June 13, 2014


A short installment of "What I Have Been Up To In My Kitchen....and Others'....."

The last month and a half have been full of roller coaster excitement, both positive and negative.  Well, just one negative, when I was sick for two weeks with strep and could not talk for 9 days straight, and even the next five days were with a strained voice.  But the end of my work year was amazing and washed over me like a tsunami, full of activities and tasks and culinary fun.  I was asked by an ardent, supportive colleague, whom I shall forever be grateful to, to cater her daughter's graduation party.  I pulled together my "Wrecking Crew", my team.  It was so much fun being creative, learning a lovely and new kitchen.  It was also a "Proud Papa" moment - actually, two days - as it was the first time I'd worked in the kitchen with both of my sons.  They both did fantastic, as did my partner in culinary crime, Miss Maria.   We had two stations:  a taco bar with pulled pork in chile ancho sauce and finely sliced marinated skirt steak.  Delicioso!  We also served steak bruschetta and a small caprese salad.  My oldest son, Matt and Miss Maria ran what I called the "Make n Bake n Take" Pizza Bar.  The kids and adults were able to "decorate" their own personal pizzas, complete with an array of sauces, cheeses and toppings.  After starting off with a bit of management pains, the Wrecking Crew took charge and it flowed smoothly.  All it took was us writing peoples' names on the parchment paper the pizzas were baked on.  Like I said, growing pains and learning experience.  We all talked about how much fun it was for an entire week afterwards!  Here are some pictures of that.  

Jackson tends to the Chile Ancho Sauce in the making

Matthew rolled out and cut the pizza dough for the personal pizzas

Miss Maria removes fresh pizza dough from their bags for Matt to work and roll out.

Setting up the pizza station, while Matthew slices steaks for the Taco bar.

Caprese Salad I made for the grad party.  

I am grilling steak I'd marinated in Italian seasonings and herbs for steak bruschetta.  I toasted a baguette sliced into angular slices drizzle with garlic infused extra virgin olive oil and melted parmesan cheese, and topped with with the thinly sliced steak.  

Grilling steaks on my Pampered Chef grill pan for the Taco Bar. 

This is not from that day, but this is what my Steak Bruschetta looks like.  I was so busy I was unable to take many photos.  Next time!

I am toasting spices and dried herbs for my Mexican Spice Blend.  Smoke Paprika, Coriander seed, Dried Oregano, Chile Pasilla and Chipotle Powders, Dried Minced Garlic and Cumin Seed.  

My Mexican Spice Blend, ground in my spice grinder and jarred.  Smells so good!


                               I used my spice rub on six roasts before searing and braising.


Searing one of the six spice rubbed, seared and braised pork shoulder roasts.  

Searing two of the other roasts in preparation for a four hour braising. 
Quite a fantastic couple of days!  Life-changing experience!
Loved IT and my incredible client and her family. 
*****************
As  I mentioned, I have been very busy in the kitchen.  Here are photos of a few more dishes I have recently prepared  Most will be blogged soon!  I am Very Excited about getting back to writing.  It is a true joy to me. I have loved writing from a very early age.  Confession:  I so loved writing and drawing that, upon getting in trouble, my punishment was not to go to my room, it was to go outside and play!!! 

With that awkward confession, here is a one of two of my "reworkings" of past dishes, my Herb and Cheese Stuffed Chicken Bundles with Garlic Parmesan Polenta Cake topped with Marinated Tomatoes, and my Garlic and Herb Cheesy Potato Stacks, along with a Parmesan Crisp topped with Marinated Cubed Salad. 


The Prosciutto Wrapped Stuffed Chicken Bundles are topped with a sage leaf, my salute to searing this Saltimbocca style. 

**************************

IN ADDITION......

I just learned how to smoke pork roasts.  I am fairly an expert at spice rubs, searing and braising pork roasts, as I have had much happy practice, but smoking?  All new to me, and great loads of fun!  I borrowed my other Partner in Culinary Crime, Miss Anne's (pronounced like Annie) smoker and she gave me a lesson on how to get started.   Grilling is great fun for me, but smoking was a different story, altogether.  I got the charcoal going, had the wood chips soaking for the better part of an hour before using, was happy to remember how to put the contraption back together.  One of the best things I did, I do believe, was to brine the pork roast overnight.  Equal parts salt and sugar, a half cup of Ponzu, a half cup of a Cajun spice blend with a quarter cup reserved and two tablespoons lavender flower honey made up my brine, along, of course, with water.  The roast sat in the brine for fifteen hours.   Although knowing that the roast would take at least four or more hours to smoke, I put it on at too late a time.  Busy day, it was.  So, I also made fried chicken.  

My pork roast out of the brine and spice rubbed with leftover spices.  Hickory wood chips have been soaking in water for nearly an hour.  

The smoker gettin' its smoker business on!

I mentioned above that I knew that I had put the roast on too late to be done right at dinner time, and I had been soaking six boneless/skinless chicken thighs in seasoned buttermilk overnight, as well, so I made a beer batter and fried the chicken for our meal - to pick at - while waiting.  I seasoned the milk with two tablespoons sriracha, a palm full of smoked paprika, half a palm of garlic powder, half of palm of garlic salt, two teaspoons black pepper and two teaspoons turmeric.  In addition, I spiced my beer batter with the same spices, along with half a palm each of crushed dried oregano and dried fenugreek leaves. Delicious!!!

Here is the final plated product.  I also served this with semi-homemade rosemary,  parmesan and black pepper biscuits and pan fried sliced red potatoes with pancetta and topped with shaved parmesan. 


*****************************

AND FINALLY..........

Another reworking of a previously posted meal, Chicken Paillard with Pomegranate and Grape Sauce, Marinated Tomato Slivers and Cheese and Grape Stuffed Pasta Ears. This was so much fun to prepare!!!  
Another view


And that endeth "What I Have Been Up To In My Kitchen"! 
Please look for the recipes of many of these dishes soon! Thank You so much for your time and consideration!  Go Cook Something for your loved ones and friends!


One Skillet Hoisin Chicken Stir Fry Over Noodles

  One Skillet Hoisin Chicken Stir Fry      Over Noodles This is one of those "people who know me Know I am obsessed over Chinese food&q...