Sunday, March 29, 2015


Stuffed Grilled Chicken Thighs
over Greens and Strawberries

While much of the eastern half of the country (USA) is blanketed with snow, spring has sprung with a vengeance in California and has been screaming "Grilling Weather"!!!  That spring fever caused me to recreate an old favorite recipe of mine, stuffed chicken thighs. In this recipe, I stuff the thighs with Fontina cheese matchsticks and a fresh herb mixture to bring gentle fresh garden flavors to the chicken.  I served this over a bed of baby greens and strawberries, drizzled with a rich balsamic vinaigrette. 

Here's my starting line-up:
12 pc boneless, skinless chicken thighs
2 pints fresh strawberries, sliced
4 cups fresh mixed baby greens
3 tablespoons dried cranberries
3 tablespoons candied walnuts 
Fontina cheese, cut into 12 one inch by 1/4 inch sticks
1 bundle fresh Flat-leaf Italian Parsley, 1/2 cup finely chopped
3 tablespoons balsamic vinegar
1 tablespoon (good splash) Garlic Mirin
4 tablespoons + of extra virgin olive oil or grape seed oil
salt and pepper
non-stick spray
poultry seasoning
6 leaves fresh sage, finely chopped
2 sprigs fresh rosemary, stems stripped, leaves finely chopped
1 shallot, finely chopped
2 cloves garlic, finely chopped
1/2 teaspoon fennel seed
*Herbs de Provence

In a small bowl, mix the garlic, shallot, rosemary and sage with a drizzle of extra virgin olive oil, salt and pepper, and set aside. 

 Slice the Fontina cheese into one inch by 1/4 inch sticks, twelve, and refrigerate.

Grind the fennel seed and, in a small bowl, mix with 1/2 teaspoon salt and pepper each, one teaspoon poultry seasoning and *Herbs de Provence. Set aside a teaspoon of the seasoning mixture.  Unwrap, lay out and season each of the twelve chicken thighs with the seasonings mix, both sides.  

Have set out 24 toothpicks. You will use them to pin the stuffed thighs together. To save on calories and sodium content, I did not wrap them in prosciutto or bacon, as I have in the past.  

Fire up the grill or light the charcoal about twenty minutes before grilling time.  Arrange the coals to have a hot side and cooler side. 

On a cutting board with a paring knife, pit and slice the strawberries place in a bowl and refrigerate.  Meanwhile, wash and dry the 4 cups of mixed baby greens and refrigerate. 

In a small bowl, add a pinch of the garlic, shallot, chicken seasoning, the Garlic Mirin, the evoo or grape seed oil, some of the fresh, finely chopped parsley and the balsamic vinegar. Whisk together and set aside to allow the flavors to marry. 

Lay out the chicken thighs smooth side down.  On the other side, cut a shallow slice into the center of the thigh, but not all the way through.  You will place the Fontina stick into this shallow groove.  Spoon about a teaspoon of the fresh herb mixture, roll the thigh and pin it together tightly using two toothpicks.  Three, if you need to. 


Spray the grill with non-stick spray.  Place the grill over the charcoals and allow the grill plate to heat up.   Place the chicken on the hot side of the grill smooth side down first. Allow about six minutes to grill on the hot side, both sides.  Try lifting one of the thighs with tongs.  When the chicken is ready to release, it should release easily.  After eight minutes, you may need to slightly help the thigh up to turn over before it burns.  Allow the toothpick side to grill eight minutes, then move all of the thighs to cooler side.  Cover and allow the grill another six minutes per side.

Plate one or two of the larger thighs.  If the juices seeping from it are clear, the thighs ought to be done.  Remove the thighs when done, cover with foil, and set them aside in the kitchen to rest. 

Meanwhile, plate the mixed baby greens, place the strawberries around the edges of the serving platter and drizzle with a a couple of tablespoons of the vinaigrette. Sprinkle the dried cranberries and candied walnuts over the greens.  Add the chicken to the top of the greens and drizzle the rest of the vinaigrette over the chicken thighs.  Sprinkle the remaining parsley atop the thighs and sprinkle shaved Parmesan cheese over the platter.  


You are now ready to serve!  A visual essay of the plated meal follows. Enjoy, People!


Saturday, March 28, 2015


What I Have Been Up To In My Kitchen

Welcome to another episode of What I Have Been Up To In My Kitchen!  I have made several meals which I did not intend to blog, but thought I would share them with you in very brief form, some with recipes and some without.  I do hope you enjoy my mostly visual essay!  If you would like to know more about anything, please leave me a message, or, see my blog Twitter site @grnmn1 (Martin Phillips) or my blog Facebook site at In-House Cook and leave me messages there. Thank You for your time and viewer/readership!  I truly appreciate you all!

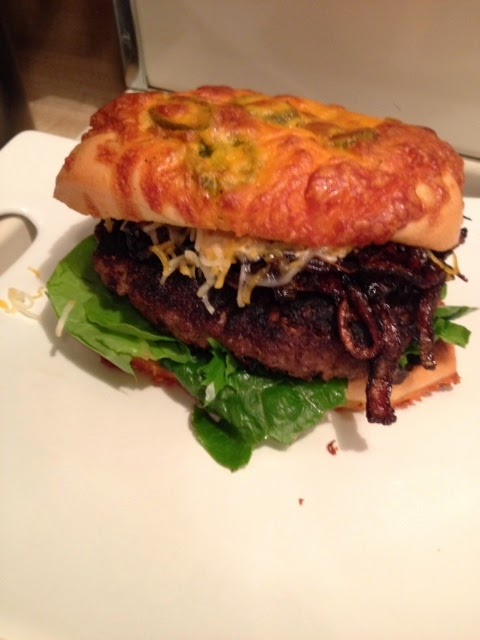
First up, my seared pork belly and caramelized onions burger on jalapeno focaccia bread. I seared the pork belly in a combination of balsamic vinegar and garlic Mirin.  Amazing flavors!  I caramelized the red onions in butter, salt and balsamic vinegar. It takes about thirty-to-forty minutes to caramelize onions, if not a wee bit longer.  My burger was simply seasoned on the outside with a mix of salt and pepper, onion powder and garlic powder. I served it over mixed baby greens with a garlic mayo sriracha aioli for a nice bite.  I just used regular shredded Jack and Cheddar cheese which I'd had on hand.  


Next up....

My Spicy Bean Hummus

Ever have one of those days when you find yourself with company coming and perhaps not enough time to get to the store?  Have chips on hand?  How about hominy or beans and just a few other little things?  I have you covered.  For this easy and simple recipe, I used a 29 ounce can (yes it was huge) of pinto beans, a tablespoon of paprika, a tablespoon of pasilla powder, two garlic cloves freshly grated, 3 tablespoons Mexican quesadilla cheese I'd had on hand, salt and pepper and half of a roasted red pepper steak.  I pureed it in my Ninja (what a wonderful gift, thanks to my friend, Spinner!) and served it with chips. I call it hummus because it has the texture of hummus, even though it is made of beans.  Sure, you could simply call it a bean dip.  I think it is a little bit more sophisticated than that, though, right.  Right????  :) 

This recipe takes less than ten minutes to prep and serve.  Could be a dinner saver!!!

And next, we have.......

Marinated Lamb Tacos
I have fallen for lamb over the last three or four years.  My dad liked lamb but my mom, aunt and maternal grandmother (my Nana), absolutely did not.  My grandpapa loved lamb, and my Nana would make it for him, I am told, but she and her daughters Hated the smell.  So I never had lamb Anything growing up.  I decided, after seeing several recipes for lamb chops, shanks and more, to make some lamb chops.  Fell in love with it, especially when the lamb has been marinated and grilled.  I saute the lamb in this recipe, and it is savory and flavorful. Hope you like it!


I slice the lamb into bite-sized chunk and marinate the lamb in my Mexican Spice Blend (you can find it here several times or on my Facebook blog site, posted by request quite recently), fresh cilantro, fresh thyme, fresh oregano and lime juice and zest, garlic and onion and fresh chopped Fresno chile with a little grape seed oil and sriracha. I marinate the lamb for three hours. After three hours, I remove the lamb from the refrigerator and allow it to come to room temperature. I add two tablespoons of grape seed oil (because it allows the marinade flavors to take over) to a hot skillet and saute the lamb with half a chopped red onion and more Fresno chiles sliced into discs for about eight to ten minutes over medium heat. I serve in flour or corn tortillas, whatever I have on hand, cheese, sauce and more fresh cilantro, my favorite fresh condiment. 


And, once again, the final product...
I promise, even if you are unsure about lamb, I believe you will LOVE this!

What's that.....?  Did someone ask me about pizza?  Oh yes, I have made yet another pizza!  My Rustic Italian Pizza with three meats  Here's a visual. 

Fresh dough, herbal evoo dressing for the dough, halved grape tomatoes, Dry Italian Salami, Coppa salami and sopressata, topped with dried crushed oregano and fresh basil. 


And this one is a really good shot.....


One More!  

My Onion Bun Bistro Burger with Parmesan Crisp, Crisped Coppa Salami, Egg and Dijon, garlic and basil aioli.  This one is simple and intensely flavorful.  Add a quarter cup of shredded Parmesan cheese to parchment paper and melt, cool, peel off the cheese crisp.  Crisp up two slices of Coppa Salami in a skillet with two tablespoons of extra virgin olive oil.  Remove and fry up the burgers which I'd added only salt and pepper to on the top and bottom of the burger to form a crust. I added three tablespoons of Dijon mustard to a small bowl, a splash of champagne vinegar, finely minced garlic and finely chopped basil and whisked together to form an aioli spread. 


And one more picture!

Have you spotted the vulture, yet?  That is my GusGus.  He loves burgers!

I hope you have enjoyed this episode of What I Have Been Up To In My Kitchen!  Thank You for your viewership!


Braised Beef Short Ribs and Polenta

 My birthday was in March and I had been craving - Thanks to post after post of roasted or braised short ribs on social media - well, beef short ribs.  I decided to make it for my birthday meal, as I do not have a party of any kind. I stopped having those long, long ago.  Really long ago.  Okay, moving on.  I also wanted to try my hand at polenta again, as it has been two years since I have made it.  I was all geared up for making my birthday dinner, but something came up with a friend who needed my help, so, my dinner did  not happen. Something far more important (seriously, it was) happened that week, so I helped out. The week after, however, I was on vacation, was asked to kind of house-sit for a day (waiting for a utility company to come turn something on) for a friend, so I cooked my birthday dinner there.  Turned out delectably well, if I do not say so, myself!  Here is my recipe.  Hope you try it on a day you have time to cook for yourself or for a special someone. This one is a keeper.  If you have a Crock Pot or Slow Cooker, that will make it all the more simple and easy for you to go about your day. 

Here is my recipe....

Ingredients:
1 large yellow or red onion, sliced into 1/4 inch thick rounds or half rounds
2 pounds potatoes, your favorites (I used Yukon Gold Fingerlings)
4 cloves garlic, sliced into discs + two cloves, finely chopped
2 pounds beef short ribs
1 cup wine, red or white +half a cup
1 box beef stock (or whatever stock you have on hand)
1 butter
extra virgin olive oil
2 tablespoons Worcestershire sauce
2 tablespoons Balsamic vinegar
2 tablespoons fresh chopped rosemary
2 tablespoons grated Parmesan cheese
 

Spice rub:
2 tablespoons paprika (half a palm full)
1 teaspoon garlic powder
1 tablespoon onion powder
1 teaspoon coriander seed
1 teaspoon cumin seed
salt and pepper
1 teaspoon dried parsley flakes
1 teaspoon dried, crushed oregano
*Note:  grind the above together in a spice grinder for best results and even seasoning

Add a tab of butter and 3 tablespoons extra virgin olive oil to a dutch oven with a few garlic chips over low heat. Using the spice mix, season every side of each of the beef short ribs.  Allow them to rest for about fifteen minutes to allow the seasonings to set in.  Meanwhile, on a different cutting board, slice the onions into discs or half discs, whatever is more comfortable for you.  The onion discs will be the bed for the ribs prior to the addition of the braising liquids. The potatoes, if you are using fingerlings or baby reds of Yukons, do not need to be cut, unless you feel the need to. They are going to braise with the ribs. The garlic, onion and liquids will make up the sauce after being reduced in the end. 

Bring the heat to high and remove the garlic chips. When the butter foams and the oil ripples, add the ribs one side down.  Allow the ribs to sear about four minutes. Turn and sear another four minutes.  Each side will develop a dark, golden crust.  Sear each side of the ribs and remove them to a bowl or plate when you are done.  Add the half cup of wine to the pot and, using a wooden spoon, scrape up as much of the burnt on black bits left from searing the meat as possible as the wine sizzles.  This is wonderful, intense flavor you want for your braising process!  


As the wine reduces, and add the Worcestershire sauce and balsamic vinegar and add the onion discs to the pot.  Snuggle the ribs, meaty side down, atop the onions, and the potatoes around the ribs. Also add the remaining garlic chips back to the pot.  Now add the rest of the wine and stock to the pot.  If this is not enough to just cover the ribs add a bit more stock, or, water will be fine.  Use the spoon to make sure all the heavier parts are in place and the braising liquid is able to mingle with it.  


Bring the liquid to a boil. Allow it to boil about two or three minutes, reduce the heat to low, and cover when the liquid settles down to a simmer.  Simmer for 3 hours, remove the lid, and simmer with the heat elevated just a little for thirty more minutes.  Afterward, remove the ribs and simmer on medium for thirty-to-forty more minutes.  If the potatoes are done, you could remove them.  I left them in the braising liquid during that forty minute reduction time as they tasted incredible, though they were pretty soft. I did not find that to be a problem when dining.  They held their shape well.  When the remaining liquid has reduced by two-thirds, turn off the heat.  Skim the fat from the top, as best as possible.  


Meanwhile, about twenty minutes before you are ready to serve, prepare the polenta according to the directions on your box or package. I added two garlic cloves, finely chopped and two tablespoons of fresh finely chopped rosemary along with two tablespoons of grated Parmesan cheese.  I felt these flavors in the polenta, the base of my meal presentation, would compliment the short ribs and the sauce. I was right. 


 Place a shape or dollop, in my case, of the aromatic polenta on the plate and lay a short rib slightly atop the polenta.  I added a sprig of fresh rosemary for green beauty. I could have stripped some of the piney rosemary leaves and sprinkled it atop the dish had I wanted more flavor.  Did not need to. This dish was well worth the wait! I also love this photo because the ribs are hot and the sauce right out of the pot and there is crazy aromatic steam rising up.  I took a video of it, but cannot add it here.  Please go to my Facebook blog site at In-House Cook to see the video and extra photos. Thanks!


Lingua Di Suocera
"Mother In-Law's-Tongue" Pasta
with Roma Tomato, Garlic, Shallot and Crisped Salami

As I browsed through Facebook one day, I'd noticed our local butcher shop, which has undergone an amazing rebirth and reinvention of itself, which I love.  A photo of a particular pasta was featured for Valentine's Day, and I felt the need to purchase it.  It is "Lingua Di Suocera".  Now, I did not know what that meant, but to be honest, I should have taken a moment to read the think banner across the top because it tells the buyer what it really is, so I asked my friend, Chef Vincenzo of "Vincenzo's Plate", what that meant, and he told me it means "Mother In-Law's Tongue" and we discussed how it should be prepared.  While I do love heavy meat sauces, I have been more into lite extra virgin olive oil bases infused with garlic and herbs and tossed with vegetables.  I decided to sliver Roma tomatoes, shallots, slice garlic cloves into discs an top with shaved parm.  It turned out brilliantly.  

This is definitely a thirty minute meal, prep included, and however you decide to serve it, this is an amazing pasta.  It is thick, enlarges as it boils but takes on infused oil flavors and catches bits perfectly.  I will be creating new recipes for this and other pastas new to me soon.  Here is my lite recipe.  And gentlemen, if you want to impress your date or your dinner company, This is the meal for you!  The line colorful lines in the pasta is comprised of vegetables, therefore, this is a healthy meal all around!

Ingredients
Lingua Di Suocera pasta
2 shallots, slivered
4 Roma tomatoes, seeded and ribbed and slivered
4 cloves garlic, sliced into discs
1/2 teaspoon crushed dried oregano
4 tablespoons extra virgin olive oil
Shaved Parmesan cheese
salt and pepper


In a large pot, at six quarts of water and place the pot over high heat.

In a large sauce pan or wok, add the extra virgin olive oil (evoo) and some of the garlic chips and the oregano so as to infuse the evoo with those flavors.  If you stopped yourself from reading and asked:  "Wha--? A wok???"  Yes.  I have found that when tossing hot pasta in hot evoo and veg, a wok is the perfect instrument for even cooking.  Turn the heat to warm or low, whichever is the lowest setting of your stove top. 

Now prep the tomatoes and the shallots.  Shallots offer a lighter sweet red onion flavor and I did not want to take away from the flavors already added to the pasta itself, so I thought shallots would be perfect. 

When done prepping the aromatics and tomatoes, remove the garlic chips to a small bowl or plate. In a separate small skillet, add a small drizzle of the oil, about a teaspoon only, and raise the heat to medium-high.  As the oil heats up and ripples, slice six slices of salami or your favorite Italian charcuterie meat into slivers.  Crisp the meat  in the smaller skillet and remove to a paper towel. 

Note:  Have a pair of tongs with long handles and your serving plates ready to be used once the pasta is ready, as the rest goes very fast!  You will not have time to look for things in the cupboard nor a drawer. Just saying this from experience with  my first "When Pasta Met Garlic" experience.  

By this time, the water in the large pot should be roiling, waiting for the pasta to enter the hot tub.  Add a generous amount of sea salt to the boiling water, but not as much as you might unflavored pasta, again, because we do not want to take away from the original veg flavors in the pasta already.  Salt will help enhance those flavors, so do not be afraid to add the salt!  Boil the pasta to just before it is al dente, just before it is done by two or three minutes. Drain in a colander and get ready to use it!  Have a pair of long tongs ready to use!  This goes by very quickly from now!


Finally, we are ready to get the main event going!  Raise the heat under the wok or high-sided sauce pan to medium-high. When the aromatic oil begins to ripple, you are ready!  Add the the pasta to the pan or wok and top that with the remaining garlic, the shallot slivers and Roma tomato slivers. Toss the pasta together with the aromatics/veg for three-to-four minutes, coating everything with the garlic and oregano infused evoo.  Take plate one, in a circular motion, plate the pasta.  You may want to use a spoon to get a bit more of the veg which may be left behind and top the pasta with it.  I like to add fresh cracked black pepper over the top.  Add some of the crisped charcuterie meat atop that and sprinkle some of the shaved Parmesan on top, and be generous!  Plate the rest, and enjoy!


One more view?  No problem!!!


Thank You for your time and viewership and readership!!!
Now, Go Cook Something!!!

One Skillet Hoisin Chicken Stir Fry Over Noodles

  One Skillet Hoisin Chicken Stir Fry      Over Noodles This is one of those "people who know me Know I am obsessed over Chinese food&q...