
WELCOME to YET ANOTHER Episode of "What I Have Been Up To In My Kitchen"!
This is the last quarter of my work year and the busiest times of the year for me, and my time in the kitchen is limited to a night here, a night there, where I can prepare dishes for future lunches or just enjoy a quick, enjoyable favorite dish. In THIS episode of "What I Have Been Up To In My Kitchen", I will show you my Herb Buttered Cornish Game Hens, a Taco dish and a savory and filling pasta bake. Let's get to it!
Herb Buttered Cornish Game Hens
2 Cornish game hens (usually, they come two to a package)
3 cloves garlic, finely chopped or grated
6 sprigs fresh rosemary, thyme and sage, separated in half, half finely chopped
1 stick softened butter
1 teaspoon salt
1 teaspoon pepper
1 teaspoon smoke paprika
1 teaspoon ground yellow mustard
1 large onion, sliced into discs or 2 medium onions, sliced into discs
2 tablespoons extra virgin olive oil

Preheat the oven to 425-degrees.

Preheat the oven to 425-degrees.
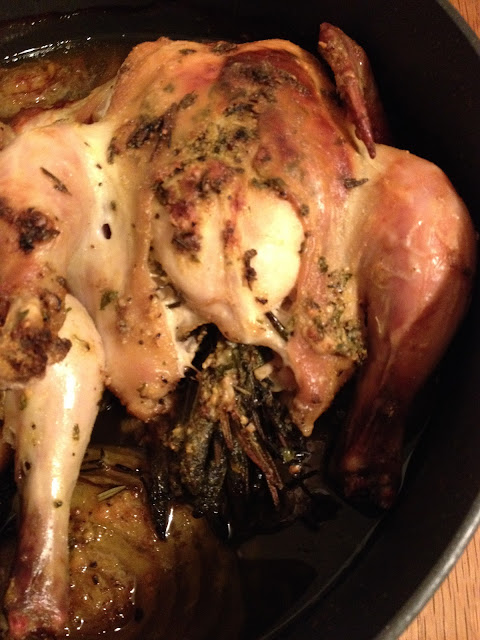
Wash and with paper towels, pat dry the Cornish game hens. Remove any innards, if your purchase has them. Meanwhile, stir in the garlic and the fresh finely chopped herbs and paprika into the softened butter. Leave the butter out at room temperature.


Using your index finger, loosen up the skin over the breast, back and between the breast and the thighs. Get a good amount of butter on your fingers and generously rub the herb butter under the skin everywhere. Repeat until you a have a very generous amount of the herb butter slathered under the skin. Next, do the same on every orifice on the outside of the carcasses. Arrange the rest of the fresh herbs into the tail end of the hens. This will add delicate but defined herbal flavor the inside of the hens.
Wash your hands quite thoroughly and slice the onion or onions into quarter to half in thick discs. In a cast iron skillet, add the discs, which will be beds for the hens. Now, sprinkle the discs with the evoo and some salt and pepper. Sprinkle some salt and pepper over the Cornish Game Hens, as well. Using utensils, or your hands, though we want to "handle" the hens as little as possible, move them onto the onion discs in the cast iron skillet.

Note, in my photos, I am not using a cast iron skillet. I have in the past, and while my pan here was quite adequate, I had to use two of them so as to space the hens, but there is NOTHING like a cast iron skillet to roast fowl. Therefore, a cast iron skillet is my recommendation.
Now, roast the hens uncovered for twenty minutes at 425-degrees. Cover the hens with foil after twenty minutes, reduce the heat to 375-degrees and roast for an hour. Uncover the hens and roast another twenty minutes. They will turn a nice golden brown. Carefully, remove from the skillet, place onto a grooved cutting board and allow the hens to rest twenty minutes, to allow the juices to redistribute.
Carefully place the hot skillet on the stove top, add a half cup of white wine and a good couple of tablespoons of balsamic vinegar and finish caramelizing the onions that were the onion bed. Add a little more salt and pepper in the process. Once the onions have reduced to a dark color, they are ready.


Not the most attractive view of this hen. Sorry!
Serve the Cornish Game Hens with the caramelized onions and with whatever starch or vegetable that makes you happy! I hope you enjoy this recipe!
Next.................TACO MANIA!!!!

Verde Carne de Puerco Tacos!
I struck gold at the store last weekend and purchased a package of pre-pounded out thin pork cutlets that were ready to be prepped for tacos; all they needed was to be seared or diced and sauteed. The best part about the purchase is that they were from the pork shoulder/butt (that we make pulled pork from). I chose to marinate and saute the pork in a screaming hot skillet. My tacos were flavorful, savory and hit the spot perfectly. Here is my recipe for my Verde Carne de Puerco Tacos.
Marinade
1 pound thin pork cutlets, pounded out to 1/4 inch thickness
2 cans fire roasted green chiles or, two fire roasted fresh Anaheim or Pasilla chiles, peel rubbed off after resting in a paper or plastic bag, seeded, stemmed and diced.
1 red or yellow onion, finely chopped
3 cloves garlic, finely chopped or grated
1 teaspoon Chile Molido
1 teaspoon chipotle powder
1 rounded tablespoon smoked paprika
1 teaspoon ground cumin
1 teaspoon fresh or dried oregano
1 teaspoon fresh or dried thyme
zest and juice of two limes
1 tablespoon apple cider vinegar
grape seed oil (to use as needed with each batch of meat)
*I also toasted the spices before adding them to the marinade.
Dice the pork cutlets and place them in a large bowl. Add all of the additional ingredients and stir together very well, or, use your hands to mix the meat and aromatics and spices all together, making sure that all of the meat receives all of the flavorful goodness of the marinade.

Marinade the mixture for an hour to overnight. I let the meat marinate for two hours.
When you are ready to get a good searing saute on the meat, add a tablespoon of grape seed oil to the skillet. I use grape seed for high heat sears or sautes because it does not interfere with the flavor balance of the marinade and, it has a high heat and smoke tolerance. I saute the meat in batches so as to get the best sear on the meat and for faster aromatics cook time.

Each batch should take about four-to-five minutes tops to get a good caramelization on the pork (puerco) and to begin softening the onions and garlic.
Once you have completed cooking all of the batches of Verde Carne de Puerco, it is time to plate and serve! I added a few pickled sliced jalapenos to my dish (which were leftover from previous dishes) and some Mexican mozzarella and fresh oregano leaves, diced. Add whatever sauce or pico de gallo you love and enjoy! Who doesn't love a good taco, now I ask you?


Now, go cook for someone you love! This is such an easy recipe to prep and serve, it is ridiculous. You can make it ahead of time and freeze it for a few days or, you can make it all in one evening, whether your marinade it for thirty minutes, an hour or overnight. Regardless, your loved ones will be thrilled with this dish, as much as I was.
Muchas Gracias!
******************

Now, on to the pasta dish busy working folks and mom's feeding families on a budget will very much appreciate! Whether you are feeding yourself for a week for lunch or dinner, or feeding a family for a few days, or, if unexpected guests arrive, this next dish covers it all!
My "Back to Basics" Farfalle Pasta Bake
Farfalle pasta is best known at "bowtie" pasta and is a favorite for festive cold pasta salads and veg tossed pasta topped with a little parmesan and fresh or dried herbs. This time, however, while I normally would use a rigatoni or penne rigate, I chose farfalle, or, bowtie pasta, as it is excellent at catching a beefy tomato based sauce and it catches layers of cheese in a pasta bake expertly.
Let's get to the sauce, shall we?
Beefy Pasta Sauce
1 pound of 80/20 ground beef
1 large red or yellow onion, finely chopped
3 cloves garlic, finely chopped or grated
2 tablespoons dried Italian seasoning herbs
2 tablespoons paprika
salt and pepper + salt for the pasta water
1 teaspoon fresh or dried oregano, chopped
2 sprigs fresh thyme, leaves stripped off
6 basil leaves, rolled and chiffonade
2 splashes red wine vinegar or, the zest and juice of half a lemon
1 pinch crushed red pepper flakes, or, 1 Fresno chile, seeded and ribbed, finely chopped (I used the fresh Fresno chile for this dish)
1 rounded cup grated mozzarella
1/2 cup grated parmesan cheese
1/2 cup provolone or Fontina cheeses (mixed is even better!)
3 tablespoons extra virgin olive oil
1 14.5-ounce can chef's cut tomatoes (Italian style)
1 28-ounce can tomato puree (I use Cento, my favorite)
non-stick spray
1 box (1 pound) Farfalle pasta
4 quarts water
In a large pot, add the evoo over medium-high heat. When the oil ripples, add the ground beef and break it up with a heavy duty wooden spoon and, as my mother would say, "brown" the meat. Add a little salt and pepper to season the beef. After about six minutes, add the onion and garlic and mix well. After four more minutes, add the lemon juice and zest or the red wine vinegar. This will deglaze the bottom of the pot and you can scrape up all of those burnt on bits of flavorful beef!
Next, add the canned tomato products and incorporate well. Add the dried and/or fresh herbs and stir in well. (NOTE: add only half of the fresh basil. Save the rest for garnish upon serving)! Now, bring the pasta sauce to a boil and partially cover, and reduce the heat to low. Simmer for thirty minutes to one hour; whichever you have time for.
Preheat the oven to 400-degrees.
Meanwhile, bring four quarts of water to a roiling boil. Add a hefty palm full or so of salt to the water and stir well. It is the only chance you get to season the pasta itself. Cook the pasta until just prior to al dente, about eight minutes, and strain in a colander.
Spray a large 9"x 11" or so baking pan with non-stick spray and set near the pasta sauce and the strained pasta. If your sink is not near your stop top, place the colander on a plate and move it over to an assembly station. Now, take a ladle/spoon and ladle a nice amount of sauce to the pan. Be generous and spread it out all over the bottom of the pan. Add a layer of the farfalle/bowtie pasta, a layer of cheese, a generous layer of sauce, and repeat until you have no sauce left. Top with mozzarella and some shaved parmesan, dried oregano, dried parsley and sprinkle with smoked paprika.


If you have not gathered it, this is very much a lasagna style pasta bake. It is one of my favorite ways to spread a buck or feed a number of hungry guests a substantial, savory, flavorful meal they will not soon forget. Bake at 400-degrees for 45 minutes.

When done, the top should be a delectable dark golden brown on top.

The scientific part of it is, although we cook the pasta to and remove shortly before it is "done", it will fully cook by soaking up the pasta sauce loose liquids and become even more flavorful than if it were merely tossed in the sauce and served promptly. Double the flavor! Boom!!! (Drops mic)

You can see the layers, and better yet? You can smell it and taste it!

One last view before I bid you good night! I served with a delicious garlic butter, cheesy sourdough Foccacia bread from Sacramento Bread Company. I love it!
Thank You, dear friends and gentle readers, for your time, patience and consideration. I very much appreciate your visits!
Now, go cook something for someone you love!


No comments:
Post a Comment