
In-House Cook's "Week-In-A-Day"
Culinary Therapy Adventure
Inspired by the TV Program and Cookbook by Rachael Ray
Everyone who knows me understands that I am a die-hard fan of Rachael Ray. Love her or not, I would not be on this journey if one, I had not had a purpose and desire to want to learn how to cook and, two, if I had not gotten hooked on Rachael Ray's "30 Minute Meals" back in 2004. I had been divorced for a few years, and my youngest son lived with me at the time, but neither of my sons ever stayed to eat at my place unless I was grilling, which I was quite proficient at. I had come down with a terrible flu that October and was - doctor's orders - bedridden for two weeks. Thank goodness it was during my autumn break! During my time in bed reading and watching tv, I got completely hooked by Rachael Ray's "30 Minute Meals" and another show, no longer on, "While You Were Out", which is where I discovered my love for making candles. Yes, I am multi-crafty-talented. I had watched Rachael make a meal then called "Spaghetti Western Man Spaghetti", which is now called "Cowboy Spaghetti". My friends, whom I could not wait to make it for, nicknamed the dish: "Mansghetti". All appropriate. I do not think I have ever blogged it. My first Rachael Ray meal and I do not think I have blogged it, although, I did not start blogging until May 31, 2012.
In any event, I also love Rachael Ray's show "Week-In-A-Day". Rachael's instruction helped me create Weekly cooked-ahead meals and meal "bags" of ingredients for my son while he was away to college. I did blog those, if you are interested in scrolling through my blog's history, 2013 or 2014 and early 2015. Being on a budget, I have decided to return to Rach's "Week-In-A-Day" instruction. I decided to spend a day making three meals to stretch out over five days. The first is a familiar rigatoni pasta bake. Next, pesto chicken with onions and the last, Bacon-Wrapped Italian Meat Loaf.
Let's get started, shall we? I am sure you will find a meal here, tweak it to make it your own, and enjoy saving money on these easy to prepare and make meals. The best part is that the oven does all the hard work for you!


Add a generous amount of non-stick cooking spray to a baking pan. Add a layer of onions over that. I love to use onions when roasting meats. The onions act as a boost, allowing the heat all around the meat, at least until the onion bed softens. You could also place a rack in the baking pan, which would do even better; I just happen to like the onions and use them later.


Let's get started, shall we? I am sure you will find a meal here, tweak it to make it your own, and enjoy saving money on these easy to prepare and make meals. The best part is that the oven does all the hard work for you!
Rigatoni Pasta Bake
A personal favorite of mine for make-ahead lunches for the work week is a pasta bake. I always use shorter pasta to catch the sauce well, such as penne rigate, rigatoni, farfalle (bow tie), fusilli or campanelle. I recently posted a pasta using campanelle, about two or three recipe blog posts back, if you are interested. Simple ingredients, simple preparation and incredible flavors. Here we go!
Ingredients
1 pound Italian sausage (hot or mild)
1 medium red or yellow onion
2 cloves garlic, grated or finely chopped
4 leaves fresh basil, rolled and chiffonade cut (into ribbons)
4 sprigs fresh Thyme
1 rounded tablespoon dried Italian herb seasonings
(Or fresh, if it is spring or summer with a full herb garden! Fresh herbs are amazing!)
salt and pepper
1 28-ounce can tomato puree
1/2 cup grated parmesan cheese
1 cup grated mozzarella cheese
4 tablespoons extra virgin olive oil (evoo)
1 pound rigatoni pasta
Bring about four quarts of water to a roiling boil.
In a large skillet, add the evoo and a pinch of the garlic over medium-high heat. When the oil begins to ripple, remove the garlic. Add the sausage, break it up and brown it up, about five minutes. Add the onion and garlic, a little salt and pepper, and saute another few minutes until the onions begin to appear translucent. Add the tomato puree and incorporate well. Add half of the dried Italian herb seasoning and half of the fresh basil ribbons and mix in well. Add a few tablespoons of water to loosen up the sauce and bring to a boil. Then reduce the heat to low and allow the sauce to simmer for fifteen to thirty minutes, whatever time you have available.


While working on the sauce, watch the pasta water. When it comes to a roiling boil, add about half a palm full of salt and stir. This is the only chance you have to season the pasta itself. Now, preheat the oven to 400 degrees. The pasta will cook about ten or twelve minutes. Before straining the pasta, retain half a cup of the pasta water. Add it and a tab of butter to the pasta back into the pot (with the heat turned off). Stir well.
When you dump the pasta into the water and stir, add the remaining dry Italian seasoning and fresh basil to the sauce and stir in well.
Now, spray a 13' by 9' baking pan with non-stick spray. Add three or so ladles of the pasta sauce to the bottom of the pan. Add a layer of the rigatoni, top with some mozzarella and parmesan, then the sauce, and repeat the process until you have used all of the pasta and sauce. You Could just add the pasta to sauce and pour it all in, which is much easier, but I enjoy layered pasta bakes, somewhat like a lasagna. I enjoy the cheese and the sauce melting into the rigatoni cores and how it soaks up the sauce flavors and cheese flavors. Amazing.
Top with a generous layer of the mozzarella and parmesan cheeses and drizzle with evoo. I like to add a little fresh oregano to the top as it bakes. Now, bake for 20 minutes until the top crisps up golden. The aroma will fill your kitchen like a dream.


Once done, allow the bake to rest and set about twenty minutes. Serve either on a plate or a bowl.

I like to serve with a garnish of fresh basil or oregano.
Bon Appetito!
Next up, Pesto Chicken!
Pesto Chicken is simple and perfect for make-ahead meals. Served with pasta, salad, in sandwiches, it is a versatile protein that anyone can enjoy in myriad ways. Let's get to it!
Now, you could make your pesto, which is easy enough, and I will share my recipe with you, but for this, I just used a jar of pesto I found on sale. It is always a great idea to stock your pantry with items you use often and with items on sale, such as pesto, which will save you time and effort.
In-House Cook's Pesto Recipe
1.5 packed cups of basil
(You could use kale, chard, Flat Leaf Italian Parsley, mint, arugula and more!)
1 - 2 cloves smashed garlic
1 palm full of grated parmesan cheese
2 rounded tablespoons of toasted pine nuts
pinch salt and pepper
1/4 cup Extra Virgin Olive Oil (drizzled in as it processes in a food processor)
Always taste before serving, and adjust, if necessary.
Preheat the oven to 375-degrees.
Now, pat dry three chicken breasts. Rub them with a little evoo, then season both sides with salt and pepper. Just a hindsight thought, which I did not do, but will in the future, halve the thick chicken breasts so you can have smaller, thinner portions, follow the seasoning procedure, and what comes next. Very simple, very easy, tons of flavor! Grease or spray the bottom of a baking pan with non-stick cooking spray (I use the olive oil non-stick spray). Slice one small or two small or medium onions into discs and lay them on the bottom of the pan. Add a little salt to the onions, which will help the onions sweat and soften during the baking process and release their flavor. Slather the bottom of the chicken breasts with some of the pesto and place them atop of the onions. Add the rest of the pesto to the tops of the breasts. I like to add a medley of fresh herbs atop the store-bought pesto.


Place the breasts into the oven at 375-degrees and roast for 30-minutes. After thirty minutes, use a meat thermometer to make sure meat has reached about 170-degrees. If you do not have one, stab the thicker piece with a fork and if the juices run clear and clean, it is most likely done. You will, of course, have to check further to make sure there is no pink.


My secret: About half way through, I topped the chicken with a little mozzarella to melt over the pesto. You didn't know I like cheese, did you? 😋
I used the cheese in a small bowl of pasta salad and sandwiches and a green salad. As I mentioned above, versatile! I further caramelized the onions to use in the sandwiches with a little balsamic vinegar and my secret ingredient, Worcestershire Sauce. Love it!
Up Next.....
Bacon Wrapped Italian Meat Loaf

I have not often made meat loaf, so I decided to give it a shot and try to be versatile with it. I decided to be a little decadent with this last dish, and it proved to be worth while. I served it with mashed potatoes (not pictured) and as a breakfast sandwich. Both were equally delicious. Let me tell you how I made it Italian with a twist.
Italian Meat Loaf Ingredients
1 pound ground sirloin
1 pound ground chuck
1 large red onion
2 cloves grated or finely chopped garlic
2/3 cup bread crumbs mixed
1/4 cup fresh grated parmesan
3 eggs, beaten
1 tablespoon fresh oregano and thyme
6 fresh basil leaves, rolled, chiffonad sliced
1teaspoon coarsely ground coriander seed
1.5 teaspoon cumin seed
2 tablespoons dried Italian seasoning, separated
3 tablespoons Worcestershire Sauce
1 rounded tablespoon tomato paste
salt and pepper
1 pound bacon
Preheat the oven to 375-degrees.
In a large bowl, add the two pounds of beef, the dry ingredients, half of the herbs, a pinch of salt and pepper and the eggs. Using your best kitchen utensils, your hands, mix the ingredients together. Add a little milk if the mixture is dry. It was with two eggs, but not with three (me lesson learned). I know milk is often used when making meat loaf, but I do not like that. IF you do, please, use it and enjoy!


I wanted to add tomato paste to the meat because I am not a fan of it atop the meat like mom's used to do in days gone by. IF you like that, make it your own and carry on!
After you gently work in all of the ingredients, without "overworking" the meat, meaning, it should not warm up and stick to your hands, set the bowl aside and wash your hands.
Next, lay out the bacon strips, overlapping each one just a little bit. You will use eight to ten strips of bacon. More, if you wish! Now, form the meat into a log and form it over the center of the bacon. Now, wrap one side of the bacon over the top of the meat and wrap the other side over that. Carefully take the log and set it into the pan over the onion bed, seam side down.

Add a sprinkling of some of the spice mix and a drizzle of aged balsamic atop the meat log.


Add some of the fresh herbs, some of the dried spices and a drizzle of aged balsamic atop the wrapped bacon meat loaf. I topped it with a little fresh grated parmesan cheese.
Now, bake at 375-degrees for fifty minutes to an hour. Use a meat thermometer, slipped between bacon slices, which have baked tightly around the meat loaf log, to make sure the meat is adequately done, 160-degrees, approximately.

Allow the meat loaf to rest about fifteen minutes before slicing and serving. I had used some leftover Yukon Gold potatoes to make garlic mashed potatoes and served it first with that. Delicious. Those two textures go well together!

You will notice that the chuck beef and the bacon will have rendered a lot of fat. The onions will have softened and the fat rendering will have kept the bottom of the meat loaf quite moist.

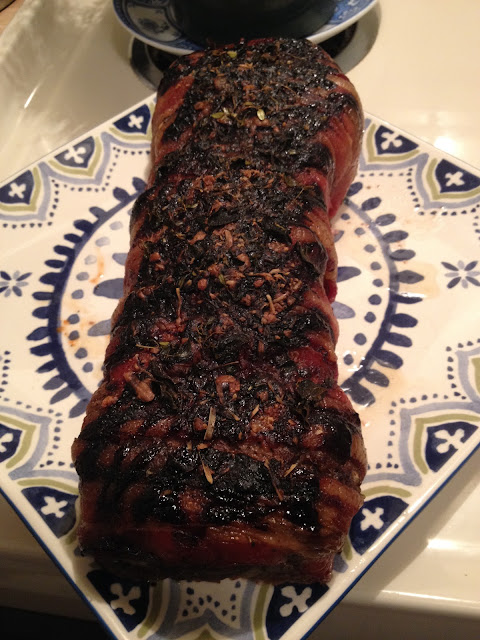
My meat loaf resting. I love how the aged balsamic caramelized. The flavor intensified and I love the tangy, seasoned flavor.

While I prefer my burgers medium-rare, I chose to bake this loaf nearly well-done.
A couple of days later, I made breakfast sandwiches for friends and I. The photos are below. I simply cut a few slices of the roast off and seared them, like a hamburger, but much more briefly, in a skillet with a little extra virgin olive oil until the meat had seared.

I toasted some rolls, added a chipotle mayo aioli, a little stone ground mustard, a sunny side up egg and served as a breakfast sandwich. This was my favorite use of the meat loaf.


Here we are, then, the end of my Week-In-A-Day Culinary Therapy Day. I say that because, as I have said before, the process of cooking, the prepping, the science and the creativity of cooking helps me put "life things" in their proper place in the scheme of life, like a computer files away your data. Decisions seem easier, fears lessen and creativity is sparked to a wonderful degree.
With that, go cook something for someone you love! And, as always, Thank You for your time and consideration!
~Martin
In-House Cook


No comments:
Post a Comment