Saturday, November 24, 2018

When Less Is More: Tikka Chicken and Onion Stir Fry Over Affordable Saffron Rice


When Less Is More...
Tikka Chicken and Onion Stir Fry Over Affordable Saffron Rice

Sometimes the grand meals I plan in my mind turn out much more simply in real life based on what I have in my frig and in my pantry. The reality is, sometimes less is more. This is one of those dishes where a few spices create a grand meal with complimentary textures and layers of flavors. 

This dish would make a great mid-week meal or Friday night meal when everyone is super tired. Let's get to it, shall we?

Affordable Saffron Rice

Go the the Mexican spices section of your local grocer. Many are starting to carry a Saffron Flower package that is slightly more expensive than the rest of the brands' spices but just as aromatic as the major expensive Spanish Saffron.  Look for the El Guapo packagingTM*.  

If you do not have access to the above listed brand, or something like it, using the expensive but always perfect Spanish Saffron (which I also have) is fine!

Add a pinch (1/2 teaspoon) Saffron strands to 2 cups water or chicken stock over medium-low heat. Allow the saffron water or stock to steep and marry its flavors. 

Meanwhile, measure one cup of rice for two good eaters, or three light appetites.  Add two tablespoons of garlic infused evoo into a shallow skillet over medium-high heat.  Add the rice to the skillet when the oil begins to ripple. You are toasting the rice.  Stir vigorously to coat the rice, providing some sizzle to the rice.  Such great flavor!  After three or so minutes, when the rice begins to darken, add it to the steeping saffron water. Interestingly, the rice will cause the water to sizzle and steam.  Bit of a fun science experience!  Bring the water to a boil, stir vigorously, reduce the heat to low, cover and cook for up to forty minutes.  


For the Chicken

six pieces boneless/skinless chicken thighs
one large red onion, coarsely chopped
1 clove garlic, finely chopped
2 tablespoons Tikka paste or powder
salt and pepper
2-4 tablespoons evoo

Add three tablespoons evoo to a skillet over medium-high heat.  In the package or on a plate, use six pieces of boneless-skinless chicken thigh and sprinkle with salt and pepper.  Next, add Tikka paste or Tikka powder to all sides of the chicken thighs.  Add the chicken cut side down when the oil begins to ripple.  It will sizzle and release an amazing aroma!  Sear on each side about three minutes.  No, the chicken will not be done, but stay tuned!  Remove the chicken and set on a plastic cutting board. 


Add one coarsely chopped red onion to the skillet with one finely chopped clove of garlic.  Saute up to six minutes, while you slice the chicken thighs into bite-sized pieces. Add the chicken pieces to the onion in the skillet and combine thoroughly.  Saute for seven or eight minutes until fully cooked over medium-high heat, stirring often. 


The rice should be done shortly.  When it is, try to plate it in a circular pattern and add a hearty helping of the stir fry atop the rice.  Garnish with fresh lemony thyme and fresh chopped rosemary. 


Serve family style or singularly. Either way, what a delicious meal!

With that, Thank You, friends, for your visit! I always appreciate when you all stop by to view my dishes.  Thank You!


Now, Go Cook For Someone You Love!

~Martin
In-House Cook


Friday, November 23, 2018

Sausage and Ricotta Stuffed Pasta Shells Finished in Pomodoro Sauce


Sausage and Ricotta Stuffed Shells finished in Pomodoro Sauce


Sometimes, holidays do not go as planned and adjustments made last minute.  I was having Thanksgiving dinner at my place, but half of our little family unit were ill, two others dining elsewhere, so that left my mom and I. We decided to put it off till later.  I needed to do Something for dinner and decided on stuffed jumbo pasta shells. It was a handy pantry item and, with a little of this and a can of that, I created an delicious and satisfying meal with leftovers for a fantastic lunch today.  This is such an easy meal to prep, minimal dishes to wash after, with complex textures and amazing flavors.  Let's get started, shall we?

Shells Stuffing

1 box jumbo shells
2 cups ricotta cheese
1 + 1 rounded tablespoons combined fresh basil, rosemary, thyme, sage and oregano, finely chopped*
1/4 teaspoon each salt and pepper
2 tablespoons finely grated parmesan cheese
2/3 pounds Italian Turkey Sausage
Evoo, two tablespoons


My Pomodoro (Tomato) Sauce

1 28-ounce can of peeled San Marzano tomatoes
*the other rounded tablespoon of fresh finely chopped herbs
1/4 teaspoon each salt and pepper
1 tablespoon lemon infused evoo
1 clove garlic, grated
1/2 cup water

*2 cups mozzarella cheese as bake topping


You can make the sauce ahead of time if you wish.  This is the simplest sauce ever.  Add a tab of butter or lemon infused evoo to a pot of high-sided skillet. Add the garlic and saute over medium heat.  Add the can of San Marzano tomatoes, herbs, salt and pepper and water.  Bring to a boil over high heat.  Reduce the heat to medium-low and partly cover.  After ten minutes, uncover and mash the tomatoes which have softened quite a bit.  Done. 

Now, I used the same high-sided skillet I'd cooked the sausage in and kept some of the fat reduction in the skillet for flavor.  


For the Shells

Bring four quarts of water to a roiling boil over high heat.  Liberally salt the water, as it is the only time you have to season the pasta. Add 13 - 15 shells, unless you are cooking for several more people than two, then add the whole box. Cook it before al dente, which is just before being done. The shell should be soft but not done yet.  You will finish it off in the Pomodoro Sauce. 

After fully sauteing the sausage with the evoo, process the chunks in a food processor so it is more of a finely crumbled consistency.  After cooling, process, then mix together with the two cups of ricotta cheese and the fresh finely chopped herbs, salt and pepper.  Use a small spatula or spoon to fill each of the shells that should be removed from the water with a spider or colander. Place each shell into the Pomodoro sauce.  Top with the two cups of mozzarella.  Bake at 350-degrees for 30 minutes. 

Saute the sausage, then, when cooled, process into a fine crumble


After combining the ricotta, herbs and sausage, fill the nearly cooked shells and place each one into the Pomodoro.

I added some extra fresh thyme atop the shells.


I smothered the shells with grated mozzarella and baked at 350-degrees for thirty minutes. Below is what the final product prior to plating looks like. 


The mozzarella becomes golden brown and the Pomodoro Sauce bubbles along the perimeter of the crust. The aroma is purely Italian. The flavor, divine. 


I plated this last night but it was recommended that I plate it on classic white plateware.  


While these are not the best pictures ever, you certainly can see the filling and denseness of the sauce. I garnished with fresh lemony thyme.

However you serve it, the point is to enjoy it, savor each bite and those whom you are sharing your meal with.  

With that, awesome viewers and readers, I  appreciate your support and I hope you had a Truly Happy Thanksgiving.  

Now, Go Cook For Someone You Love!

~Martin
In-House Cook

Saturday, November 3, 2018

Mother Hubbard Empty Cupboard Pantry Meal: Tortellini with Fresh Tomatoes and Herbs


My Mother Hubbard Empty Cupboard 
 Pantry Meal:
Tortellini with Fresh Tomatoes and Herbs

As a teacher on a single income, the last week of the month oftentimes is very lean.  Food is not lavish, but more pantry meals. October was an extremely tight month and the day before Halloween was the very last meal my cupboard pantry and refrigerator could muster. I made the most and best of it, though, and with the help of my friends, Anne and Chase, Thanks Friends!, I made a fulfilling and delicious extreme pantry meal. The LAST pantry meal.

I had a bag of Tortellini in my freezer and though I had intended to have it this day, that day and the other day, I kept putting it off.  So glad I did!  It was the Last usable item in my freezer and refrigerator. I had no more tomato based products, so the sauce was going to have to be something else. But, I did have butter!  So, brown butter sauce was part of the menu.  Problem:  I did not have fresh sage, no money to get any, and no friends have it growing.  So brown butter sage sauce, was going to have to be brown butter something-else sauce. 

Let's get to the ingredients, shall we?

Ingredients

1 package tortellini
1 pint grape or cherry tomatoes
1 teaspoon or tablespoon garlic
*onion, if you have it, sliced
1/4 stick butter
salt
2 tablespoons dried Italian seasoning
4 + 4 leaves fresh basil
1 tablespoon fresh thyme
2 tablespoons evoo
parmesan cheese

I had gotten some fresh basil for a previous dish a few days earlier from Anne and Chase, so I had greens.  I had parmigiana, a few sprigs of thyme and a pint of baby grape tomatoes in the frig, as well, and a small container of garlic paste.


I added three tabs of butter and a teaspoon of garlic paste to a skillet over medium heat with two tablespoons extra virgin olive oil. While the butter melted, I added four quarts of water to a pot over high heat. 

When the butter melted in the skillet, I added the tomatoes and four chiffonade cut leaves fresh basil, as well as a tablespoon of fresh thyme. I allowed the flavors to marry during a medium heat saute. 


When the water comes to a roiling boil, liberally salt the water and stir it in.  Add the tortellini and stir again to prevent sticking.  Like gnocci, tortellini sinks then rises when it is done. As the flavors marry in the skillet, use a spider or other water draining utensil to scoop out the tortellini and place it into the skillet. I do not know if this video will work, but, if not, please visit my blog's facebook (In-House Cook) site, instagram (In-House Cook) or Twitter (In-House Cook/@crdn9) and you can see several videos about this dish.  Thanks!


When the tortellini has finished cooking, add it little- by- little to the skillet.  Toss gently and coat the pasta evenly. Add a tablespoon of dry Italian seasoning and stir.  Again, I hope the video works when the post is published!!!


I garnished with some more fresh basil and shaved parmesan cheese. This dish easily feeds three or four, especially with additional items, such as garlic bread or a protein. 


Some people do not like butter or oil on their plate (I love brown butter sauce, so it Is on my plate) so you can always use a slotted spoon to plate the tortellini. 


Such a basic dish but so delicous.  Lesson learned?  Always have that one item like tortellini or ravioli in your freezer with something to create a sauce with and keep that in your pantry. When you have that one day when you really need it, it's there. 

With that, my gentle viewers, Thank You for your time and consideration.  I am grateful for your visit!

Now, Go Cook Something For Someone You Love!

~Martin
In-House Cook


Friday, November 2, 2018

Marinated, Grilled, Sliced Flank Steak and Pesto Farfalle Pasta


Steak and Pesto Farfalle Pasta

Last week I was asked to cook for a dear friend's family twice and I had the pleasure of cooking this for them last Tuesday.  I had marinated a deliciously seasoned flank steak I'd purchased from our local butcher, grilled it, let it rest and sliced it.  So soft and delicious! I'd made farfalle pasta, otherwise known as bow tie pasta, added fresh tomatoes, fresh torn basil and pesto to it and tossed it in butter for flavor and a sheen.  What a delicouis meal with a built in salad!

Let's get started, shall we?

Flank Steak Marinade

1 flank steak
2 cloves garlic, grated
1/4 onion, grated
dried or fresh rosemary, thyme, oregano
4 leaves, fresh basil, finely chopped
4 tablespoons evoo
white balsamic vinegar 
1 Fresno chile, finely chopped
salt and pepper

Place the steak into a gallon sized plastic zip-lock bag. Pour the marinade into the bag, zip the lock, smush the steak and marinade together so it coats the entire steak. Set it into the frig for as long as you can to marinate. 


Grill the flank steak indoors or outdoors, about 7 minutes per side.  Remove and let the steak rest about five minutes. Slice. Halve the longer pieces. 


Bring 4 quarts of water to a roiling boil and liberally salt the water as it is the only time you have to season the pasta. Add one box or container of farfalle, aka. bow tie pasta and stir to prevent sticking. Cook until done, not al dente, or almost done, as the package suggests, about twelve minutes. When done, drain the pasta.  


two pints of baby tomato medley
four leaves fresh basil, chiffonade cut
1 white onion, halved and sliced into crescents
2 cloves garlic, grated
fresh thyme and oregano
1 4-ounce container store-bought pesto
3 tabs butter
2 tablespoons evoo
1 tablespoon dried Italian seasoning

Reduce the heat to medium, add the butter and garlic.  The aroma will floor you!  Add the rest of the ingredients listed above and saute three minutes to coat with the oil and butter. Now add the hot, moist pasta atop the veg and toss several minutes to marry the amazing flavors. 

Plate the pasta family style on a large serving plate and top with the steak.  Garnish with fresh torn basil and shaved parmigiana. Serve. 


Enjoy yourselves! This is a simple, easy, and fun recipe to make!

As always, my gentle readers, Thank You for your time and consideration and visit.  I'm humbled!

Now, Go Cook For Someone You Love!  

~Martin
In-House Cook


Sunday, October 21, 2018

Spicy Pot Roast


Martin's Spicy Pot Roast

In a series of recipe blog posts of firsts for me, I have prepared a recipe from my childhood but, you know me, I put my own spicy spin on it.  I prepared pot roast with the usual fixins, potatoes, carrots, onion and garlic, but also with fire roasted green chiles, chipotle in adobo, my Mexican spice blend, and braised it in Mexican beer. The braising aroma was insanely delightful. I made this with the flavors of Mexico so I could make several meals out of the leftovers. Tacos, burritos, and served with the potatoes in a more traditional style. 

Let's get started shall we?

Ingredients

1 pot roast steak
1 large white onion, coarsely chopped
1 pound Yukon Gold potatoes, quartered
3 cloves garlic, smashed and peeled
1 pint beef stock
3 bottles (from a six pack) Mexican Beer (I used Pacifico) and a little for the cook!
3 tablespoons Mexican Spice Blend
1 carrot, grated or finely sliced
3 tablespoons vegetable oil
2 small cans fire roasted diced green chiles
1 rounded tablespoon tomato paste
3 tablespoons Worcestershire sauce
4 ounces fire roasted salsa
2 tablespoons chipotle in adobo
fresh thyme
1 tablespoon Italian dried seasoning


Add the vegetable oil to a large pot over high heat.  Season the pot roast meat with the Mexican Spice Blend.  I did not add salt and pepper to the ingredients list because there is salt and pepper in the spice blend. When the oil begins to ripple, add the meat.  It will sizzle and that is what you want. We sear the meat to get a good caramelization crust. Sear on each side about five minutes.  Remove the roast and add a good splash of the beef stock and the Worcestershire sauce.  Scrape the bottom of the pan, as that is flavor you want to employ! The smell will be incredible!  Now, reduce the heat to medium, add the potatoes, carrots, onion and half of the garlic and half of the thyme. Sprinkle a little of the Mexican Spice Blend over the veg, stir and allow the veg to get a little crust on it, about four minutes.  Add the tablespoon of tomato paste, stir thoroughly.  Add the pot roast to the pot atop the veg. Add the beef stock or broth and the beers. Return the heat to high.  The liquids will fill just to the top of the beef.  If not, add a little water or more beer. 


Add the remaining thyme, garlic and Italian dry seasoning to the top of the roast, add the remaining Mexican spice blend and bring the liquids to a boil. Stir a little, cover and reduce the heat to low.  Braise for three or four hours, up to six hours. 


Final product after four hours of braising.


I painstakingly skimmed off the fatty oil so as to preserve the meat.  For me, it finished cooking late at night, about 11pm.  My fault, I started it that late. The next day, however, I had reheated it in the same pot, less as much of the fat as I could remove, and it was delicious as burritos, tacos and later, as a skillet breakfast dish with the potatoes and eggs and cheese.  Muy bueno!!!

I do not have a plated photo or photos this time.  As I said, I used it for three different dishes and fully enjoyed each one.  I purchased large tortillas to wrap into a supersized burrito with the shredded beef, scallions, Salsa Ranchero and scrambled eggs with green chiles mixed in.  Delicioso!  I did pretty much the same thing, less the egg, with the tacos.  

You could serve it in the traditional manner, with the potatoes and carrots, onion and the beef.  Amazingly aromatic and delicious.  Winner every time. 


With that, Thank You, gentle viewers and readers, for your time and consideration.  I always appreciate your visits!

Now, Go Cook For Someone You Love!💓

~Martin
In-House Cook


Friday, October 12, 2018

Chicken in Foil Packets


Chicken in Foil Packets

It's been a busy day, you and the kids are hungry, there is chicken thawed in the frig, but you still have more to do before you can even get to dinner!!!!!  

STOP!!!!

We've got this!  Got foil?  Got chicken?  Got a little cooking spray or extra virgin olive oil?  Have some spices or a spice packet?  Yes? Then we're good to go!  

I have a couple of chicken in foil recipes to share with you, but the reality is, you can do this with any cut of meat or vegetables or both!  Steak, chicken, pork, fish.....the possibilities are endless.  I have done this with steak and potatoes, which is a previous blog post.  I was tired, it was getting late and I did not feel like working over the hot stove. In my original recipe, I cubed a ribeye steak and tossed it in a bowl with baby potatoes and fresh herbs and garlic and spices.  I oven roasted it for thirty minutes at 350-degrees in a foil packet and it turned out perfect!  Now, let's see some chicken recipes!


Martin's Mexican Chicken in Foil

Ingredients:
4 large or 6 small boneless, skinless chicken thighs
1/2 onion, coarsely chopped
2 cloves garlic, grated or finely chopped
1 tablespoon chipotle in adobo
1 tablespoon Mexican spice blend*
Fresh or dried thyme and oregano
Fresh cilantro (or dried)
Cooking spray or evoo

Preheat the oven to 350-degrees.

Slice the chicken into slivers or cubes. 

Pull one two-foot long piece of foil and one foot long piece of foil. Lay the longer foil lengthwise (east west) in front of you and the other piece cross over away from you (north south). Spray cooking spray or lightly drizzle a little evoo over the center square.  Add half the onion to the square and place the chicken atop the onion. Add seasoning to the top of the chicken, turn it and season the other side. Add the other half of the onions and the herbs and fold the shorter north and south side inward and the longer east-west foil over. Twist and fold as needed.  Place into an oven-safe skillet or onto a baking pan and place into the oven. Roast for 35-40 minutes at 350-degrees. 

I was Going to serve this to myself as tacos but alas, I had used up all the tortillas so I made Spanish Rice and served it atop that. Delicious meal!  


This could be served as tacos, burritos, over rice, or any number of ways. The flavors are delectable!!!


Ready to travel to Pakistan?


Martin's Tikka Masala Chicken Thighs in Foil

Ingredients:

4 bone-in, skin-on chicken thighs
2 tablespoons Tikka Masala seasoning*
1 teaspoon coriander seed
Cooking spray or evoo
Foil
Basamati rice

Preheat the oven to 350-degrees and make the rice. 

Rip off one layer of foil about two feet long, lay it east and west.  Tear off another about a foot long and lay it cross-wise north and south.  Spray the center with cooking spray or lightly drizzle with evoo.  Add a teaspoon of the Tikka Masala seasoning* (You can find it at most grocery stores, but I buy mine from a local Pakistani store in my town; such great spices and blends! They have a package of seeds and leaves for you to grind yourself and make your own blends, which inspired me to make my own blends a few years ago).  Now, place the chicken in the center and add the seasoning atop the chicken, including whole coriander seeds. Fold the north-south flap over and then the other side, crimp as needed and place the packet onto a baking pan and roast at 350-degrees for 35-40 minutes.  

Serve atop or with the rice.  Whatever you feel like serving with it is fantastic and whatever you like. Rice is commonly served with it, along with Naan. 


Not sure if this video works, but I had just pulled the packet from the oven and it was still bubbling.  The spices cooking filled my apartment with the most amazing aromas, I tell ya! 


I know, not a glamorous blog post, but it has its reason for being written and posted.  Convenience and simplicity!  Remember, you can do this with any protein and/or vegetables, which can go in together!  

As always, Thank You, gentle readers for your visit and your consideration.  I hope you make this and drop me a line telling me how you like it!  

Remember, you can follow my blog on Facebook:  Look up In-House Cook.  You can also follow my cooking adventures on Twitter:  crdn9.  I'd be very happy to see you! 

Now, Go Cook For Someone You Love!  

~Martin
In-House Cook


Friday, October 5, 2018

Chile Rellenos with Spicy Spanish Rice and Black Bean Frijoles


Chile Rellenos with Spicy Spanish Rice and Black Bean Frijoles

I have been on a quest to try preparing dishes all new to me, something I have never prepped before.  I started with Swordfish Pasta, which was a great success.  If you recall, five years ago, my friend, Maria, and I made tamales. Maria taught me very well, but I scraped more masa off my walls than went into my tamales.  There are times when my dishes are successful and elegant and times when they are successful but not so pretty.  This is one of Those dishes. 

My first favorite Mexican food item was chile rellenos, a cheese stuffed fire roasted chile, seeded and gently fried or oven baked in an egg white batter.  Oh man, do I have stories about this dish!  It is why I call this a "learning" blog.  I think cooking, whether you are a Michelin starred chef, a line cook or a home cook, gastronomy changes all the time; it is a moving, living thing; the techniques and science behind it are always changing and refining. 

You cannot really have an item like chile rellenos without complementary side dishes.  I made a spicy Spanish rice and, black bean frijoles with my oven roasted salsa. Let's get started, shall we?


Preheat the oven to 400-degrees.

Roasted Salsa
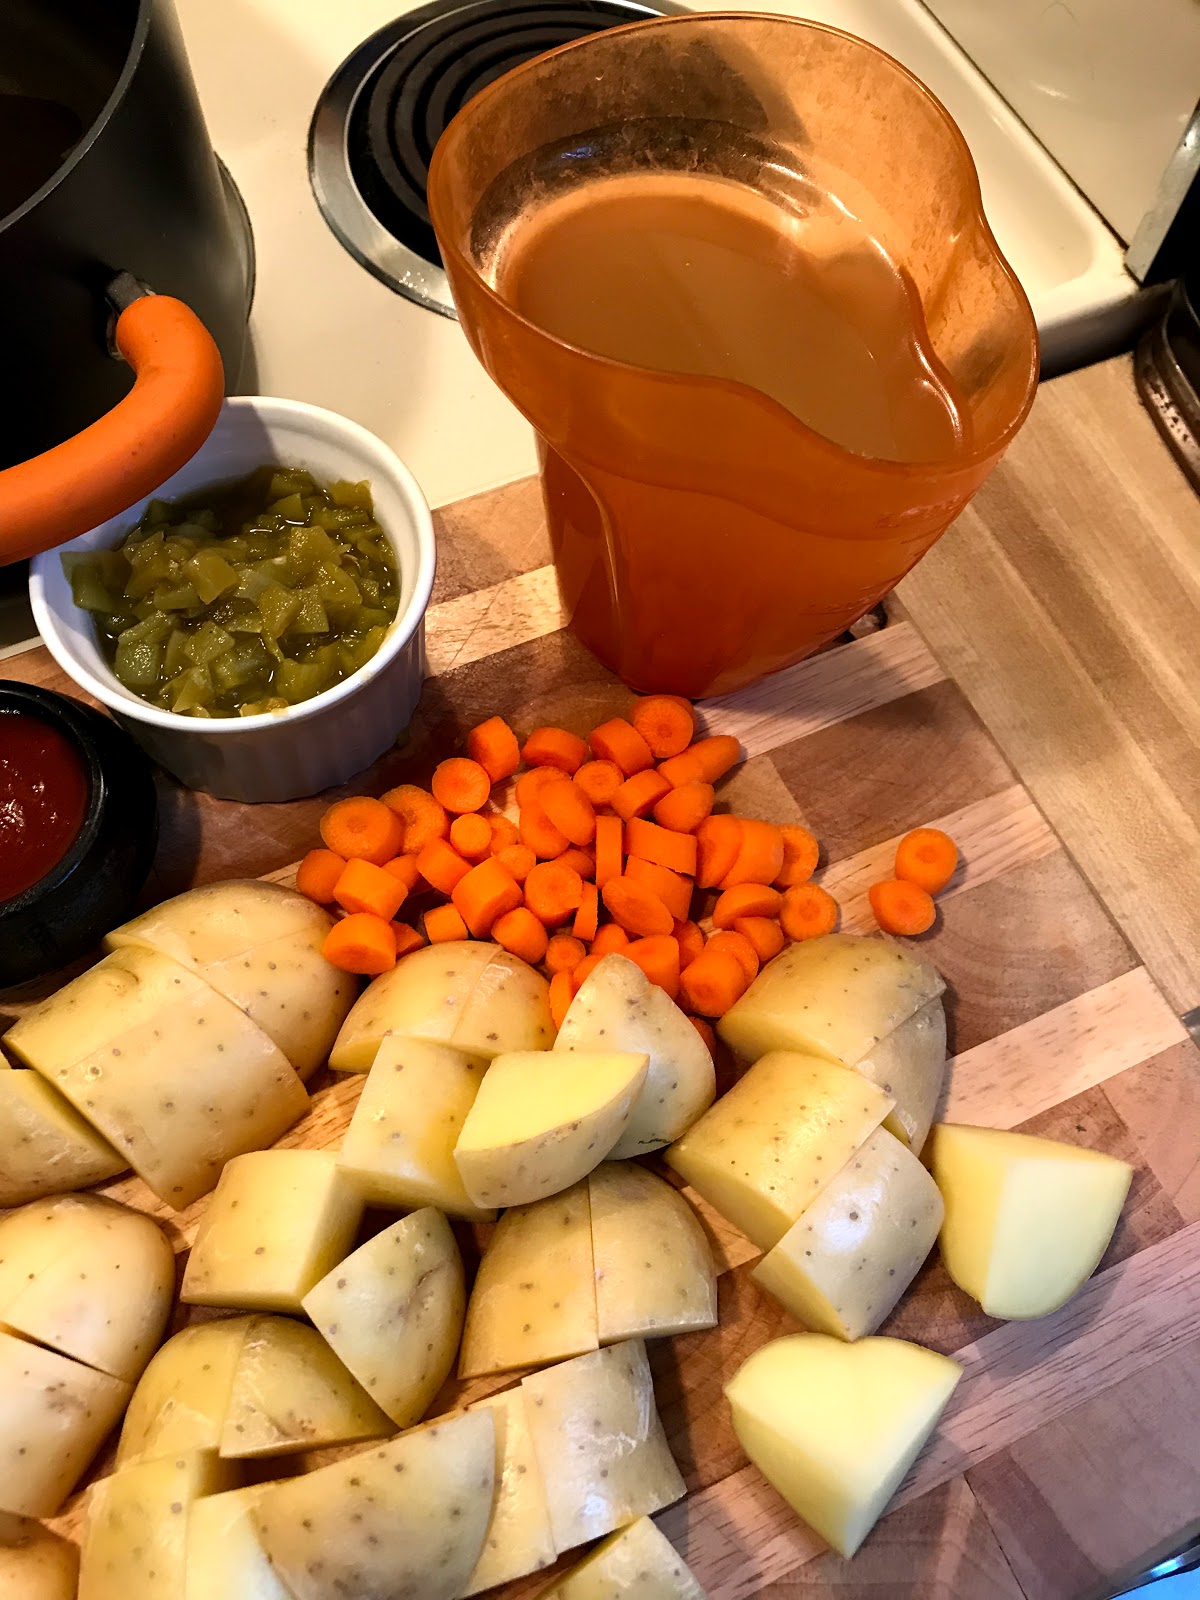
1 white onion, quartered
3 cloves garlic, smashed and peeled
1 large or 2 small Fresno Chiles, whole
2 serrano chiles
salt and pepper
fresh thyme and oregano
2 limes


Place foil down over a baking sheet or pan. Place the veg and aromatics on the foil. Drizzle vegetable or grape seed oil over each item. Sprinkle or grind salt and pepper atop the veg generously and toss them in the oil thoroughly. Oven roast for 18 minutes, turning at ten minutes. Remove and let cool. 

You will want to follow the same procedure, even adding the pasilla/poblano chiles to this baking pan for the rellenos.  You want them to blister on all sides. 

If you want to grill the items, follow the same procedures, but using tongs, place each item (except the garlic, place them on a piece of foil) on the grill and allow the chiles to blister on all sides.  Turn the onion at nine minutes.  They should have beautiful grill marks. 

If you have a gas stove top, you can follow the same procedures, but without the oil. 

Remove the ingredients. Seed and stem the serranos and the Fresno chile. Place them into a food processor and roughly process.  You are making a salsa. Add a good teaspoon of lime juice, just eyeball it, to the mix and process.  No salt and pepper needed, or shouldn't be, but if you feel it needs it, go for it, to taste. Process till chunky. 


Black Bean Frijoles

Drain and rinse one 14.5-ounce can of black beans.  Place the beans in a sauce pan with one tablespoon vegetable oil over medium-high heat.  Add one heaping tablespoon of the roasted, processed salsa and stir that in with a pinch of salt and pepper.  Stir thoroughly and reduce the heat to low, cover and simmer for twenty minutes.  Afterwards, smash some of the black beans and add a teaspoon more of the roasted salsa. Add a little fresh lime juice. Remove from the heat, cover and set aside. 


Spicy Spanish Rice

2 cup rice, thoroughly rinsed
3 cups water
3 tablespoons roasted veg salsa
1 teaspoon salt
1 can (8 ounces) El Pato sauce
2 tablespoons vegetable oil

Place the rice and oil into a high-sided sauce pan over medium-high heat. Stir the rice for a few minutes while it toasts.  Add the water and elevate the heat to high. Add the salt and bring to a boil. Reduce the heat to low, cover and simmer for one hour, checking and stirring at the thirty minute interval. After the hour, remove the lid and turn off the heat. Let stand for ten minutes to release the steam.  Add the can of El Pato sauce and the salsa and stir to incorporate thoroughly. 

Chile Rellenos

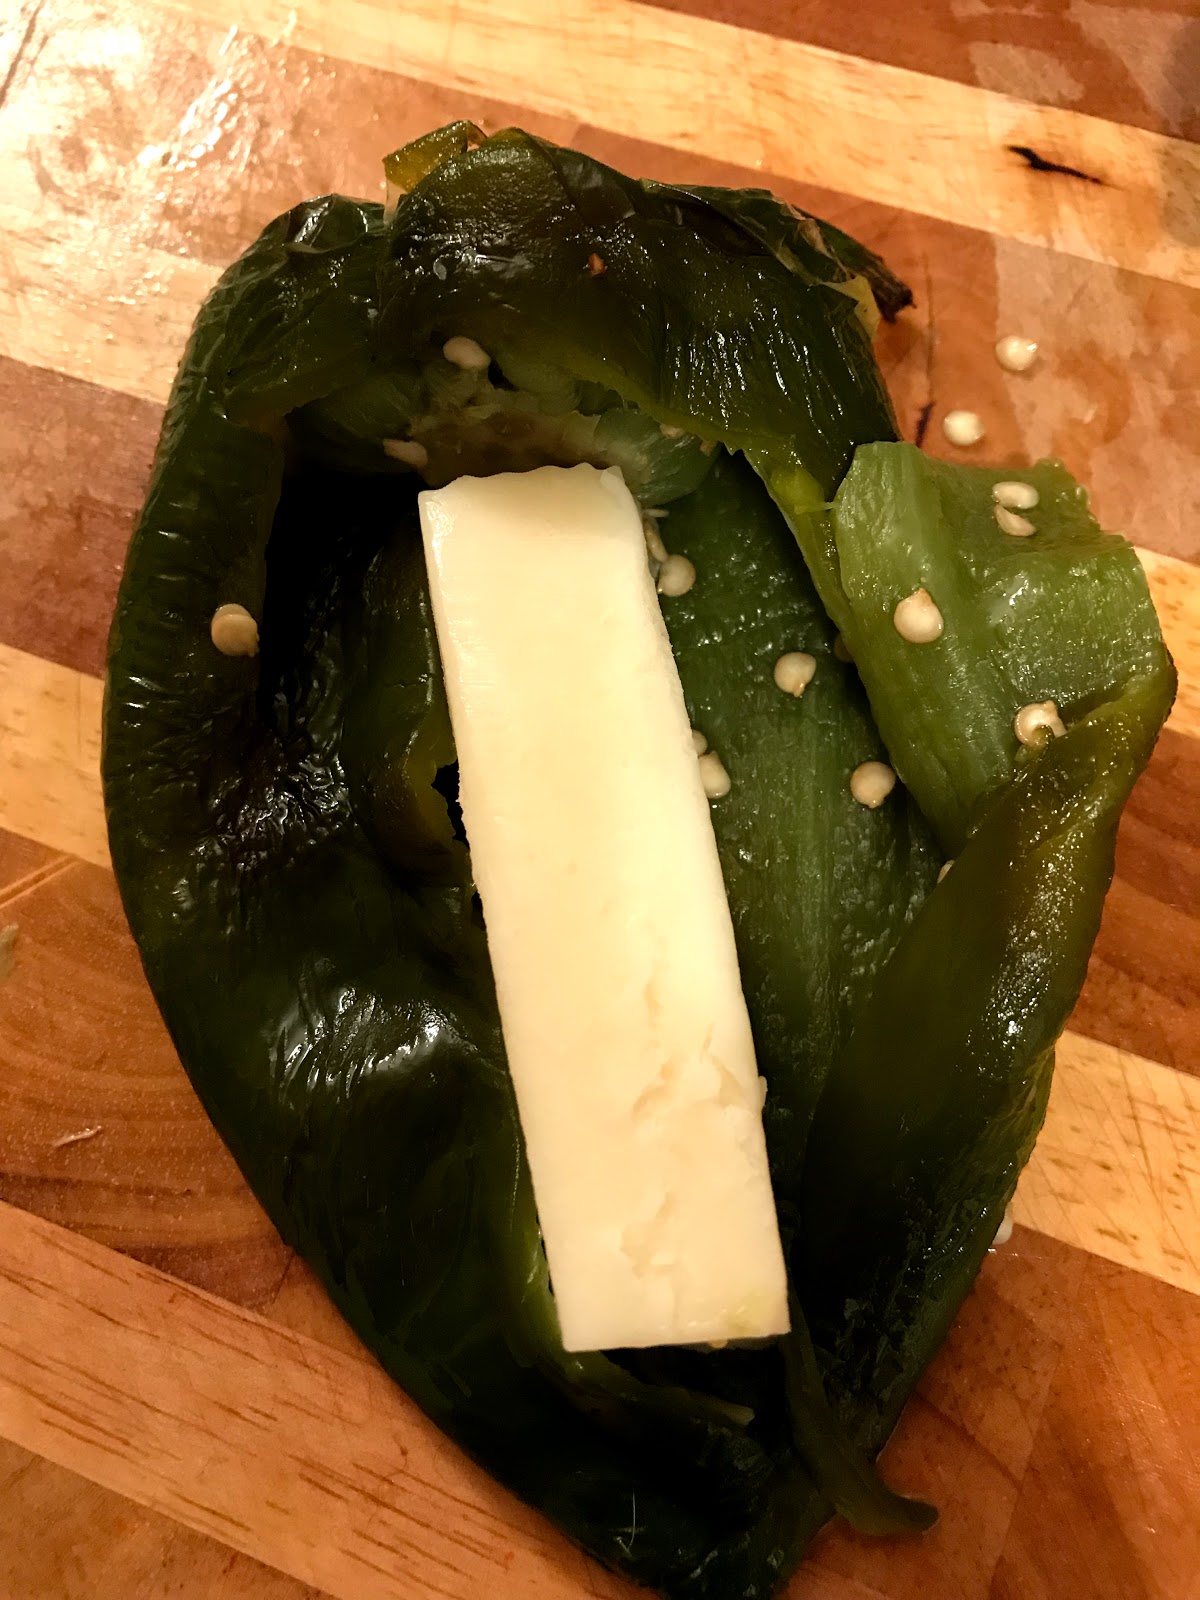
Earlier, I had roasted three pasilla/poblano chiles.  Anaheim green chiles are great to use, as well.  After the chiles have steamed and cooled, remove the skin from the chiles very carefully. Use a paring knife to gently cut a T near the stem top of the chile and open.  Try not to tear the back side. Cut or scoop out the seed base at the stem and gently scoop out as many of the remaining seeds as possible.  Add either a stick of Oaxaca cheese or a good amount of grated Oaxaca (or mozzarella) and fold the T closed.  


In a large bowl, add four - six egg whites and whip the eggs until they begin to solidify due to the air being beaten into the egg whites. Now, here is where my learning process really started.  In my first attempt, I cracked five eggs into a bowl and used a hand mixer to beat the egg whites.  But after twenty minutes, the mixture was looser than the the unbeaten egg whites!  

Don't do this at home, kids!!!!!

My great friend, Jonathan, a Chef from Panama, suggested I use room temperature eggs and beat them with a whisk, not a power utensil.  Oh, but the first time, I put the original eggs into my Ninja, to no avail after the hand mixer was a bust.  So frustrating!  Allowing the eggs to come to room temperature for about 35 minutes was the key and using a whisk for about ten to fifteen minutes made a perfect, thick batter.  Great arm workout!  

I carefully dipped the three stuffed chiles into the batter and placed them into a large skillet over medium-high heat with three tablespoons vegetable oil drizzled in.  Tip, do not place the egg battered chiles into the skillet until the oil ripples.  Then I reduced the heat to medium.  Pour any extra batter atop the T of the egg to hold the chile together. That is another tip I figured out, too. 


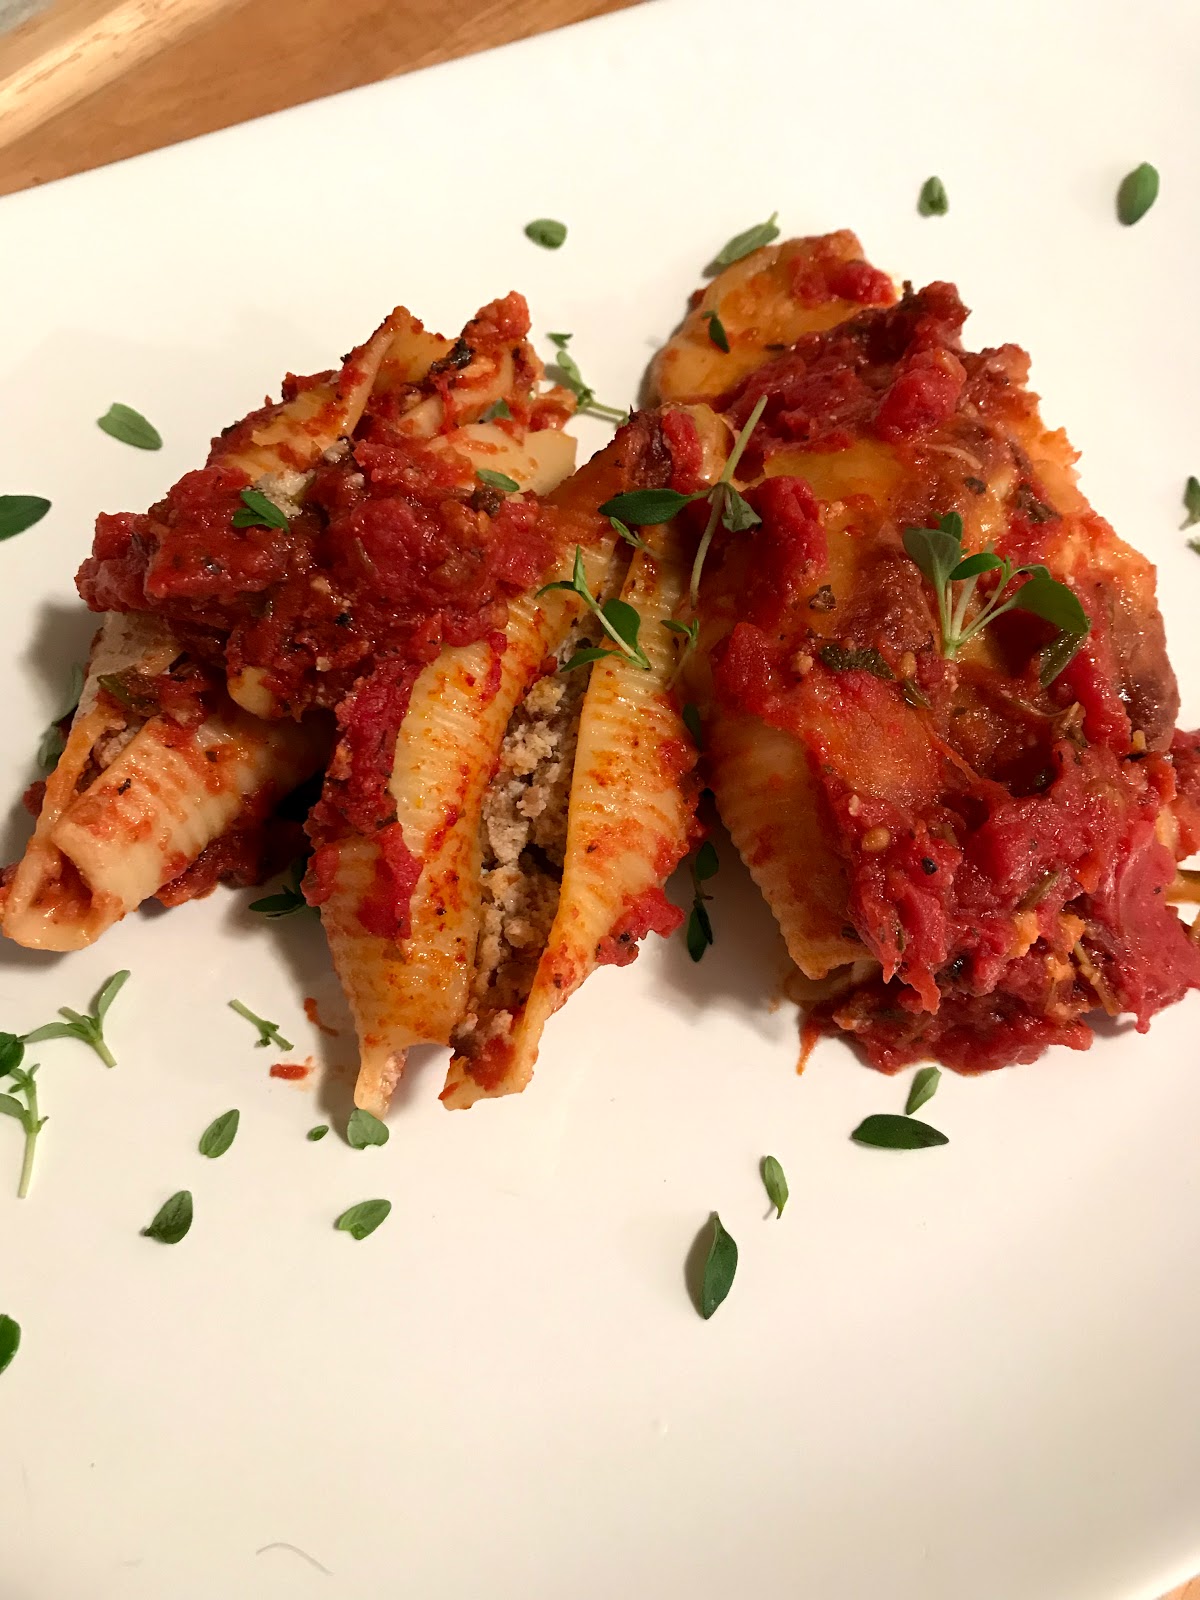
My chile rellenos did not turn out pretty, I know.  I cannot claim fame there.  Next time, since I now know the nuances of chile rellenos and egg whites batter.  However, allow the egg whites to turn golden and remove.  A little darker is not a problem.  You may see the cheese start to bubble and ooze out.  You Know they are done, particularly then.  

Serve with the Spanish Rice and the Black Bean Frijoles and you have a fantastic, fairly authentic Mexican Meal.  The flavors are savory, warm and aromatic.  Just a wonderful, complete, healthy meal. Despite having no meat, there is protein in the beans, carbs in the rice and vitamins in the chiles.  Delicious and healthy!


Add fresh oregano as garnish and drizzle the remainder of the roasted salsa atop a chile relleno and serve.  I had wanted to add cheese to the top of the beans and relleno but i forgot.  Forgive me. 

My recipe for the chile rellenos serves two or three, but you can change that to as many as you need. Adjust the eggs, two per chile relleno.  I used six eggs for three chiles. 


As always, Thank You for your time and consideration, friends!  Thanks for your visit!
Please remember that Food is Love.  With that, Go Cook For Someone You Love!!!

Addendum:  I am so embarrassed that I published the original document as it was last night.  I had worked on it for several hours yesterday and was so tired when finished, though I thought I had properly edited spelling and grammar, I obviously did not.  Please forgive the original unprofessional document.  While I may have missed something during this thorough editing, and while the way I write is the way I speak, some things may not sound correct to you, I believe I have fixed most issues.  Thank You for your patience with me.  I really wanted to finish and publish last night.  Lesson Learned:  Be professional and thorough. 

~Martin
In-House Cook 


One Skillet Hoisin Chicken Stir Fry Over Noodles

  One Skillet Hoisin Chicken Stir Fry      Over Noodles This is one of those "people who know me Know I am obsessed over Chinese food&q...