Sunday, July 20, 2014


Grilled Lamb Shoulder Chops with Parsley Mint Chimichurri and Marinated Romas

My family Never had lamb growing up.  Although my dad liked it, my mom hated it.  My aunt and maternal grandmother hated it, too.  I did not have lamb until three years ago.  Since then, I have blogged about lamb ribs, lamb chops, and more, brined, braised, roasted and grilled.  Today's short blog is all about grilled lamb shoulder chops which I'd marinated and served, with marinated slivered Roma tomatoes and garlic bread. Let's get to it, shall we?

Lamb chop marinade:
2 tablespoons extra virgin olive oil
2 cloves garlic, minced
1 shallot, finely chopped
1 tablespoon fresh mint and 1 tablespoon fresh basil, finely chopped
1 tablespoon Worcestershire sauce
2 tablespoons apple cider vinegar
zest and juice of one lime
salt and pepper, pinch each

Place the lamb shoulder chops in a large zip lock plastic bag.  Mix all of the ingredients in a bowl, mix thoroughly with a fork or whisk, and pour that into the bag with the chops.  Completely seal the zip lock and smush (yes, I said "smush") the ingredients around the chops.  Let them marinate for one or more hours.  I did not have that much time, so an hour, it was. Remove the marinate bag about thirty minutes before you start grilling so the meat can arrive at room temperature.

Marinade for the Roma tomatoes:
Slice into slivers Roma tomatoes; one per person.  Remove the seeds and ribbing. In a bowl, add:

1 clove garlic, grated
1 shallot, finely chopped
2 tablespoons extra virgin olive oil
1 tablespoon champagne vinegar
small pinch salt and pepper
 

Whisk the ingredients thoroughly and add the tomatoes to the bowl.  Refrigerate until you are ready to serve.  To serve, use a slotted spoon to remove the tomatoes from the marinade.  I served them over a fragrant bed or fresh basil leaves from my potted patio garden. 

The Chimichurri:
In a small food processor or blender, add:  2 tablespoons fresh leaves mint, 1 tablespoon fresh leaves flat leaf Italian parsley, 1 garlic clove, 1-2 tablespoons extra virgin olive oil, salt and pepper.  Process until the mix becomes thick like a pesto. 

When you are ready to grill, place your grill plate or grill skillet over medium-high heat.  If you are grilling outdoors, make sure you add just a little evoo on a towel or use a non-stick spray on the grill.  Although there is, of course, evoo in the lamb marinate. there are also ingredients that bring out the sugars in the meat and that will cause it to stick to the grill.  This is going to be so good!

When the grill is very hot, add the lamb chops.  Allow the chops to grill four to five minutes per side.  Immediately remove the chops and set aside.  If you want cross grill marks, change chop positions after three minutes and leave it for another three minutes.  

Remove the chops when done. It is alright if they are a little rare in the middle.  If you would like them more well done, leave the chops on for eight minutes per side. When you are ready to plate, add a few fresh basil leaves stem spine down so the leaf acts like a small cup.  Layer a few leaves to form a bed.  Using a slotted spoon, arrange the tomatoes over the basil.  After allowing the chop to rest for several minutes, up to five minutes, plate with the tomatoes.  Drizzle teaspoon fulls of the chimichurri over the chops.  Add a sprig of mint or rosemary, very commonly associated with lamb dishes, as garnish. Serve with your favorite bread and enjoy!


Thank You for your time and consideration!  
Enjoy and now...go cook something for someone you love!!!


Saturday, July 19, 2014


Kung Pao Chicken with Rice and Garlic Chips

I have mentioned in several previous posts that I am a great lover of Italian, Mexican, Japanese, Greek, and Chinese food.  There are plenty other genres of foods to add to the list, but not enough binary space and time.  One of my all-time favorite Chinese dishes is Kung Pao Chicken.  I have had it myriad ways; with celery, without celery; with peppers and without; with a ton of garlic (which I LOVE) and with very little garlic. I have to admit, I have never quite perfected that spicy, hot lite gravy sauce that punctuates it, but I have to say, I love my own sauce.  Shall we get to my recipe?  It is easy and above all, quite tasty!!!

Ingredients:
1 pound package boneless, skinless chicken thighs or breasts, cubed
 4 cloves garlic, finely chopped + 1 large clove sliced into chips
1 large yellow or red onion, chopped into squares/cubes about 1/2" to one inch, square
1 yellow or orange bell pepper, cubed
1 red or green pepper, cubed
1 stalk celery, cubed (but I did not, this time!)
1 serrano chile, seeded and finely chopped
1 pinch crushed red pepper flakes (if you want extra heat, like me!)
2 tablespoons vegetable or canola oil and a teaspoon Toasted Sesame Oil
1 tablespoon peanuts or slivered almonds
1.5 tablespoons aged Tamari sauce
pinch cracked black pepper
2 tablespoons Kung Pao sauce (which you can find at your local store)
1 teaspoon Hoisin sauce (also purchased at your local grocery store)
4 stalks scallions, greens sliced at an angle
1/2 teaspoon fresh grated or ground ginger
1/2 teaspoon fennel seed
1 teaspoon tumeric
1/2 teaspoon all spice

If you plan to serve this over rice or noodles, now would be the perfect time to get that started!

 
 Once you have prepped your vegetables and aromatics, and readied your spices, which, of course, you might want to add any other spices you prefer! add the vegetable and sesame oil to your wok or high-sided skillet.  Add the garlic chips and slowly increase the heat every few minutes (three or so minute increments) until you have reached medium-high and the garlic chips begin to sizzle and brown.  Remove the chips once they are a light golden brown.  Add the onion, chile, garlic and peppers and saute four minutes.  Add the sauces and incorporate thoroughly.  Afterward, move the veg off to the side of the wok or skillet and add the chicken cubes.  Allow the chicken to cook two or three minutes each side, then add the spices.  Toss all of the ingredients together, including half of the scallion greens, but reserving, still, the garlic chips. 


Continue tossing for four to five minutes over medium-high heat until the chicken has cooked, the onions have softened and the peppers have softened.  You just do not want the veg to become mushy.  Stirring or tossing allows them to maintain their texture.  All the while, your kitchen will be filled with an intense but extremely pleasant aroma.  


If you plan to serve this over rice or noodles, now would be a great time to plate it.  

I chose to serve my Kung Pao over rice.  In my previous post, from back in my early days of this, my three-year blog works, I served it over udon noodles.  I chose rice, this time, for a purely selfish reason.  I plan to make egg fried rice with seared pork belly tomorrow.  See?  Always thinking!  You could use a bowl, which might be a wise choice, but a rimmed plate would be quite fine, as well.  Place a paddle of rice either in the center or to the side of your plate, and layer the Kung Pao Chicken over part or all of the rice.  I chose to layer it over part of the rice for bright, contrasting colors.  I garnished with the scallion greens, garlic chips and slivered almonds.  What an aromatic, colorful dish!  

 
I hope you enjoy making a devouring this dish as much as I enjoyed doing the same!  
Thank You so much for your time and consideration!

Now, go cook this or something else for your loved ones!


Thursday, July 17, 2014


When Pasta Met Garlic
My Garlicky Pasta tossed in fresh garlic infused evoo, scallions, pancetta, more garlic, grape tomatoes and basil

Over the last two weeks I have spoken with two or three people, one of whom is a most fantastic fellow blogger, about how just about uncomfortable it is to cook without using garlic and onion.  For me, it is nearly impossible to cook without either of them.  Unthinkable! Unless it is a dessert.  However, I have been kicking around a pasta dish idea incorporating a lot of garlic and fresh aromatic vegetables and herbs.  I think, my friends, that I have done so pretty well!  Not only is this recipe a thirty minute or less meal, prep time included, unless you get distracted, but it will fill your kitchen and/or home with the most incredible aromas of garlic and basil and extra virgin olive oil and more.  It is fresh, colorful and above all fantastically flavorful.  Perfect summer fresh meal!  Let's get to it!

The Ingredients list is short and sweet:
1/2 pound your favorite spaghetti for two, a pound for four
1 pint grape or cherry tomatoes, halved at an angle (must be pretty!)
1 cluster scallion greens, cut at an angle (pretty!)
6 large garlic cloves, finely chopped or grated + two cloves sliced into chips
1/4 to 1/2 cup of cubed pancetta  
Parmigiano Reggiano shaved and a palm full grated
6 fresh basil leaves, chiffonad
4 tablespoons your favorite high quality extra virgin olive oil (I used a bottle of evoo gifted me last Christmas by one of my precious students whose family make it:  Olive Tree, Teresi Family Orchard, Acampo, California).  Some of the best extra virgin olive oil I have used!
Salt and Pepper

 
You can purchase the pancetta already cubed at most grocery stores, or, you can purchase it from a more traditional Italian deli counter and cube it yourself.  I love doing that, personally, but I bought a package already processed at the store.  To prep, halve the tomatoes at an agngle, along with the scallions.  Just makes a nicer appearing ingredient in the toss and garnish. As I  mentioned above, six fresh basil leaves, rolled up and chiffonad cut.  You can always tear the leaves, which is far more traditional.  

Start a large pot of water on the stovetop over high heat to boil the spaghetti or, your favorite long pasta.  Be sure to liberally salt the water when it begins to boil, as that is the best and about the Only time you can season the pasta. 

In addition, add a tiny amount of evoo to a small skillet and saute up the pancetta, allowing the bits to form a crust, over medium heat for several minutes.  About seven minutes.  This will add amazing flavor.  

Meanwhile, add the four tablespoons of evoo to a large non-stick skillet or, as I used, a non-stick wok.  And do not let me forget to tell  you what I learned in this process.  I KNEW what I was Going to do, but did not, and learned a lesson everyone who has cooked with oil before Knows.  I knew and I still made the  mistake, for which I am deeply shamed.  Add the garlic clove discs to the skillet or wok over warm heat, then to low in a few minutes.  To infuse the oil with the fresh garlic, you want to very slowly increase the heat over several minutes' time for the best infusion of flavor. 

I sauteed the pancetta in a small cast iron skillet to allow the bits to caramelize and form a crust. 

When the pasta has finished cooking to al dente, drain it and leave it in the colander until ready.  Elevate the heat of the oil to medium and after two minutes, to medium-high.  Remove the garlic chips and set aside for garnishment and treats for the cook!  

Alright.  Now to my embarrassing part of the story and the unfortunate lesson I learned.  I knew that once the oil was hot and rippling, I was ready to add the pasta followed by the finely chopped garlic, then the tomatoes three minutes later, followed by some of the scallions and some of the fresh basil a few minutes after that.  I meant to use my tongs or my hands to scoop out the pasta (I used a half pound, and, though it was hot, still, my hands and fingertips are very used to hot things) to place the pasta into the non-stick wok I was using.  Perfect for this type of dish!  I used a couple of days ago to make Kung Pao Chicken, which will arrive on this blog site tomorrow.  Stay tuned for that, please!  But no, I lifted the entire colander over to the wok and yes, water dribbled into the wok and my kitchen and I were splattered with hot oil like it was a geyser!  Luckily, it was not as bad as I just made it sound.  I was able to get out of the way and the worst part was, of course, the clean up afterwards. Had I used my hands or tongs to lift and place the pasta into the wok, it would have been a much more pleasant and cleaner experience.  

The oil in the skillet is rippling, smells fragrantly of garlic, and CAREFULLY lift the pasta with tongs, perhaps shake it out a little, and add it carefully to the skillet or wok.  Add the garlic immediately and toss aggressively.  Get the pasta good and mixed with the oil and garlic.  After two or three minutes, add the halved grape tomatoes and toss vigorously.  You do not want anything to sit and crisp.  Keep tossing!  Now add a small hand full of grated parmigiano reggiano to the pasta.  Toss!  After four or so minutes, add half or more of the chopped scallions and some of the fresh basil and continue tossing!  Very important to keep tossing!  The entire cooking time takes seven to eight minutes from start to finish.  

Turn the heat off when you are ready to serve and remove the skillet or wok from the heat immediately.  This is important so the pasta does not harden.  Use tongs to plate the pasta.  Make sure you get some of that crispy pancetta and the now warmed and tangy sweet tomatoes to add beautiful bright colors to your plate!  Add some of the remaining scallions and basil to garnish your plates.  Toss some of the shaved parmigiano reggiano to each pasta plate. 


Be sure to drizzle the extra virgin olive oil left in the skillet over the pasta.  What a fragrant and incredibly flavorful (I am still even surprised by how flavorful and aromatic it was, and I planned it to be that way!) meal.  Your family and friends will love it, unless they are not garlic people, but the chances may be pretty slim. I am also confident that you will be receiving many requests for you to prep this dish for your family and friends, repeatedly.  So, get ready!  

Thanks Very Much for the generosity of your time and consideration. 
Enjoy!
Now, go cook something wonderful - like This dish - for someone you love!
Thank You!


Saturday, July 12, 2014


Hi Friends!  I just wanted to take a moment to tell you a couple of things.  Foremost, I have been amazed at how awesome the social media world is and how supportive and generous so many talented and incredible people have been for my blog and myself.  I just want to say THANK YOU to those who persevere through my attempts at humor, my ramblings about so many things and yet who enjoy my food and let me know about it via social media.  I am totally Grateful!!!  That brings me to another item for discussion.  

It has been brought to my attention that you good folks cannot leave comments at the end of my posts.  I know some people have been able to pretty regularly, but I also know that many of them are already on Google, which may make a difference?  I do not know.  I have gone in to the system for a second and third time to enable comments, and as far as my untrained eyes can see, the comments sections SHOULD be enabled.  I hope it works for sure now for Everyone!   

In addition, I tried to go in to leave messages for my incredibly awesome loyal followers, and this is the funny part, even though this is my blog, I had to log in and follow my own self, and STILL could not leave a message for my AMAZING followers!  I will work on that IMMEDIATELY!!!  Miss R, you up for that challenge????  I was so excited this evening to log on to see another follower!  A die-hard eighth follower!!!  Uhhh, it was me.  Imagine my red cheeks and burning ears.  Oh, the embarrassment!  But, life goes on.  

Most importantly, I am excited because I am looking forward to blogging a new lamb recipe, calzones and more!  Please stay tuned, and again THANK YOU to all of my followers and Google friends and all of those awesome folks who engage me on Twitter, Facebook, Instagram and more recently, Pinterest.  Again, THANK YOU!!!  Have a great night!!!

Martin
Your In-House Cook

Wednesday, July 9, 2014


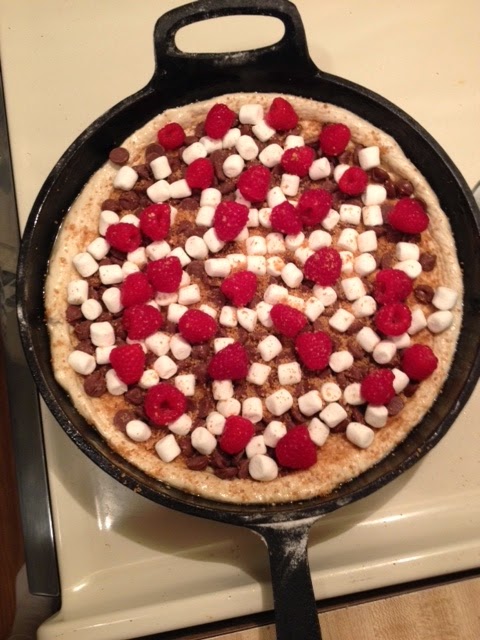
S'No Worries S'Mores Pizza with Raspberries

I am quite sure I have mentioned previously that when things weigh heavily on me, I go to the kitchen.  I cut or pinch fresh herbs from my potted herb garden, I chop onions aggressively (and yes, I have all of my fingers) and I eat.  My go-to ingredient, which, I have also argued previously and forever shall, and which gives me comfort, is chocolate.  I had an incredible craving for something out of the ordinary and something that would neither break the bank nor take a ton of time nor be too difficult.  Something chocolatey and flavorful and fun.  This is what I came up with.  The title tells you that once you have a slice of this pizza, you have no more worries!  Without further ado, let's get to it!

There are only six ingredients for this decadent and versatile pizza.  Here's our starting line-up: 
1 ball fresh pizza dough
1 cup Ghirardelli milk chocolate chips
2 individual packages of granola bars (4) (or you can use the more traditional graham crackers, but I will explain why I used granola bars later)
 1.5 cups mini marshmallows
2/3 cup fresh rinsed raspberries
2 tabs butter, melted
 
flour for dusting
non-stick spray


 Preheat the oven to 350 degrees.  

In a blender or food processor, or food chopper, or even in a zip lock bag with the air fully smushed out of it (yes, smushed) and pounded with a rolling pin or small skillet, grind up the four granola bars into a loose granulated consistency.  Meanwhile, melt the two tabs of butter and take out a brush to use momentarily. 

As shown above, dust a large wooden cutting board or your pastry marble or marble counter top, knead and roll out your pizza dough with a flour dusted rolling pin.  Try to for a disc, but rustic is okay. 

Spray a cast iron skillet with non-stick spray.  If you are not using a cast iron skillet, add a little flour to your pizza stone or baking sheet and lay the rolled-out dough onto that.  Crimp the perimeter so as to keep the chocolate and the marshmallows on the pizza.  Brush the entire top disc, crimped perimeter, included, with the melted butter.  Using a spoon or your hands (it is much more fun with your clean hands) sprinkle a thin layer of the granulated granola bars over the pizza dough. Add the cup of chocolate chips (and not the "one for you, two for me" method) to over the granola layer.  Repeat with the marshmallows.  

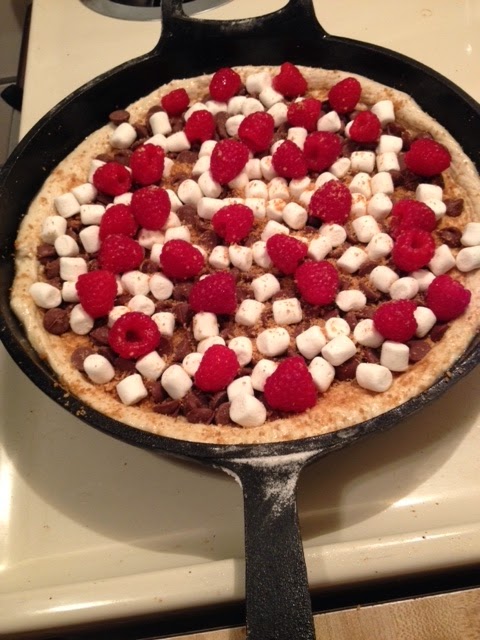
This last ingredient was a last minute decision, but I was inspired by a new friend who made a dish called a Clafoutis.  Therefore, I added raspberries to my pizza.  I love raspberries with chocolate, which is the only reason for my use of raspberries over any other berry.  Trust me, however, the tang of the raspberries with the lusciousness of the chocolate, and the sweet, honey flavor of the melted sugars of the granola bar (the reason I used those over graham crackers) all work together to create a wonderful, decadent chase-your-worries-away dessert.  It is quite rich, and a small piece will satisfy your craving quickly.  Then you have a whole new set of frustration to deal with.  Wanting more but unable to eat that much!


Okay, you caught me, this second photo was just for fun!

Bake for twenty minutes and remove from the oven.  The cast iron skillet will remain consistently heated (the reason I love cooking with them) and will continue to cook the softer part of the pizza dough for several minutes more.  The marshmallows should be a wonderful golden brown.  Your nose will tell you when you are getting near that twenty minute mark, I assure you. Allow the pizza to cool for ten minutes, at least, before serving. 

  
  My friend, Miss Maria, said it would be awesome to serve it with a dollop of fresh whipped cream.  Sadly, although I love just about Everything milk and dairy related, I do not like whipped cream.  If you like it, go for it!  My  mom would serve it with vanilla ice cream on top and allow it to soften before devouring.  Whatever you happy toppings are, enjoy.  This one is so simple, thirty to forty minutes TOPS, in prep and cooking time, is all you need.  Enjoy, Thank You for your time and consideration.  
Now, GO COOK SOMETHING OR SOMEONE YOU LOVE!!!


Tuesday, July 1, 2014


Fake Out Chile Verde Carnitas Tacos 

Yes, I know, I have posted my Chile Verde Carnitas before.  I have just tweaked it a little to be quite the versatile dish.  I have been on a pulled pork taco craze lately, but wanted a totally different flavor; I have been making guajillo sauce for these dishes;  this time, I used a green chile verde salsa for a tangy flavor.  I love it! Hope you will, too. 

I originally posted my Carnitas as part of my College Foodie series. It was served in a bowl and eaten with a spoon.  But, being the Taco-holic that I am, I wanted a thicker sauce and I wanted to use the chunks of trimmed, chopped pork shoulder for my taco meat.  Wonderfully diabolical plan, don't you think? 

The dishes I created for my College Foodie series were affordable, fast, convenient to prepare (little to no hassle, in my point of view, perhaps not in the eyes of a college kid on the go, I do recognize!), delicious and with Just the right amount of leftovers.  College kids are not too big on leftovers, I have learned (I was, so this new trend was all new to me!), therefore, having one lunch or dinner left over amounts is good, so as not to waste food.  When my son goes back to college for the new fall semester, I will be back at the series again. Stay tuned for that!  But, I digress.  Back to business!

Let's get to the recipe.  I call this my Fake Out dish, because, for the sake of time, I bought two one-pound packages of chopped up pork shoulder pieces (usually used for stews or stir fry), one large bottle of my favorite salsa verde, one large can of roasted green chiles and a can of chicken broth/stock.  Rather than use a large pork butt shoulder roast and make the sauce from roasted Anaheim chiles and tomatillos and cilantro, onion and garlic, sear the roast and braise it in the homemade sauce for four or so hours, I cheated.  Yes.  There!  I said it!  I cheated!  

Here is what I did to get nearly the same flavor as carnitas from scratch in a quarter of the time.  

Ingredients:
2 one pound packages of pork bits
1 yellow onion, finely chopped
3 cloves garlic, finely chopped or grated
1 can whole roasted green chiles, and chop into half inch squares
1 can diced roasted green chiles
1 large can corn kernels in water
1 large bottle of your favorite chunky salsa verde
1 can chicken broth or stock
1 tablespoon smoked paprika
1.5 teaspoons pasilla powder (or, your favorite smoked, ground chile powder)
1 teaspoon crushed coriander seeds
1 teaspoon cumin seeds 
1 teaspoon ground cumin
half palm full of thme (fresh or dried)
the zest of half a lemon or lime, and the juice of one lime or half a lemon
salt and pepper to taste 
extra virgin olive oil to lightly coat the bottom of the pot

In a large pot over medium-high heat, add extra virgin olive oil to lightly cover the bottom of the pot.  When the oil ripples, add a few coriander and cumin seeds and a little garlic to flavor the oil  Add the pork meat to the pot and saute.  Stir immediately to mix the meat with the seeds and garlic so they do not burn.  Once the meat has begun to caramelize, add the rest of the seasoning to the pot.  Stir to coat the meat with the seasonings. Allow to saute at least five minutes, reducing the heat to medium to prevent seasoning from burning.  Once the meat is about half cooked, add the diced and chopped green chiles and incorporate thoroughly.  


Next, add the aromatics:  the onion and garlic!


Stir to mix the meat and veggies very well and saute for several more minutes, about four, before you add the salsa verde (whole jar, about 20 ounces), the can of corn and the entire box or can of chicken stock (about two cups).  

Stir thoroughly and allow to simmer for one hour over low heat, mostly covered. The aroma will fill your kitchen with amazing scents!


 A little trick to add even more acidity:  add two tablespoons or even a quarter cup of either apple cider vinegar or pickled jalapeno juice.  Trust me, the flavor is incredible!

After allowing the mixture to simmer unattended, mostly, except for an occasional stirring, which is more me being happily anxious to eat than anything else, for forty-five minutes, uncover and simmer for fifteen minutes more on low-medium heat.  The sauce will reduce by nearly half and thicken.  

After a few minutes, you are ready to serve tacos!  I used a slotted spoon to scoop up meat, corn, onions and chiles for my tacos. 


 The versatile part of this meal is that you can scoop out all of the meat and store separately and serve this a basically meatless soup. Or, simply serve it as soup with or without the meat!  

Thanks for viewing this versatile recipe.  I appreciate your time and consideration.  Now, go cook something for your friends and loved ones!


My Waaayyy Overstuffed Baked Potatoes

  My Waaayyy Overstuffed Baked Potato Last Thursday my spouse and I went out to run errands and we ended up eating at a local eatery. As we ...