Thursday, July 23, 2015


Another Episode of.....
What I Have Been Up To In My Kitchen!

Hello, Friends!  Welcome to another episode of What I Have Been Up To In My Kitchen!  I have a couple of recent recipes to briefly share with you, including my "Everything But the Kitchen Sink" BBQ Sauce, an ALL NEW recipe!  In addition to pork ribs, and the interesting story behind why I oven roasted them, I am going to share with you my seared Rib Eye steak with oven roasted potatoes and broccoli.  There is more, but that description is coming later. 

One week this summer, between an extreme heatwave and regular hot summer temperatures, we had a week of humid, cloudy, monsson-like weather with mild temperatures.  It happened to be that week that I had purchased a beautiful slab of pork ribs and wanted to use my grill, finally.  As it turned out, and I have had this problem previously, between the scattered showers and the humidity, the charcoal would not light. Oven Time!  In order to accommodate the huge slab of pork ribs, I divided it into thirds and placed two on one baking pan lined with foil with a rack over that, and the larger of the three on another.  I wanted to let the meat rest and come to room temperature before slow and low roasting them at 250-degrees for one-and-a-half hours, covered with a little water in the bottom of the baking pan, about a third of a cup, to keep things moist.  I liberally applied my bbq spice rub and set the slabs on their racks.  

My spice rub:
2 large rounded tablespoons of smoked paprika
1 tablespoon sea salt
2 teaspoons ground black pepper
1 tablespoon pasilla powder
1 large rounded tablespoon ground cumin
1 large rounded tablespoon garlic powder or granulated garlic
1 large rounded tablespoon onion powder
1 tablespoon thyme
1 tablespoon oregano 
2 level tablespoons brown sugar
1 teaspoon ground cloves

I gently toasted the spices in a small skillet over low heat until the spices began blooming and releasing their fragrant aromas. I then ground them together in my spice grinder, as the oregano and thyme were dried leaves.  It is also an incredibly fast and easy way to quickly and thoroughly combine all of spices evenly. 

 
 I covered the ribs with foil and placed both pans in the oven to roast for 1.5 hours, low and slow!  I uncovered after that and allowed them to roast another thirty minutes before cranking up the heat and applying the sauce.  Speaking of the sauce, let's get to my "Everything But the Kitchen Sink" BBQ Sauce!

EBTKS BBQ Sauce Ingredients
1 tablespoon extra virgin olive oil
2 tablespoons Worcestershire Sauce
1/4 cup Hoisin sauce
2 tablespoon Plum Sauce or berry jam
2 tablespoons low sodium Soy Sauce, or, Shoyu
2 tablespoons red wine vinegar
2 tablespoons Mirin, Rice Wine Vinegar
1 teaspoon liquid smoke
3 cups ketchup
1 tablespoon smoked paprika
1 tablespoon onion powder or granulated onion
1 tablespoon garlic powder or granulated garlic
1 teaspoon cumin powder
1 teaspoon ground cloves
1teaspoon ground thyme
1 teaspoon sea salt
1 teaspoon black pepper
1 rounded tablespoon of brown sugar or 1 tablespoon of molasses
1 tablespoon pasilla powder or cayenne


Bring the mixture to a boil and simmer over low heat in a medium sauce pan for one hour.  It should have reduced by half.  Remove from the heat and allow to cool.  The sauce will thicken. The flavors will fill your kitchen and place with incredible aromas!  Scrape the sides and bottom of the sauce pan every fifteen or so minutes and redistribute the sugary mass that will develop.  As the sugars release, they will form a film.  That is flavor intensified!  Be sure to redistribute them!
 
Remember, I uncovered the ribs after 1.5 hours of slow roasting, and by now the water should be evaporated and replaced by the rendered fat of the ribs.  Roast, same temperature, for another thirty minutes.  Afterward, crank the heat to 400-degrees.  Using a brush, slather on the BBQ sauce generously (this makes a big batch) and roast for seven or so minutes.  The sauce will begin to caramelize and form a crust.  Using tongs, turn the ribs, slather on sauce, roast for about eight minutes.  Flip, and repeat at least one or two more rounds.  


Remove the ribs and place them on a thick cutting board or chopping block.  Let the slabs rest for about five or ten minutes. Using a sharp chef's knife or cleaver, chop or slice and separate the ribs.  Add extra sauce if you wish, but the multiple caramelization of sauce will be thick and sticky.  


 Serve with your favorite sides and Enjoy!

Now, onto the Extreme Comfort Food dish I felt compelled to make myself last night....

Cast Iron Skillet Seared Seasoned Rib Eye Steak with Blue Cheese, Garlic and Herb Compound Butter, Garlic Oven Roasted Broccoli and Garlic and Rosemary Oven Roasted Smushed Baby New Potatoes. 

 
 It is well-known about me that when I am a bit blue, I become a wild and creative machine in my kitchen, creating comfort food for the bruised soul.  Yesterday was one of those days, and yes, I made Extreme Comfort Food for the soul.  I purchased a large, thick, 1.4 pound ribeye steak, a bag of multi-colored baby potatoes, and a bag of fresh-frozen broccoli (Remember my talking about budget pantry meals?  The broccoli was a leftover from that series).  This is a perfect meal for those with the blues, Hellooooo!!!! it is not mandatory to be blue in order to make this!  It could be just for the fun of it!

I brought to complete room temperature 3/4 of a stick of butter.  In a bowl, I mushed the butter with a fork and mixed it together thoroughly with half a small container of blue cheese, about a quarter of a cup, two cloves garlic and two tablespoons of flat-leaf Italian parsley, finely chopped.  I did not roll it in waxed paper to make it a pretty roll, I just left it in the bowl and refrigerated it.  It was just me, after all!

Next,  I washed my vegetables.  I set the heat to 400-degrees to preheat the oven.  I pulled out my large cast iron skillet and two small skillets.  In the small skillets, I added two tablespoons of extra virgin olive oil, each skillet.  I tossed the potatoes with finely chopped garlic and fresh washed rosemary sprigs in one, and tossed the broccoli in evoo and a teaspoon of finely chopped garlic in the other.  I placed the potatoes in the oven first, once preheated, as it would take the longest.  By-the-way, I had ten baby potatoes in the skillet.

 Meanwhile, on a plate, I drizzled extra virgin olive over the steak to moisten it and simply seasoned it with salt, pepper, a little fresh rosemary leaves,  a half teaspoon of smoked paprika, both sides of the steak.  I love the crust these three create on meats.  That is just me.  Salt and pepper are actually just fine.  


 While the potatoes roasted, I brought my large cast iron skillet to high heat and added the steak to it.  I did not add evoo since I had the steak slightly marinating in it on the plate.  I seared the steak for about five minutes and turned it, and yes, it released from the skillet easily, so the sugars had developed and formed a crust along with the salt, pepper and paprika. I seared the steak about two minutes before reducing the heat to medium.  I removed the potatoes from the oven and added the cast iron skillet to it to finish the steak. 

I had placed the potatoes skillet on the still hot burner the cast iron skillet had been on, and using a coffee cup, smushed the baby potatoes.  I also removed the rosemary sprigs.  

After seven minutes, I removed the cast iron skillet (I wanted my steak fairly rare) and placed both the potatoes and the broccoli into the oven for another fifteen minutes.  Afterward, I'd removed the two skillets (both oven safe skillets) and enjoyed the aromas of the garlic and rosemary. 

I placed the mostly crispy broccoli onto the plate, layered the steak over it, and added smushed potatoes beside the steak.  I placed a dollop of the blue cheese butter atop the steak, which began to melt immediately.  The blue cheese aroma with the herb and garlic was amazing!  Perfect Extreme Comfort Food dish for the blues!!!  

I garnished the plate with a bit of chopped Flat Leaf Italian Parsley and the potatoes with a little bit of grated parmesan cheese.  

As I said, you do not need to have to blues to enjoy a great meal with blue cheese!

Thank You for your time, gentle readers, and now go cook something for someone you love!


Saturday, July 18, 2015


Guest Blogger
Jack Knight
Jack Knight Cooks
Cookbook Quiz!!!
Hello Gentle Readers!  Thank You for joining me for my second Guest Blogger post.  So pleased to have my Best British Friend, Jack Knight of Jack Knight Cooks (Jackknightcooks.wordpress.com) write for us based on a recent passion of his.  Jack loves cookbooks, vintage cookbooks, particularly, and old family recipes, of which he has boxes and folders full of them from many, many years back.  He has graciously posted his favorite cookbooks for us and, he has graciously created a quiz for us! Please take a look at what Jack has in store for us!  Thank You!
                                               Martin
                                               In-House Cook


Hello everybody. Jack Knight, Martin's guest blogger in residence here. Did you all miss me?
To mark my return to the role, I've decided to tell you a bit about my favourite cookbooks. This is inspired by a series of posts on a site called Serious Eats.
I hope you like this post. Maybe we could persuade Martin to take part?

The Jack Knight Cooks book quiz:
How many cookbooks do you own? The truth. - I have about 170 books and twenty folders and notebooks full of recipes. A little obsessed I know. I used to have over 300, but before I moved to Hampshire from Essex, I did a mass clear-out. Anything that didn't pass the test got donated to a nearby secondhand book shop.
What do you look for in cookbooks? - Good old-fashioned home cooking. None of that bloody "towers of risotto and sprinkles of ostrich eyeballs" shit for me, what Elizabeth David very aptly called "theatre on a plate".
I also like a good well written text, especially if it tells the story of the author in the kitchen.
Which ones do you go to when you're entertaining? - I am currently building a repertoire for entertaining. Thus far I've found How to Eat by Nigella Lawson and Jamie Oliver's Italian book best for ideas for appetizers like bruschetta.
Which ones are your go to baking ones? - I love the Hummingbird Bakery books. Their cupcakes and layer cakes are divine. I also like Brilliant Bread by a young guy called James Morton and The Boy That Bakes by Edd Kimber.
What are the ones you go to for everyday cooking? - I love Small Adventures in Cooking by James Ramsden for everyday food. I also like Donal Skehan's books. Do check them out.
What's the most used cookbook on your shelf? - The most used cookbook is Nigel Slater's Kitchen Diaries. The brownie recipe in that book is the best one ever.
Which lesser known cookbooks/authors do you feel deserve more recognition? - I think that us Brits need to know more about Amanda Hesser, and Americans should know about Delia Smith. They are both wonderful writers.
And the books that I feel that every one should have are The Essential New York Times Cookbook and Cooking for Mr Latte, both by Amanda Hesser. The former is a compilation of the best recipes from across a hundred and fifty years of food writing in the New York Times; the latter is a collection of Ms Hesser's articles telling the story of her romance with her now husband, Tad Friend.
Which titles do you recommend for a beginner cook? - Anything by Jamie Oliver, Nigel Slater or a British food writer called Delia Smith.
What was the first cookbook you ever brought? - The first proper cookbooks I ever purchased were Jamie Oliver's The Naked Chef book, and a boxset of classic cookbooks, Elizabeth David, Jane Grigson, that kind of thing.
What cookbooks have you brought recently? - A book of recipes for European peasant food. I am also awaiting a delivery of the books that were published to go alongside the second, fourth and fifth series of BBC's Great British Bake Off.
What future cookbooks are you most looking forward to? - Nigella Lawson's latest, and anything written by Nigel Slater, or the team behind the Great British Bake Off.
But one cookbook I would really like to purchase is if and when my friend and fellow food blogger, Sebastian Holmes,  who is a chef at a London restaurant called the Smoking Goat, writes one.
Electronic cookbooks or proper ones? - Proper ones are best for reading and cooking from. I have no time for electronic book readers. I am reminded of a great quote I read somewhere: We need to make books cool again. If you're dating someone and you go to their place, if they don't have any books, don't fuck them.
Do you mind having secondhand cookbooks or do you prefer brand new? - I love new cookbooks, but I adore secondhand ones. Particularly ones that have notations from the previous owner.
A friend of mine once brought a book on baking and it was just full of notes. The author's apple cake was thought excellent, a moist chocolate cake however was thought "As dry as a nun's fanny". My, how she giggled.
Do you write notes in the margins of your cookbooks? - Yes, of course I do.
Finally, which food writer, living or dead, would you most like to have a meal with? - Why that's easy. Elizabeth David. We'd have French omelettes and champagne, followed by coffee and her chocolate cake from French Provincial Cooking. We'll talk about food and books. Oh how I wish I was doing this right now.


Thank You, Jack!  You have an incredibly awesome and varied collection!!!  I love your culinary passion, sir.  Thank You so much for sharing with us!!!


Below are just a scant few of my cookbooks.  I have a ton  more in my bedroom.  You cannot tell that I am a huge Rachael Ray fan, right?  Love her or not, if it were not for "30 Minute Meals with Rachael Ray" back in winter of 2004/2005, I would not have found my passion in cooking. 


If you have not yet found your passion, such as mine are teaching, writing and cooking, I do hope you find yours.  I am living proof that you are NEVER too old Nor too young to find your passion!!!
Now, Go Cook something for someone you love!!!
Enjoy!


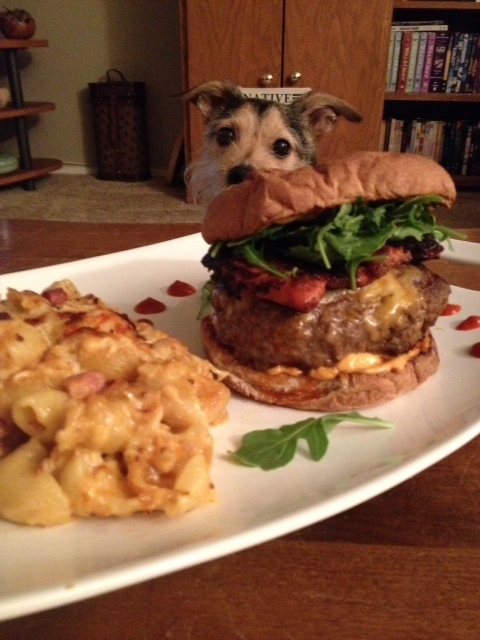
Chipotle Burger with Seared Pork Belly and Sriracha Pork Belly Mac and Cheese

Sometimes in life you have to deal with disappointments.  It happens to all of us and we all deal with it in different ways. What do I do when I am a bit blue?  I make comfort food.  Interestingly, I think I have finally decided what my niche in this culinary business is:  comfort food.  I am at my most creative, and possibly most deliciously self-destructive when I have the blues. My most oft viewed dishes have been when I was mad, sad or disappointed, just outright blue.  How funny and ironic is that?  I really  need to find a creative balance so that I create awesome, thoughtful dishes All the time!  Guess I am work in progress, huh?

So the other night I received a bit of disappointing news. Life in the big city news, something that just couldn't be helped.  And like everyone's Grandma, I went directly to the store and got busy in my kitchen cooking up a storm.  Isn't that what most Grannys do for their kids or grand kids who either come to visit or who are unhappy?  Mine always did. From the minute we arrived at my Grandma P's house until the minute we left, my Grandma was in and out of the kitchen, the most amazing smells wafting with her from the kitchen.  I still remember those myriad aromas, savory and sweet, both.  Perhaps that is why I always go directly to comfort food because those visits with my Grandma and Grandpa were always comforting, as they were very loving people.  My problem now?  I just called myself an old granny.  Oyyy.  But, I digress.  I have an awesome, and I mean AWESOME burger and mac and cheese recipe for you!!!  Let's get busy with it!!!

Unsure as to why I threw this flavor combination together, but I wanted smokey and spicy, so I made a burger incorporating Chipotle seasonings into the burger, topped it with sriracha seared sliced pork belly, garnished with fresh baby arugula to incorporate arugula's peppery flavor, and slathered the top and bottom of the bun with sriracha mayo I'd spiked with Chinese garlic chili sauce. 

Burger Mix
2 pounds ground beef ( one pound lean, one pound chuck)
1/4 finely chopped onion
2 cloves garlic, finely chopped or grated
2 tablespoons Chipotle in Adobo, finely chopped
1 teaspoon Chipotle powder
2 tablespoons smoked Paprika
1 tablespoon ground cumin
2 tablespoons Worcestershire sauce
1 teaspoon sriracha sauce + 2 tablespoons sriracha sauce (this for the pork belly)
salt and pepper, about a teaspoon each
1/4 pound pork belly, sliced in to eight pieces (two per burger)
extra virgin olive oil
3/4 cup sharp cheddar cheese


Place one small skillet over medium-high heat.  Add a small drizzle of evoo to the skillet.  Once the oil ripples and flows like water over the skillet, add the pork belly.  It will sizzle and maybe smoke a little, so you may want to turn on the hood fan. Add a drizzle of sriracha atop each of the pork belly slices.  When the bottom crusts, flip it and add sriracha to the seared side.  After four minutes, flip it again for another two.  This allows the sauce to crust onto the pork belly. This will smell absolutely incredible!


 Score the meat after mixing and create four equal sized burgers.  I was able to do that and have a "chef's treat" mini patty.  Set that aside for bit and let the meat come to room temperature, about thirty minutes.  

Next, you can add a little evoo to a large skillet, but, I used my cast iron skillet, so I did not need to add evoo to it.  Over high heat, I added a little salt and pepper, top and bottom, to each burger and allowed them to sear until they had formed an amazing and aromatic crust, about six or seven minutes.  Once again, the range hood fan should be on high, as the meat will cause some great smelling smoke. Test a burger to see if it is ready to be flipped.  If the meat sticks to the skillet, do not forcefully try to scrape it up.  Allow it to sear further.  It will release on its own once the sugars develop.  Once you have flipped the burgers, reduce the heat to medium.  Add the cheese to the top of the burgers, add a foil tent to it and allow the cheese to fully melt so it drips over the sides of the burgers.  


Finally, toast the buns, whatever buns you decide to use.  I sprayed them with evoo and sprinkled some garlic powder on them.  That is one more bit of added flavor that I love to do for my burgers. I put sriracha mayo on the top and bottom of the buns, added a cheesy burger, the sriracha seared pork belly and arugula atop that.  Incredibly warm, spicy, tangy  flavorful burger.  Every bite is an adventure in flavor!  The mac and cheese accompanying it is just as radical!!!


Now, ready for the mac and cheese?  I call it my Seared Pork Belly Sriracha Mac and Cheese. I used five different cheeses:  Pepper Jack, Mozzarella, Chipotle Cheddar, Fontina (one of my favorites!) and Extra Sharp cheddar. 


 Here are the other ingredients
1/2 onion, finely chopped
3 cloves garlic, finely chopped or grated
1 cup of diced pork belly
2 tablespoons + 1 tablespoon sriracha sauce, separated
1 pound large, grooved macaroni elbows
1/2 cup buttermilk
1/2 cup parmesan cheese for topping the mac and cheese
2 tablespoons evoo + two tabs butter for the roux
3 tablespoons flour 
salt and pepper, 1/2 teaspoon each for the roux
1/2 cup beer or wine (for "growed up" mac and cheese) to deglaze the pan

Everyone has their own mac and cheese recipe and their own way of making it.  There really is not wrong way to do this, unless you burn it, but here is how I make mine. 

First, preheat the oven to 400-degrees.

Starting bringing four quarts of water to a boil in a large pot.   

Grate the cheeses and prep the garlic and onion. 

In a large, high-sided sauce pan, add a small drizzle of evoo over medium-high heat. Add the cup of diced pork belly and allow it to crisp up, about five to seven minutes. Remove and set it aside in a bowl.  Next, reduce the heat to medium and add the garlic and onion and allow it to saute, about three or four minutes, until the onion begins to soften. Some of the fat in the pork belly, which has considerable fat content, will have rendered.  Remove about half of it, to remove some of the sodium content, and add the evoo and butter.  Add the flour and buttermilk and whisk it well and quickly to break up and cook the flour.  Add the two tablespoons of sriracha to the roux. Add the beer or wine, IF you are making a grown up version, otherwise just leave it out, and begin to add the cheeses, a good rounded cup of each.  If you need to add more milk, add it a splash at a time.  You do not want to overdo it on the buttermilk.  You want the mixture to be gooey and thick. 


By now, the water in the large pot should be at a roiling boil.  Liberally salt the water, as it is the only chance you have to season the macaroni. Boil the macaroni elbows according to the directions.  Now, I'd picked up a particular macaroni that I will be using from now on. The elbows are larger than usual, they have grooves on them which picks up and keeps sauces and in our case, cheese, that clings to each bite.  Flavor!!!  Drain the macaroni in a colander and add it right back to the sauce pan with the cheese mixture. Do not worry if there is pasta water still in some of the macaroni.  This is a good thing!  It helps the cheesy mixture cling better to the macaroni!


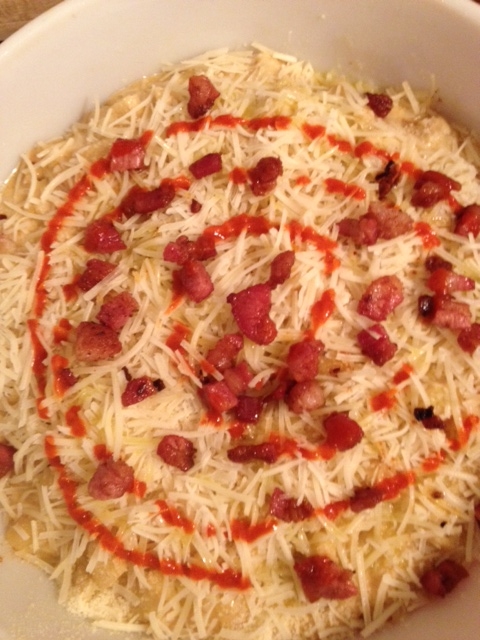
 Stir the macaroni into the cheese mixture and get it all coated and incorporated.  Once you have tossed it to your satisfaction, add it to an oven safe bowl or baking pan.  I used the  60- year- old Pyrex my Aunt gave me a few years ago.  You can see it in various mac and cheese recipes I have blogged previously.  Top the mac and cheese mixture with grated parmesan cheese, sprinkle the crisped pork belly bits atop the parm and add a drizzle of the sriracha.  I made a circular pattern, but you do what you want.  I was feeling fancy, if you can call that fancy.  Let's take a look!


 Ready for the oven, just about!  Drizzle some evoo atop the parmesan and sriracha.  This will help the cheese to brown up and crisp up!  Bake in the oven at 400-degrees for
40 minutes.  Some people cover it for thirty minutes, then uncovered for fifteen or twenty minutes, but I just baked it for forty minutes uncovered.  


Now, time to plate your dish!  I made four burgers, and this batch of macaroni and cheese will serve eight, easily, with leftovers to spare!  And who doesn't like luxuriously decadent mac and cheese leftovers?  Here's a little photo essay.  Try to spot the jealous vulture!!!  


As always, dear gentle readers, Thank You for your time and consideration!  Now, go COOK SOMETHING GREAT for someone you love!  Or a lot of someones you love!!!
 

Friday, July 10, 2015


Sausage Stuffed Roasted Onion Shell over Saffron Scented Couscous

I saw a recipe about stuffing an onion "shell" on Facebook, and decided to recreate it in my own way.  The original recipe (WISH I could tell you who actually created and wrote that FB recipe because it is AWEsome, so I do not know who to give official credit to here!) calls for stuffing the onion shell with beef and mushrooms and more, wrap it in bacon and grill it and add a delicious sauce to it.  But, you know that mushrooms and I are unmixy things, like shellfish and I, so I tweaked it to meet my own palette.  I did not wrap it in bacon (though that sounds awesome) nor did I BBQ it.  I roasted it in the oven. Want to hear about my spicy, flavorful version of this delicious, simple recipe?  Great!  Thanks!  Let's get to my starting line-up!

Stuffing Ingedients
1 pound hot Italian sausage
1 large yellow onion
1/4 onion, finely chopped
2 cloves garlic, finely chopped, plus 1 finely chopped, separated
fresh or dried herbs (I used a mix of sage, basil, oregano and thyme from my patio potted garden, which I finely chopped)
1 tablespoon dried Italian seasoning
1/3 cup fresh flat leaf Italian parsley, finely chopped
evoo, 2 tablespoons plus 2 tablespoon + 1 tablespoon separated
1 teaspoon smoked paprika
1/2 teaspoon cumin seed or ground cumin
1/2 cup + 1/2 cup grated Parmesan cheese, separated
1/2 cup panko bread crumbs
1 package Pearl Couscous (or your favorite)
1 pinch of saffron
1 pinch red pepper flakes
2 cups of water in small sauce pan
salt and pepper

In a small sauce pan over medium-low heat, add a pinch of saffron to the 2 cups of water. Steep the saffron low and slow. The water will begin to give off a most wonderful, rich aroma.  I just love saffron, which is the dried stigma of crocus, a low growing bulbous plant.  It is very expensive, so when I say a pinch, I really do mean just a pinch! Saffron is the epitome of "a little goes a long, long way"!  This steeping process should take about fifteen minutes. 

Preheat the oven to 375-degrees. 

In a small skillet, add one generous tablespoon of extra virgin olive oil (evoo) over medium high heat.  Add the chopped onion, garlic and fresh finely chopped (or dried) herbs) and saute about five minutes.  Stir frequently so the garlic does not burn and brown. When the onion begins to turn translucent, remove the skillet from the heat and add the saute to a large bowl.  Add the paprika, dry Italian seasoning, bread crumbs, cumin, half of the parmesan cheese, red pepper flakes and a little salt and pepper, as well as the sausage to the bowl.  Using your hands, mix thoroughly to incorporate the ingredients to the sausage. Let the meat rest for a few minutes. 


Time for the couscous!  The sauce pan aroma should be making you crazy about now, it should smell so good!  Remove the water from the sauce pan to a bowl. Try to fish out the saffron strands.  Add two tablespoons of evoo to the small sauce pan over medium-high heat and when the oil ripples, add a tiny bit of the separated finely chopped garlic.  Before it browns and becomes bitter, add the couscous to the sauce pan.  Stir thoroughly to toast the couscous and add garlic flavor to the pearl pasta beads. Now, add a cup of the saffron scented water and bring it to a boil.  Stir the couscous carefully so it does not stick to the sauce pan.  When it comes to a boil, add the next cup. When it comes to a boil again, slightly cover the pan and reduce the heat to low.  Allow it to steep and steam about fifteen minutes until the couscous pasta has absorbed all of that saffron scented water and garlic flavors. No need to tend to it, the water does all of the work now. 

Now, prep the onion shells.  Slice off the top and bottom of the onion and peel just the one outer layer away.  Take a sharp culinary knife and slice the onion from the center outward on just one side, like a radius of a circle. Separate the layers of the onion carefully and set the shells aside.  Take a palm full of the sausage mixture and stuff the onion shells from the bottom up. The small shells will obviously use a smaller amount of the stuffing mixture. Place each shell in an onven-safe skillet drizzled with two tablespoons of evoo, or, if you are using two onions, doubling the recipe, you could use a muffin tin sprayed with non-stick spray. Place the skillet into the oven and bake for 35 minutes. No need to turn or flip.  Just let it roast for 35 minutes.  As the fatty sausage renders its fat, the onion will also shrink and engulf the shrinking meat stuffing.


While the onion shells are roasting, add the other part of the parmesan cheese and a quarter of the finely chopped flat-leaf Italian parsley to the couscous and stir to incorporate well.  Again, let it sit off the heat and allow the flavors to marry. 

 Stuffed Onion Shells fresh and hot right out of the oven!

Once the roasting stuffed onions are done, remove the skillet or pan and allow them to rest a few minutes before handling.  Allowing them to begin to cool allows them to "set". This makes moving them much easier.  To plate, take a good cup or so of the couscous and place it on a plate and spread it to make a sort of a bed for the stuffed onion.  After about four or five minutes, remove one of the stuffed onions and place it in the center of the couscous bed.  Sprinkle some of the remaining finely chopped flat leaf Italian parsley atop the meal.  I would add a drizzle of evoo around the couscous.  Adds wonderful flavor and a bit more moisture to the already aromatically delicious couscous!


Alright.  So I mentioned what I did not do, but instinctively realized I should have done, and that is to drizzle evoo around the perimeter of the couscous, maybe even some atop the stuffed onion.  Better yet, I thought about in hindsight, I would infuse evoo with a crushed garlic clove and drizzle that, enhancing the flavor!

Now, here is what I did to the first dish.  I wanted to add a drizzle of balsamic vinegar but, try as I might to add just a light drizzle, I ended up flooding the plate.  Not a bad taste, but overwhelming.  I think if I had added a controlled drizzle of balsamic, then a drizzle of garlic infused evoo around the balsamic, I would have had a winner!  But alas, hindsight!!!

My balsamic flood.  Live and Learn!


 As always, Thank You for your readership!  This entire recipe takes a little less than an hour to prep and cook.  It is completely delicious, and the great thing is, you can create your own stuffing!  Vegetable, rice and veg, any meat you want.  The possibilities are just about endless.  I hope you enjoy this recipe as much as I did!  

Now, GO COOK SOMETHING for someone you love!!!


My Waaayyy Overstuffed Baked Potatoes

  My Waaayyy Overstuffed Baked Potato Last Thursday my spouse and I went out to run errands and we ended up eating at a local eatery. As we ...