The Great Enchilada Caper
When I was younger, almost every extended family get-together included enchiladas. I am told I loved my aunt's version when I was a kid, but I apparently lost my taste for it once I entered middle school. Afterward, no one really made enchiladas that I could get hooked on until my friend's mom sent me some (we were neighbors) and I loved them. The flavors were layered, complex and truly Mexican, flavors which I love. I never made them, however, afterward. Now, I know enchiladas are "Mexican Food 101", one of the most made Mexican food dishes in the USA, and of all of the dozens of taco dishes and carnitas dishes I have made over the last ten years, I have never made enchiladas. Not once. I am deeply shamed and we must never speak of it.
I decided to get over myself and make enchiladas. I am always trying to expand my horizons and try my hand at new things, new dishes. On a side note, a bird walk, I am often asked why I do not make dishes with shrimp, abalone and mussels as well as mushrooms. I am allergic to mushrooms and shell fish. However, I have decided to get over that, too, and expand my horizons and prep dishes with those, too, although just the aroma of mushrooms sauteing makes me quite ill. I have to figure that part out, still, and I will need taste testers because, well, there is the whole allergic issue. Alright, back to enchiladas! I decided that if I were going to make this dish I was going to do it my way, use my own methods, herbs and spices. Since I grew up with the ground beef version - and I do not find anything wrong with that, folks - I decided to use chicken and spice it up, season each layer of the dish, from the chicken to the tortillas, the sauce and the cheeses. Let's get to it, shall we?
I began by toasting the cumin and coriander seeds to make my Mexican Spice Blend. I then combined and ground the following spices and dried herbs in my spice grinder.
Recipe for my Mexican Spice Blend
3 rounded tablespoons smoked paprika
1 tablespoon garlic powder
1 tablespoon granulated onion
2 teaspoons chile molido or your favorite chile powder
1 tablespoon dried oregano
2 teaspoons dried thyme
1 partly rounded teaspoon sea salt
1 teaspoon black pepper
1 tablespoon toasted coriander seeds
I know that this is the same photo that I used for my previous blog post but it always looks the same. 😋
I simply seasoned both sides of six boneless, skinless chicken thighs and three chicken breasts. I added three tablespoons of extra virgin olive oil over medium high heat to a skillet and seared the chicken in batches without cooking them all the way through. In the meantime, I prepped the other ingredients for braising the chicken so it'd be tender even through the baking process.
1 large yellow onion, finely chopped
3 cloves garlic, grated or finely chopped
1 28-ounce can Cento tomato puree
2 14.5-ounce cans fire roasted diced tomatoes
1 large bottle of Corona beer
1/2 cup coarsely chopped fresh cilantro
2 rounded tablespoons of Mexican Spice Blend
2 cans fire roasted diced green chiles*
1 28-ounce can chile ancho sauce*
1 4-ounce can Salsa Ranchero
1.5 cups Mexican Fiesta Cheese Blend
Now, in the same skillet in which I'd seared the chicken, I added the finely chopped onion and sauteed it for about three minutes over medium heat. I did not add salt to the onion as the salt from the spice blend on the chicken had salt enough in it. I am seriously trying to monitor and diminish my sodium intake. Afterward, I added the garlic and gave it two more minutes. Next, I'd transferred the onion and garlic to a slow cooker. To that, I added half a bottle of Corona beer - delish, I know! - and one 28-ounce can of tomato puree (I love Cento), 2 14.5-ounce cans of fire roasted diced tomatoes, two tablespoons of my Mexican Spice Blend, the can of salsa ranchero and 1/4 cup coarsely chopped cilantro. I thoroughly stirred the liquids and spices together to incorporate well. I snuggled all of the chicken breasts and thighs into the braising liquid. I added another fourth of the beer bottle and stirred once again. I set the timer for 5 hours on high.
After a long five hours, long due to the mouthwatering aroma in the kitchen all day, I removed the chicken and shredded it. Very simple and easy by that time! It practically fell apart by itself.
The combination of thigh meat and breast meat was delicious, and I used that combination because the friend I was cooking for wanted the breast meat and I wanted the thigh meat, so we compromised. Next time, because I really enjoy chicken thigh meat, all juicy and flavorful, I will use that for my next batch of enchiladas. I want to make my own sauces, both chile ancho and salsa verde with fresh tomatillos, Anaheim and serrano chiles, garlic and onion and cilantro. Looking forward to spring fresh veggies and herbs!
Dipping and filling and rolling and placing.
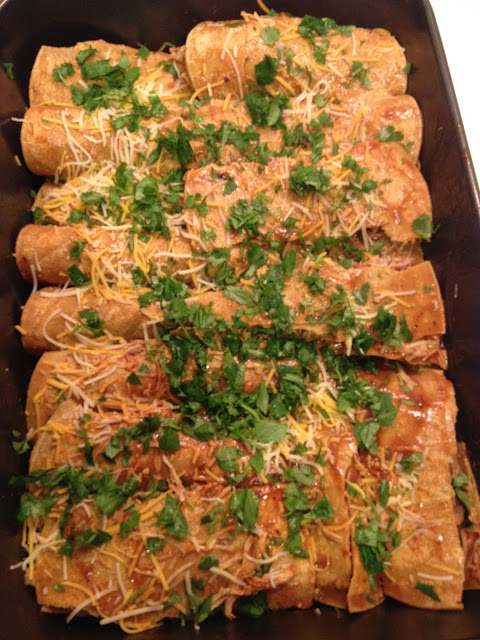
Oven ready!
You can see the two rolls in the center right that did not work out so well. The cheeses did cement it together nicely, thankfully.
I have to mention that the above photo does not show everything. I added more cheese atop what you see and then baked it for 25 minutes at 350-degrees.
Final product!!!
Lovely melted cheese with diced fire roasted chiles oozed in, topped with olives on half of it (my friend loves olives, but I am not partial to them, except in a tapenade).
Annnnnd plated!
Alright, now for the learning part. I KNEW that I should have heated up my corn tortillas before using them, but I thought that if I heated up my store-bought chile ancho sauce I'd dipped the tortillas in before filling and rolling, that would make them more pliable. Wrong. Lesson Learned: Heat Up The Tortillas First. We must never speak of it again.
I reduced (but not enough; next time!) the braising liquid after skimming off much of the fat renderings and used some of that to mix with the shredded chicken to add even more flavor to the meat. I added some finely chopped onion I had reserved, along with diced fire roasted green chiles to the meat and mixed that together with tongs. I dipped a tortilla in the ancho enchilada sauce, placed it in a baking pan I'd sprayed with non-stick spray, added about two tablespoons of meat, some cheese and fresh cilantro, rolled the tortilla and moved it to the side of the pan. I continued the process, but because I did not heat the tortillas up properly, as I mentioned above, some of them tore. I tucked those under the enchilada roll next to it in hopes that in the baking process, sauce and cheese oozing downward would cement it together. BOOM! 😊 Mic Drop! That worked quite well.
Reducing ancho sauce for the tortilla hot tub.
Oven ready!
You can see the two rolls in the center right that did not work out so well. The cheeses did cement it together nicely, thankfully.
I have to mention that the above photo does not show everything. I added more cheese atop what you see and then baked it for 25 minutes at 350-degrees.
Final product!!!
Lovely melted cheese with diced fire roasted chiles oozed in, topped with olives on half of it (my friend loves olives, but I am not partial to them, except in a tapenade).
Annnnnd plated!
I garnished with fresh cilantro, Tapatio and salsa ranchero sauce. I was very pleased with the combination of flavors and the textures. I think I am back to loving enchiladas again!
I'd love to hear your tips and flavor combinations. Drop me a line! You can visit my Facebook blog site at In-House Cook and leave me a message! Or, you can follow me on Twitter: @grnmn1
Thank You!
Now, go cook for someone you love! They will love you for it!
As always, Thank You for your time and consideration.
~Martin
In-House Cook


