Friday, January 3, 2014


Puerto Rican Chicken and Spaghetti

You may well have guessed by now that I love pasta, I love spicy food, and I love using fresh ingredients as often as possible.  This dish incorporates all of that and then some.  Now, I have made this before, and I have blogged this dish previously, about a year or so ago.  Feel free to look it up.  I reworked it a little bit this time to make it hotter and spicier.  Last time, I was making it for others who are sensitive to heat, so I toned it down.  Not this time!  I love that this dish incorporates chicken and pasta.  It would be just perfect to serve the chicken (roasted with the seasonings) and serve it with rice or a salad, something like that.  I love that it incorporates Latin spices and pasta, which are two of my intense favorites.  It is a perfect dish as far as I am concerned!  Hope you like it (again, maybe), too!

Let's get started.  Here's part of my starting line-up:

Not pictured are a can of fire roasted tomatoes, a large can of Cento tomato puree and a can of corn.

Ingredients:
1 large yellow onion, chopped
3 cloves, garlic, finely chopped and separated
3 tablespoons fresh cilantro, torn or chopped, and separated
1 tablespoon dried or fresh oregano, separated  (I used fresh oregano in my original post as it was in season)
1 tablespoon tomato paste
2 teaspoons chipotle powder, separated
1 teaspoon pasilla powder, separated
1/4 teaspoon red chili flakes  (told you this one was hot!)
2 teaspoons ground cumin, separated
1 teaspoon coriander seed, crushed
2 tablespoons smoked, sweet paprika, separated
salt and pepper
1  15 ounce can fire roasted tomatoes
1 11 ounce can corn kernels, drained
1 28 ounce can Cento (or your favorite) tomato puree or crushed tomatoes
1 pound of spaghetti (your favorite; I used angel hair)
1 package of 4 - 6 chicken thighs
extra virgin olive oil
 

Listing out the ingredients is the hard part.  The rest is quite easy.  Add three rounds of extra virgin olive oil to a dutch oven (about three tablespoons) to cover the bottom, add a teaspoon of fresh garlic, and turn the heat to low.  You are going to season the oil slowly.  Meanwhile, add the spices I'd listed to "separate" to a small bowl and thoroughly mix.  Add salt and pepper to the chicken thighs and liberally season the skin side of the chicken with the spice mix while the oil heats and becomes seasoned with the garlic.  This is just something I do, as I love the aroma and the flavor it adds to the chicken as it sears.  When the garlic begins to sizzle, move it off to the side and add the chicken, seasoned skin side down over medium-high heat.  Allow the chicken to sear thoroughly, about four or so minutes.  It should release pretty easily after about four minutes.  If not, allow another minute or two, then turn it.  When the sugars develop and caramelize, it will finally allow the skin to release from the hot pot more easily.  Season the other side before turning, of course.  Same situation applies, sear about four minutes on the bone side. You do Not want to cook the chicken all the way through, as the braising process in the pasta sauce will finish that off.  So good!


Place the chicken thighs seasoned skin side down.

Searing both sides of the chicken.  Looks really good, right?  If only you had smellaputer or smellaphone!!!

After about eight to ten minutes of searing the chicken - remember, you do not want it fully cooked, just a good caramelized crust! - remove the chicken and set it aside.  Try to spoon out half of the fat without removing the burnt-on seasonings on the bottom of the pot.  That's flavor you want to save!  If not, you can do it later, trust me!  Now, the dutch oven is pretty hot, and you want to deglaze the pot and scrape up the burnt-on seasonings.  I added a half cup of red wine.  The wine will sizzle.  Good stuff!  Use a wooden spoon to scrape the bottom of the pan and get those browned bits up and into the wine.  As the wine reduces, the flavors intensify, so the aroma will be quite happy!

Some for the sauce, and some for meee!  I mean, half a cup to deglaze the pan and then add the tomato products.  Yes, that's it!  Uh-huh!

Once the browned bits have been scraped up and the wine reducing, add the tomato products and the corn.  Stir thoroughly and bring the sauce to a boil.  Add all of the other dried seasonings and half of the chopped cilantro, incorporate well, and reduce the heat to low.  Now snuggle the chicken into the sauce, skin side down, and try to cover the chicken with sauce.  Partly cover and allow to simmer for thirty minutes.  IF you are in more of a hurry, cover and simmer on medium heat for fifteen minutes and boil the pasta and serve within that fifteen minutes.  The Longer you allow the sauce to simmer on low, however, the better the flavors marry.  Just saying.  

Meanwhile, after fifteen minutes, bring a large pot of liberally salted water to a boil. Add a pound of spaghetti and allow to cook until Just al dente, or just before done, about eight to then minutes; maybe twelve for a pound.  Reserve a cup or so of pasta water when the pasta has finished cooking.  Drain the pasta.  Remove the chicken from the sauce (it Should be done by now, the meat practically falling off the bone!) and add the pasta to the sauce.  Welllll, there is the dilemma.  I would add the pasta to the sauce and toss it, but people sometimes like to add sauce to plated pasta, so whichever method you prefer, go for it!  My mom likes the sauce added to the plated pasta, so I indulge her wish.  I also add shaved parmesan and sprinkle the dish with the other part of fresh chopped or torn cilantro for a pop of freshness and color. I LOVE this dish!


 Hope you do, too, but remember!  This one is the hot and spicy version!  


Roasted Quail over Lemony Thyme Polenta 

Unlike most people on New Year's Eve....all over the Earth planet....I did not have any plans.  I decided to make a dish for my self that was unlike anything I have done previously; something to challenge myself.  I decided on quail, polenta and a splash of healthy green with broccoli rabe roasted with garlic, s and p and evoo.  Delicious!  I decided to marinate the quail to lessen the alleged gamey natural flavor of the little birds, which, by-the-way, are far more cute alive than dead.  I'm just sayin'. I knew I was going to roast the birds and, just in time, my wonderful, good friend, Miss Maria (whom I am quite sure you all are familiar with by now!), gifted me with a mini cast iron skillet.  Perfect!  This meal was not only delicious, but took far less time than I'd first thought.  I have had polenta before, I have even made it, according to an old recipe I wrote down about eight years ago, and am not sure why I haven't made it Much more often!  Yum-o!  (Thanks Rachael Ray for the various quips I cannot help but utter!). Why I chose the flavors I decided upon just came with experience with poultry, fowl and pork. Lemon and Thyme are prevalent throughout. Enjoy!

Let's get started. Here is my marinade.  It is sweet, savory flavors the meat profoundly.  Just delicious!

The Marinade:
1/4 onion, grated
3 cloves garlic, grated or finely chopped
1 teaspoon cumin powder
1/2 tablespoon of Herbes de Provence
2 - 3 sprigs fresh thyme, finely chopped
1 Fresno chili, ribbed, seeded and finely chopped
1 Serrano chili, ribbed, seeded and finely chopped
Zest and juice of half a lemon
2 tablespoons red wine vinegar
salt and pepper
1/2 teaspoon sriracha
1 tablespoon Ponzu (citrus soy sauce)
1/2 tablespoon spicy stone ground mustard
 1/4 cup extra virgin olive oil

 Quail
I have not butterflied poultry before, and practice on the little quail was good practice.  I feel that I can do this with chicken and turkey now, successfully.  I had pictures, but I just felt that it would not be in good taste to post them here.  But, I will describe the process.  Using a pair of heavy duty kitchen scissors, locate the spine of the bird.  Cut from back to front on one side, and repeat on the other side, effectively removing the spine of the bird.  Open up the bird.  Inside are the rest of the ribs, legs and wings.  I should have more properly treated the legs and, particularly, the wings, but I have learned from this experience and hope to grow.  

After repeating the butterflying process with the three quail, I placed the carcasses in doubled zip lock gallon sized bags which I'd placed in a bowl.  I seasoned each bird with salt and pepper, then poured the marinade over the birds.  I threw in a couple of sprigs of fresh thyme and allowed them to marinate for an hour. 


Meanwhile, knowing that the polenta did not take much time, but required patience and personal attention, I prepped for that and prepped the broccoli rabe.  I blanched the broccoli rabe first and readied it for roasting it.  To blanch, bring a large pot of liberally salted water to a boil, with a large bowl of iced water close by. When the water is at a roiling boil, add the broccoli rabe and allow it to boil for one minute.   Remove it and place the veg in the ice bath for a couple of minutes to stop the rapid cooking process.  It should be bright green.  If you decide on a different green leafy vegetable, you can perform the same process.  I dried off the veg in a paper towel and placed it in a small skillet, drizzled evoo and grated garlic over it, sprinkled it with salt and pepper, and readied it for the oven.  When you are ready to serve, you will need to prep and cook the polenta and broccoli rabe at the same time, so be ready to multitask! The quail is the easiest part of the whole dish! Start by preheating the oven to 400 degrees. 


 Add the quail to the skillet and place it into the preheated oven (at 400 degrees).  Roast one side for 12 minutes, turn, and roast the other side for 12 more minutes. 

Admittedly, I did not follow the directions on the bag of the polenta.  If you are new to polenta, it is basically dried corn meal. You can flavor it however you wish, sweet or savory.  You can spread it out to make things like cakes, grill it or fry it to make bruschetta, and the best part, it is completely healthy!  As I mentioned previously, I decided on fresh lemon and thyme.  Thyme is an herb with a lemony flavor, so the two go well together.  I added a couple of rounds of evoo in a large sauce pan along with two tabs of butter, and a clove of garlic, finely grated.  I also added one cup of polenta and sauteed it until the corn meal had been nicely toasted.  Afterward, I added one cup of chicken stock and one and a half cups of water.   I added a full tablespoon of fresh, finely chopped thyme, the zest of half a lemon and the juice of half a lemon.  I stirred the mixture to keep it from burning until it thickened. Just before I covered the pot, I added a small handful of finely grated parmesan cheese  and incorporated it well.  (A lot of stirring is involved for a couple of minutes). 
 Now would be a great time to add the broccoli to the oven!

 Stirring the seasoned polenta.  


 Ready to serve the polenta!

After twenty-five minutes, or so, the quail should be done, after ten minutes, the broccoli rabe should be done, as well as the polenta. You can cover the polenta and allow it to steam, off heat, until you are ready to serve.  Use a fork to fluff  it p if you wish to have peaks rather than smooth, as it will geld together.  I simply made a mound, set the roasted (and amazingly aromatic) quail on two sides of the mound, garnished with fresh thyme, and set some broccoli rabe spears on the other side, garnished with shaved parmesan cheese. Delish!  
 This is my dish.  It was aromatic, fresh and flavorful.  You can make this easily for one, two or twelve. The dish sells itself and the dining experience is quite comforting.  Enjoy!


Wednesday, December 25, 2013


A Message For My Friends and All of My Readers

I just wanted to let you all know how much I appreciate your support over the last two years.  This learning adventure has been quite amazing, and your support especially endearing.  I look forward to new adventures in the kitchen with you all.  With that, Happy Holidays and respect for you and your support.  Thank You, once again.   ~  Martin

After much had work since Monday creating and making personalized gifts - calendars and candles - for my family  members, I decided to gift myself late last night (too late, I know; bad, very bad!) with an extreme burger.  I created a burger meat mixture of spices and tikka masala, tamarind paste and Ponzu.  I added garlic and stone ground spicy mustard, as well.  The flavor was extreme but amazing.  I KNEW it would be fantastic as a glaze on a burger.  So, I went with that.  I also knew bacon had to be part of it, as well as making it a Bistro Burger, so a fried egg was an added must.  The above photo is what it all looked like after a sprinkling of a pre-grated Mexican cheese blend.  Soooo powerfully but not overwhelmingly flavorful.  I would say, create your favorite burger and put the glaze on your burgers as you fry or grill them.  The glaze seals in juices and flavors from the meat and adds an awesome and flavorful crust.  If you like extreme flavors, this one is for you!!!  

Sauteing the burgers at medium heat with the glaze on both sides. It is DeLish!!!

Once again, folks, Thank You so much for your readership and viewership!  Much respect and appreciation for you!!!
~Martin

Monday, December 23, 2013


Jeanine's Chicken Saute'  


My former roommate and good friend, Jeanine, is an amazing cook.  She makes the most amazing pies Ever, and I love to eat them.  She is also a talented cook with generations of family recipes and teachings in her arsenal of dishes.  I appreciate that she honors her family and ancestors.  She is certainly not afraid to take on or invent something new that comes to mind. This, I think, is one of those "this just sounds really good" dishes and she made it with amazing ease and with incredible flavors. ***I must make a correction.  Glad I thought to ask (again).  She had watched one of her friends, co-owners of a local fantastic restaurant, make this dish, and she recreated it with her own style.   I am giving you the recipe as she gave it to me (she is amazing on technology, and I am not about to try to change it up).  This is just one of those "must do" recipes this winter.  Go for it.......


Chicken sauté 


Chicken (choose your favorite)
Thighs, drumstick, half breast
1. Clean chicken, salt and pepper
Set chicken aside
2. Prep garlic (5 large cloves)
3. In large sauté pan,
Olive oil
Butter
Garlic (p
ressed)
Fresh rosemary
4. place chicken in sauté pan when pan is at medium heat.
And brown chicken (fat side first)then braise
Half way, pour in 1/2 cup to 1 cup or even two cups of white wine
Boil off alcohol until half the liquid left. Cook 30-40 minutes
5. While chicken is cooking, get water ready for noodles (egg noodles)
6. Use Wondra by gold medal
For thickening
7. When chicken looks golden brown
Add mushrooms. Lots of mushrooms.
8. Last 5 min. Cook noodle,
Butter noodles after straining
9. Take chicken out. Leave chicken juice to make gravy
10. Pour gravy over chicken

                             
                             I cannot wait to make this dish, myself!
                                                    Enjoy!

Recipe (per viewing a friend who had made this dish for her) and Photos by:  Jeanine Mastel, 2013


Monday, December 16, 2013


Spaghetti Stuffed Meatball Sammies with Homemade Chunky Marinara

Don't you just love a meatball sammy?  Who doesn't?   Juicy meatballs full of warm spices, both dried and fresh herbs and small pieces of spaghetti, smothered in flavorful homemade chunky marinara and topped with parmigiano cheese atop a toasted garlic roll leaves you wanting more and more. Ok, it did with me, but you be the judge.  I wish I could take credit for this one, but Rachael Ray introduced this one a few years back and I have been wanting to try it ever since.  I was not disappointed!  Let's get going.

Ingredients List
8 San Marzano or Roma tomatoes, 6 seeded and quartered  (or one large can crushed tomatoes) and the other two chopped into chunks
1 ten ounce can tomato sauce
2 tablespoons tomato paste
4 cloves garlic, halved + 2 cloves garlic finely grated
1 large white onion, half quartered and half finely chopped + half a white onion, finely chopped
2 tablespoons Italian seasoning, separated
salt and pepper
1 teaspoon cumin seeds, crushed
1 tablespoon smoked paprika
1/4 cup parmigiano cheese, grated
1/2 cup spaghetti broken into half to inch pieces
1 teaspoon fresh or dried oregano
4 large fresh basil leaves
quarter to half teaspoon red pepper flakes  (your preference)
extra virgin olive oil
1 tablespoon red wine vinegar (I use Cento)
1 or 1.5 pounds ground beef  (I used an 90/10 mix of lean ground beef)
1 tablespoon Worcestershire sauce


Some of the ingredients of tonight's dish.

In a large bowl, toss the seeded tomatoes, onion and garlic in extra virgin olive oil and season with salt and pepper. Spread the veggies out on a baking sheet and roast fifteen minutes at 400 degrees.  Place the veggies, once cooled about five minutes, into a food processor or blender and chop and puree the veggies.  

In a large saucepan or pot, add two tablespoons of extra virgin olive oil over medium-high heat.  Add the chopped onions and saute' until they begin to become translucent, then add the chopped tomatoes. Lightly season with salt and pepper and cook for about three minutes longer. Add the pureed veggies, the dry and/or fresh herbs and incorporate well.  Add the red wine vinegar and bring the marinara to a boil.  Reduce the heat to low and stir well.  Allow to simmer on low for twenty or more minutes, if possible.  Now to the meatballs. 


In a large bowl, add the ground beef, the other half of the finely chopped onion, the finely grated garlic clove, one leaf fresh basil, finely chopped, and the half cup of broken spaghetti, the other part of the Italian seasoning and a good pinch of both salt and pepper.  Mix the meat thoroughly, folding the ingredients into the meat, trying to not overwork it.  Once incorporated, allow the meat to rest for about ten or so minutes, then form the meatballs into golf-ball sized rounds.  You could use a regular sized ice cream scoop to regulate this, if you wish.  Once formed, there are two ways to start cooking the meatballs.  You could bake them 400 for ten minutes, or, you could fry them in a skillet with evoo until the meatballs have caramelized on all sides; two sides, at least.  NOTE:  You do Not want to cook them all the way through.  They will finish cooking in the marinara sauce. I chose to fry them but I have baked meatballs before with similar, juicy results. 


Remove the meatballs and snuggle them into the marinara sauce and try to cover them with sauce.  Allow them to cook with the simmering sauce for ten to fifteen minutes more.  


Add evoo to the rolls you are going to use.  I chose sourdough rolls.  Love them!  I also sprinkled the rolls with a little garlic powder before toasting in the oven.  

 When you are ready to serve, tear up the rest of the basil leaves into small pieces.  Add cheese to both sides of the toasted roll and spoon some of the steaming, chunky, aromatic marinara over the cheese on both sides.  Scoop two meatballs out of the pot and place them on the bottom part of the roll and drizzle with marinara.  Top with finely grated parmigiano cheese, garnish with basil and serve.  


WARNING!!!  This is messy! You may want to use a knife and fork.  Orrr not!  
Enjoy!!!  Thanks for your time!


Saturday, December 14, 2013


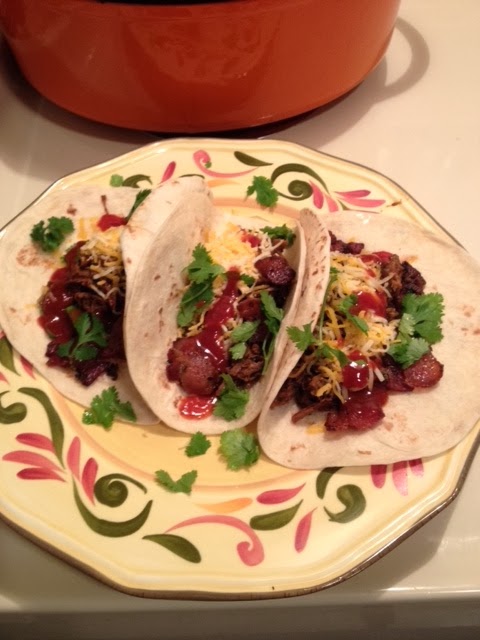
Beef Short Rib Tacos

If you have not noticed by now, I LOVE tacos as much as I love burgers and pizza.  This is also not my first beef short rib taco recipe.  Last Christmas, my family decided to break open the Christmas dinner box and we had a Taco Bar for Christmas dinner.  I had a fantastic time making beef short rib tacos, citrus and chile pulled pork tacos (pibil) and regular old ground beef tacos (my mom's request).  My family is not too adventurous when it comes to spicy foods and heat, so I kept the heat to a minimum.  So this time, I decided to crank up the heat. Here is what I did. 

 Beef Short Rib Taco Ingredients:
 2 packages of beef short ribs, about 2 - 3 pounds
1 large white or 2 medium white or yellow onions, quartered
8 cloves garlic, peeled
4 Pasilla-Chile Ancho pods
3 Guajillo Chile pods
2 teaspoons Chipotle in Adobo
2 tablespoons smoked paprika
salt and pepper (to season the ribs before searing)
3 strips bacon, chopped
1 teaspoon coriander seeds, crushed
2 teaspoons cumin seed or ground cumin
1 cup fresh chopped or torn cilantro
2 teaspoons dried oregano, crushed between your palms
corn or flour tortillas
grape seed or extra virgin olive oil
Lavender flower honey (or whatever honey you have)
1 box (2 cups) chicken or beef stock
1 bottle or can of Mexican beer

When you look at that list, you immediately ask yourself: "What is not to like?"  Seriously.  It all sounds incredibly mouthwatering.  And spicy.  It is, but it is decadent,delicate and balanced, all at once. We all have our own likes and dislikes, so I am sure you will make it your own, add and delete, as you wish. Isn't that the fun of food, afterall?

Season the room temperature beef short ribs with salt and pepper on all sides.  Slice the bacon strips into bite-sized bits and add to a large dutch oven over medium-high heat.  You may add a little grape seed or extra virgin olive oil if you like, but with bacon, it is not necessary.  Meanwhile, heat the oven to 400 degrees.  The rack should be in the center.  


Toss the quartered onion and garlic in two tablespoons oil and place place them in a cast iron skillet or skillet oven safe up to 400 degrees.  Season with salt and pepper and place in the oven for about eighteen minutes until golden brown.  Slightly burned is fine.  That is flavor!  Meanwhile, in a saucepan, add the dried pepper pods and toast over medium heat for about three minutes.  Add water until the pods are covered and bring to a boil.  Cover and let sit off the heat about fifteen minutes, or until the peppers have reconstituted.  Tip:  I stem and seed the peppers before I toast them and place them in water.  If you want your sauce extremely hot, you could leave the seeds inside.  
 
The onion and garlic roasted to a nice golden brown is pure flavor. 

Place all of the roasted veggies in a food processor or blender, as well as the reconstituted peppers.  Add a cup of the saucepan pepper water and a teaspoon of honey.  The honey will help balance out the acid spice and heat.  Blend until you have a thick consistency.  Do not worry about it being thick, because you will be adding additional liquids for the braising process soon.  Leave the chile sauce in the blender until you are ready to use.  

Now, here is where I have a story to tell.  Worry not, it is shorter than most of my stories.  My friend, Maria, whom you all know well, by now, was helping me write this recipe.  It was at this point that I received several texts concerning a familial matter which I ended needing to attend to, so I had to put cooking on hold for several hours. The chile sauce had a long time to sit and the flavors had time to marry, so the flavors were quite rich.  I wish I'd had time to roast my spices and incorporate them into the sauce, too, before I had to leave, but, next time!

Back to business.  The bacon should render its fat within a few minutes; remove the bacon bits and set aside for later.  They are great for the cook to snack on!  Place the beef short ribs bone side down in the dutch oven and sear until the skin releases, about three or four minutes.  Turn and sear the meaty side for four minutes, until the meat has begun to caramelize.  The aroma will be amazing.  Trust me. When all the ribs have seared, remove the meat and add the a cup of the Mexican beer to deglaze the pot.  Use a wooden spoon to scrape up the burned or browned bits and stir well.  As the beer begins to burn off and reduce down, add the pepper veggie sauce along with a cup of chicken or beef stock and stir well.  Snuggle the meat back in, meaty side down, if possible, and cover with both beer and stock. Add the dry spices at this time.  Using the spoon, make sure the meat are covered and cushioned by the sauce.  Bring it to a boil and cover.  Place the dutch oven in to the oven at 375 degrees for three hours.  Afterwards, remove the meat, which, by-the-way, may well fall off the bones.  Bring the sauce to a boil and reduce by half.  

 Beef Short Ribs searing in rendered bacon fat. 


The ribs should have a beautiful caramelized sear on al sides, but not cooked all the way through, as they will braise for three hours in the chile sauce with chicken or beef stock and beer!


Beef Short Ribs removed from the braising liquid.  The meat is ready to fall off the bone and is easily shredded, as seen below!


As you shred the meat, do not forget about the reducing sauce in the very hot Dutch oven.  When you have finished shredding the meat, skim as much of the fat from the sauce as possible.  There will be a considerable layer of fat, so be aware that this will take several minutes to affect. Trust me, it will be well worth it!

Once the fat has been removed, place the meat back into the sauce and simmer for about twenty minutes.  You Could, if you like, and I love this alternative, is to take a hunk of the meat, splash down about two tablespoons of the sauce into a skillet over medium-high heat, place the meat atop that, and mix and sear until it crisps up.  I love the crisp meat and the rich, delicate heat of the sauce.  So good!  Just an alternative.  I served my beef short rib taco meat in both small four and doubled corn tortillas with cheese, my favorite hot sauce (as if the chile sauce is not hot enough!) and fresh cilantro. 
I also sprinkled a little bacon atop the cheese and hot sauce before serving.  Amazing. 

I hope you enjoy this recipe.  It is Perfect for our cold winter nights.  The oven heats the kitchen and the home and fills it with amazing aromas.  It is a Delicioso treat!


Sunday, December 8, 2013


Roasted Spiced Chicken over Saffron Scented Couscous and with Caramelized Onions

I know that title is a bit of a mouthful, but this is just simple and easy comfort food for any time of the year.  If you are a busy student, the oven roasting time frame for the chicken frees you up to research, write or do whatever your homework tasks are. If you are a busy parent or single, this is just as simple and easy a recipe which frees you up to complete whatever tasks you might have to do before you settle in.  Or, if you are cooking for a loved one, you can simply snuggle and enjoy quality time while you wait a little while for the chicken to roast.  You will love the aromas of the saffron and herbs de provence, among other spices and herbs as you do what it is you.....well, do. With that, let's get to it, shall we? 

Here is what you will need:
1 package of 4 - 6 chicken thighs, bone in and skin on.  That is just my preference for this dish, but feel free to use boneless-skinless chicken thighs, if you like. 
salt and pepper
1 rounded tablespoon of Herbs de Provence  (Love it with lavendar in the mix
2 teaspoons sweet paprika
1 teaspoon cumin seeds or 1/2 teaspoon ground cumin  (adds a smoky warmth)
2 cloves garlic, finely chopped or grated
3 tablespoons extra virgin olive oil 
2 tabs of butter
1/2 cup chicken stock (but don't put it away just yet!)
1- 2 large yellow onions, sliced into thick discs of half discs

Preheat the oven to 400 degrees.  Season the chicken with salt and pepper on both sides.  In a small bowl, mix the other spices and herbs and sprinkle half of the mixture liberally on the skin side. Sprinkle the garlic over the skin side of the chicken.  Add the extra virgin olive oil and the butter to a cast iron skillet or an oven safe skillet over medium-high heat.  When the oil begins to ripple, chicken skin-side down and sear for about four minutes.  Carefully turn;  if the skin is still sticking to the skillet, however, allow it to sear another two minutes until the skin releases easily.  Turn off the heat after one minute and place the chicken onto a plate and keep it close by, along with the onions and the chicken stock. 

Arrange the onions in the center of the skillet, sprinkle the onions lightly with salt and pepper, and place the chicken atop the onion discs. Add the chicken stock to the skillet, which will help keep the chicken and onions moist.  Add half a cup of your favorite wine, too, if you wish, to add extra flavor.  Do not be afraid to add beer, either!  The alcohol burns off but leaves great flavor behind for those browning and softening onions.  It is just delicious!


Roast for 25 - 30 minutes.  You will love the aromas filling your kitchen as time goes on. 

In the meantime, add a tab of butter and a tablespoon of extra virgin olive oil to a medium sauce pan and melt until the butter is foamy.  In a separate small sauce pan, add 1 1/2 cups chicken stock and a pinch of deep red, aromatic saffron over medium heat.  Allow the saffron to steep on low once the stock begins to boil.  The aroma will dazzle you, I tell you.  You may get quite distracted from your multi-tasking due to the amazing aromas filling your kitchen. I must now add a vague disclaimer if you suddenly find yourself unable to continue your tasks due to the aromas floating around in your kitchen. I'm just sayin'!

Once the butter foams and mixes with the evoo, add a cup of couscous.  Toast until the couscous starts becoming a beautiful golden color, then add once finely grated garlic clove and sautee for a good minute.  Smells great, I know!  Now add the saffron scented chicken stock, stir, turn off all of the heat and cover the couscous sauce pan. That is it!  You can leave it covered until you serve the dinner as a whole!

Back to the tasks at hand!  Orrrrr not!

When it all comes together after about thirty minutes, get ready to plate.  I was cooking this dish for my son up at college, so I served the chicken with a simple salad alongside a couscous round and the caramelized onions.  

Once the chicken is done, remove it and allow to rest.  Meanwhile, place the skillet over medium-high heat and reduce any remaining liquid with the now quite softened onions. Try to skim off some of the fat with a spoon.  I added a splash of balsamic vinegar to the onions just for the caramelization fun of it.  I used a small bowl and packed it with couscous (smells pretty great now!) and made a rounded stack in the center of the plate.  I added salad to one side, leaned chicken on either side and added some of that amazing caramelized onions between them.  I know, I am diligently working on my presentation skills. One of my major goals this new year. Watch me grow!


This was plate two, served up a little differently.  

 
Thank You, once again, for your viewing and reading time!


Asian Inspired Hoisin Pork Belly Sandwich

  Asian Inspired Hoisin Pork Belly Sandwich I like to get take out for either breakfast or lunch. That has not been good for me, so I decide...