Sunday, October 21, 2018

Spicy Pot Roast


Martin's Spicy Pot Roast

In a series of recipe blog posts of firsts for me, I have prepared a recipe from my childhood but, you know me, I put my own spicy spin on it.  I prepared pot roast with the usual fixins, potatoes, carrots, onion and garlic, but also with fire roasted green chiles, chipotle in adobo, my Mexican spice blend, and braised it in Mexican beer. The braising aroma was insanely delightful. I made this with the flavors of Mexico so I could make several meals out of the leftovers. Tacos, burritos, and served with the potatoes in a more traditional style. 

Let's get started shall we?

Ingredients

1 pot roast steak
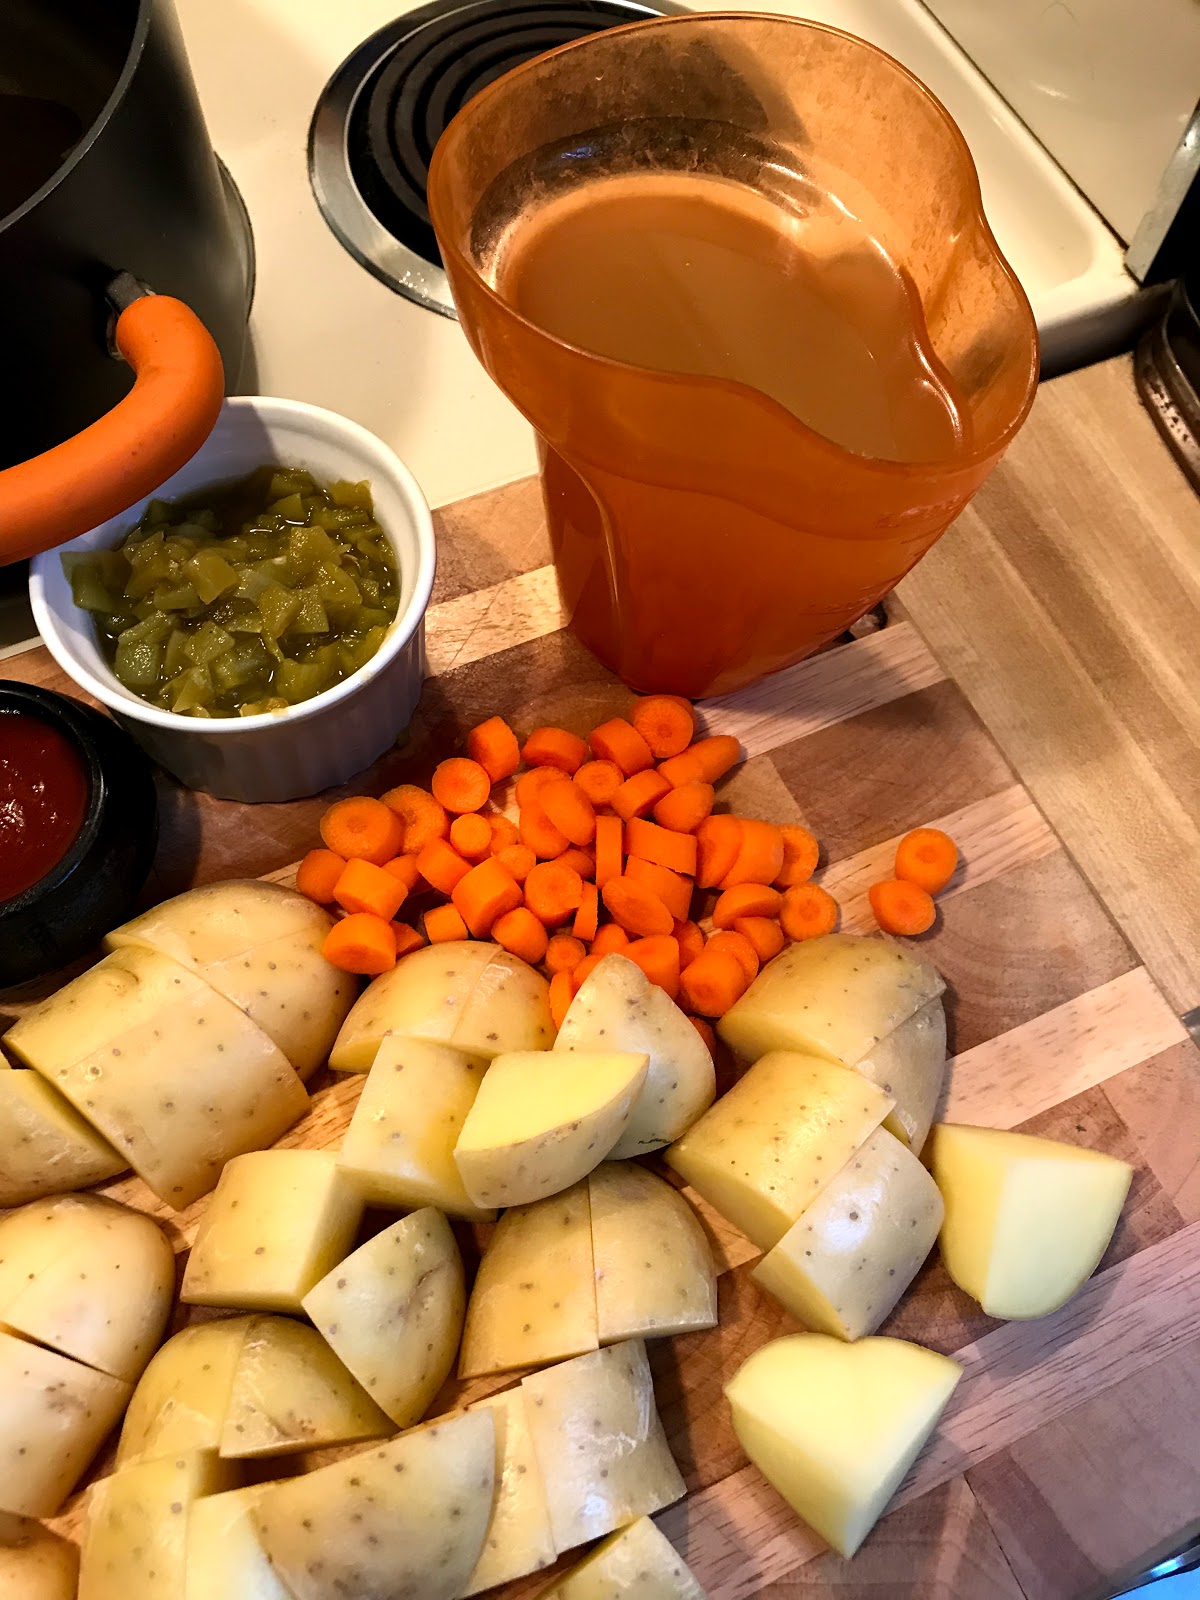
1 large white onion, coarsely chopped
1 pound Yukon Gold potatoes, quartered
3 cloves garlic, smashed and peeled
1 pint beef stock
3 bottles (from a six pack) Mexican Beer (I used Pacifico) and a little for the cook!
3 tablespoons Mexican Spice Blend
1 carrot, grated or finely sliced
3 tablespoons vegetable oil
2 small cans fire roasted diced green chiles
1 rounded tablespoon tomato paste
3 tablespoons Worcestershire sauce
4 ounces fire roasted salsa
2 tablespoons chipotle in adobo
fresh thyme
1 tablespoon Italian dried seasoning


Add the vegetable oil to a large pot over high heat.  Season the pot roast meat with the Mexican Spice Blend.  I did not add salt and pepper to the ingredients list because there is salt and pepper in the spice blend. When the oil begins to ripple, add the meat.  It will sizzle and that is what you want. We sear the meat to get a good caramelization crust. Sear on each side about five minutes.  Remove the roast and add a good splash of the beef stock and the Worcestershire sauce.  Scrape the bottom of the pan, as that is flavor you want to employ! The smell will be incredible!  Now, reduce the heat to medium, add the potatoes, carrots, onion and half of the garlic and half of the thyme. Sprinkle a little of the Mexican Spice Blend over the veg, stir and allow the veg to get a little crust on it, about four minutes.  Add the tablespoon of tomato paste, stir thoroughly.  Add the pot roast to the pot atop the veg. Add the beef stock or broth and the beers. Return the heat to high.  The liquids will fill just to the top of the beef.  If not, add a little water or more beer. 


Add the remaining thyme, garlic and Italian dry seasoning to the top of the roast, add the remaining Mexican spice blend and bring the liquids to a boil. Stir a little, cover and reduce the heat to low.  Braise for three or four hours, up to six hours. 


Final product after four hours of braising.


I painstakingly skimmed off the fatty oil so as to preserve the meat.  For me, it finished cooking late at night, about 11pm.  My fault, I started it that late. The next day, however, I had reheated it in the same pot, less as much of the fat as I could remove, and it was delicious as burritos, tacos and later, as a skillet breakfast dish with the potatoes and eggs and cheese.  Muy bueno!!!

I do not have a plated photo or photos this time.  As I said, I used it for three different dishes and fully enjoyed each one.  I purchased large tortillas to wrap into a supersized burrito with the shredded beef, scallions, Salsa Ranchero and scrambled eggs with green chiles mixed in.  Delicioso!  I did pretty much the same thing, less the egg, with the tacos.  

You could serve it in the traditional manner, with the potatoes and carrots, onion and the beef.  Amazingly aromatic and delicious.  Winner every time. 


With that, Thank You, gentle viewers and readers, for your time and consideration.  I always appreciate your visits!

Now, Go Cook For Someone You Love!💓

~Martin
In-House Cook


Friday, October 12, 2018

Chicken in Foil Packets


Chicken in Foil Packets

It's been a busy day, you and the kids are hungry, there is chicken thawed in the frig, but you still have more to do before you can even get to dinner!!!!!  

STOP!!!!

We've got this!  Got foil?  Got chicken?  Got a little cooking spray or extra virgin olive oil?  Have some spices or a spice packet?  Yes? Then we're good to go!  

I have a couple of chicken in foil recipes to share with you, but the reality is, you can do this with any cut of meat or vegetables or both!  Steak, chicken, pork, fish.....the possibilities are endless.  I have done this with steak and potatoes, which is a previous blog post.  I was tired, it was getting late and I did not feel like working over the hot stove. In my original recipe, I cubed a ribeye steak and tossed it in a bowl with baby potatoes and fresh herbs and garlic and spices.  I oven roasted it for thirty minutes at 350-degrees in a foil packet and it turned out perfect!  Now, let's see some chicken recipes!


Martin's Mexican Chicken in Foil

Ingredients:
4 large or 6 small boneless, skinless chicken thighs
1/2 onion, coarsely chopped
2 cloves garlic, grated or finely chopped
1 tablespoon chipotle in adobo
1 tablespoon Mexican spice blend*
Fresh or dried thyme and oregano
Fresh cilantro (or dried)
Cooking spray or evoo

Preheat the oven to 350-degrees.

Slice the chicken into slivers or cubes. 

Pull one two-foot long piece of foil and one foot long piece of foil. Lay the longer foil lengthwise (east west) in front of you and the other piece cross over away from you (north south). Spray cooking spray or lightly drizzle a little evoo over the center square.  Add half the onion to the square and place the chicken atop the onion. Add seasoning to the top of the chicken, turn it and season the other side. Add the other half of the onions and the herbs and fold the shorter north and south side inward and the longer east-west foil over. Twist and fold as needed.  Place into an oven-safe skillet or onto a baking pan and place into the oven. Roast for 35-40 minutes at 350-degrees. 

I was Going to serve this to myself as tacos but alas, I had used up all the tortillas so I made Spanish Rice and served it atop that. Delicious meal!  


This could be served as tacos, burritos, over rice, or any number of ways. The flavors are delectable!!!


Ready to travel to Pakistan?


Martin's Tikka Masala Chicken Thighs in Foil

Ingredients:

4 bone-in, skin-on chicken thighs
2 tablespoons Tikka Masala seasoning*
1 teaspoon coriander seed
Cooking spray or evoo
Foil
Basamati rice

Preheat the oven to 350-degrees and make the rice. 

Rip off one layer of foil about two feet long, lay it east and west.  Tear off another about a foot long and lay it cross-wise north and south.  Spray the center with cooking spray or lightly drizzle with evoo.  Add a teaspoon of the Tikka Masala seasoning* (You can find it at most grocery stores, but I buy mine from a local Pakistani store in my town; such great spices and blends! They have a package of seeds and leaves for you to grind yourself and make your own blends, which inspired me to make my own blends a few years ago).  Now, place the chicken in the center and add the seasoning atop the chicken, including whole coriander seeds. Fold the north-south flap over and then the other side, crimp as needed and place the packet onto a baking pan and roast at 350-degrees for 35-40 minutes.  

Serve atop or with the rice.  Whatever you feel like serving with it is fantastic and whatever you like. Rice is commonly served with it, along with Naan. 


Not sure if this video works, but I had just pulled the packet from the oven and it was still bubbling.  The spices cooking filled my apartment with the most amazing aromas, I tell ya! 


I know, not a glamorous blog post, but it has its reason for being written and posted.  Convenience and simplicity!  Remember, you can do this with any protein and/or vegetables, which can go in together!  

As always, Thank You, gentle readers for your visit and your consideration.  I hope you make this and drop me a line telling me how you like it!  

Remember, you can follow my blog on Facebook:  Look up In-House Cook.  You can also follow my cooking adventures on Twitter:  crdn9.  I'd be very happy to see you! 

Now, Go Cook For Someone You Love!  

~Martin
In-House Cook


Friday, October 5, 2018

Chile Rellenos with Spicy Spanish Rice and Black Bean Frijoles


Chile Rellenos with Spicy Spanish Rice and Black Bean Frijoles

I have been on a quest to try preparing dishes all new to me, something I have never prepped before.  I started with Swordfish Pasta, which was a great success.  If you recall, five years ago, my friend, Maria, and I made tamales. Maria taught me very well, but I scraped more masa off my walls than went into my tamales.  There are times when my dishes are successful and elegant and times when they are successful but not so pretty.  This is one of Those dishes. 

My first favorite Mexican food item was chile rellenos, a cheese stuffed fire roasted chile, seeded and gently fried or oven baked in an egg white batter.  Oh man, do I have stories about this dish!  It is why I call this a "learning" blog.  I think cooking, whether you are a Michelin starred chef, a line cook or a home cook, gastronomy changes all the time; it is a moving, living thing; the techniques and science behind it are always changing and refining. 

You cannot really have an item like chile rellenos without complementary side dishes.  I made a spicy Spanish rice and, black bean frijoles with my oven roasted salsa. Let's get started, shall we?


Preheat the oven to 400-degrees.

Roasted Salsa
1 white onion, quartered
3 cloves garlic, smashed and peeled
1 large or 2 small Fresno Chiles, whole
2 serrano chiles
salt and pepper
fresh thyme and oregano
2 limes


Place foil down over a baking sheet or pan. Place the veg and aromatics on the foil. Drizzle vegetable or grape seed oil over each item. Sprinkle or grind salt and pepper atop the veg generously and toss them in the oil thoroughly. Oven roast for 18 minutes, turning at ten minutes. Remove and let cool. 

You will want to follow the same procedure, even adding the pasilla/poblano chiles to this baking pan for the rellenos.  You want them to blister on all sides. 

If you want to grill the items, follow the same procedures, but using tongs, place each item (except the garlic, place them on a piece of foil) on the grill and allow the chiles to blister on all sides.  Turn the onion at nine minutes.  They should have beautiful grill marks. 

If you have a gas stove top, you can follow the same procedures, but without the oil. 

Remove the ingredients. Seed and stem the serranos and the Fresno chile. Place them into a food processor and roughly process.  You are making a salsa. Add a good teaspoon of lime juice, just eyeball it, to the mix and process.  No salt and pepper needed, or shouldn't be, but if you feel it needs it, go for it, to taste. Process till chunky. 


Black Bean Frijoles

Drain and rinse one 14.5-ounce can of black beans.  Place the beans in a sauce pan with one tablespoon vegetable oil over medium-high heat.  Add one heaping tablespoon of the roasted, processed salsa and stir that in with a pinch of salt and pepper.  Stir thoroughly and reduce the heat to low, cover and simmer for twenty minutes.  Afterwards, smash some of the black beans and add a teaspoon more of the roasted salsa. Add a little fresh lime juice. Remove from the heat, cover and set aside. 


Spicy Spanish Rice

2 cup rice, thoroughly rinsed
3 cups water
3 tablespoons roasted veg salsa
1 teaspoon salt
1 can (8 ounces) El Pato sauce
2 tablespoons vegetable oil

Place the rice and oil into a high-sided sauce pan over medium-high heat. Stir the rice for a few minutes while it toasts.  Add the water and elevate the heat to high. Add the salt and bring to a boil. Reduce the heat to low, cover and simmer for one hour, checking and stirring at the thirty minute interval. After the hour, remove the lid and turn off the heat. Let stand for ten minutes to release the steam.  Add the can of El Pato sauce and the salsa and stir to incorporate thoroughly. 

Chile Rellenos

Earlier, I had roasted three pasilla/poblano chiles.  Anaheim green chiles are great to use, as well.  After the chiles have steamed and cooled, remove the skin from the chiles very carefully. Use a paring knife to gently cut a T near the stem top of the chile and open.  Try not to tear the back side. Cut or scoop out the seed base at the stem and gently scoop out as many of the remaining seeds as possible.  Add either a stick of Oaxaca cheese or a good amount of grated Oaxaca (or mozzarella) and fold the T closed.  


In a large bowl, add four - six egg whites and whip the eggs until they begin to solidify due to the air being beaten into the egg whites. Now, here is where my learning process really started.  In my first attempt, I cracked five eggs into a bowl and used a hand mixer to beat the egg whites.  But after twenty minutes, the mixture was looser than the the unbeaten egg whites!  

Don't do this at home, kids!!!!!

My great friend, Jonathan, a Chef from Panama, suggested I use room temperature eggs and beat them with a whisk, not a power utensil.  Oh, but the first time, I put the original eggs into my Ninja, to no avail after the hand mixer was a bust.  So frustrating!  Allowing the eggs to come to room temperature for about 35 minutes was the key and using a whisk for about ten to fifteen minutes made a perfect, thick batter.  Great arm workout!  

I carefully dipped the three stuffed chiles into the batter and placed them into a large skillet over medium-high heat with three tablespoons vegetable oil drizzled in.  Tip, do not place the egg battered chiles into the skillet until the oil ripples.  Then I reduced the heat to medium.  Pour any extra batter atop the T of the egg to hold the chile together. That is another tip I figured out, too. 


My chile rellenos did not turn out pretty, I know.  I cannot claim fame there.  Next time, since I now know the nuances of chile rellenos and egg whites batter.  However, allow the egg whites to turn golden and remove.  A little darker is not a problem.  You may see the cheese start to bubble and ooze out.  You Know they are done, particularly then.  

Serve with the Spanish Rice and the Black Bean Frijoles and you have a fantastic, fairly authentic Mexican Meal.  The flavors are savory, warm and aromatic.  Just a wonderful, complete, healthy meal. Despite having no meat, there is protein in the beans, carbs in the rice and vitamins in the chiles.  Delicious and healthy!


Add fresh oregano as garnish and drizzle the remainder of the roasted salsa atop a chile relleno and serve.  I had wanted to add cheese to the top of the beans and relleno but i forgot.  Forgive me. 

My recipe for the chile rellenos serves two or three, but you can change that to as many as you need. Adjust the eggs, two per chile relleno.  I used six eggs for three chiles. 


As always, Thank You for your time and consideration, friends!  Thanks for your visit!
Please remember that Food is Love.  With that, Go Cook For Someone You Love!!!

Addendum:  I am so embarrassed that I published the original document as it was last night.  I had worked on it for several hours yesterday and was so tired when finished, though I thought I had properly edited spelling and grammar, I obviously did not.  Please forgive the original unprofessional document.  While I may have missed something during this thorough editing, and while the way I write is the way I speak, some things may not sound correct to you, I believe I have fixed most issues.  Thank You for your patience with me.  I really wanted to finish and publish last night.  Lesson Learned:  Be professional and thorough. 

~Martin
In-House Cook 


Thursday, October 4, 2018

Swordfish Pasta


Swordfish Pasta 

There comes a time when you must stop and listen to your own body.  Last year was a difficult year for me, physically, and while I am tougher than an old boot, as my dad would say about our family, I have come to realize that I am at that age -- old -- when I must make some drastic changes to my life. It is perilous to one's mentality when you receive more facebook friend requests and twitter follows from AARP and Humana than from actual friendly people. That's me, right now.  Even more so, I have come to the realization that my body does not function the way it did in my 40s, 30s and 20s and younger. I have determined that I need to change my diet so as to help my body metabolize, process and absorb nutrients and vitamins in a different way on a molecular level.  In other words, I need to eat differently.  Does that mean I am going to stop eating burgers and tacos and pizza and the foods I truly love?  Heck no!  But I do not cook extravagantly every day, especially when I am working, and I eat for convenience more often than for health.  That must be changed now:  I am eating for the fun and the health of it.  You will see more healthy recipes from me these days, interspersed with some decadent recipes.  

That was a lot, and Thank You for bearing with me. To start this journey of change and fun, I have prepared a dish that is all new for me:  Fish!  I have never been a big fish eater.  Trout has too many bones.  Salmon I love, but expensive.  Swordfish has always been my favorite; it does not have that fishy smell that other fishes do at market.  Here is a pasta recipe I created with swordfish and fresh vegetables and fresh herbs. Healthy, flavorful and natural. Let's get to it, shall we?

Ingredients
2 - 4 small swordfish fillets, cubed
1 pint mixed baby tomatoes
1/2 red onion, slivered
3 cloves garlic, sliced + 1 smashed
6 fresh basil leaves, plus garnish
several sprigs fresh thyme
lemon zest and juice and juice of half lemon*
parmesan cheese, shaved
garlic and lemon infused extra virgin olive oil*
salt and pepper
2 teaspoons dry Italian seasoning

This is such an easy recipe, you will love it. The downside?  Dishes. One pot and one large skillet are needed, tongs, colander and whatever else you feel the need to use. But it is flavorful and the textures, aromas, tastes create a happy party in your mouth. 

Prep is the name of the game here. Cut off the skin and cube the swordfish.  Prep the herbs, onion and garlic. The tomatoes can go in whole, and that is the idea. As they simmer, many of them will pop and release amazing flavor. 


If you do not have lemon and/or garlic infused evoo, add four tablespoons of evoo to a cup.  Add lemon zest and a smashed garlic clove to the oil and let it infuse for thirty minutes prior to using.* 


This is a great video but it won't play, I do not think. However, the cubed swordfish is featured here.  

Next, add four quarts of water to the large pot. Start to bring it to a boil.  Once this recipe gets going, it goes quickly!

Meanwhile, in the large skillet, add the evoo, flavor infused or  not, over medium-high heat. Add salt and pepper to the swordfish, all sides. When the oil begins to ripple, add the swordfish.  Do not stir it up. Allow the fish to form a caramelized crust; about three minutes.  Then, using tongs, flip and cook three minutes more.  The fish will not be done, but remove it to a plate and set aside. Now add the onion and half of the garlic. Saute without adding salt and pepper, as it is already in the skillet, for three minutes. Next, add the tomatoes and nestle them into the onions and garlic. Add several tender sprigs of fresh thyme and some tender fresh oregano.  

At this point, add a quarter cup of water, the dried Italian seasoning and simmer for ten minutes over medium-low heat. 

By now the pasta water should be at a roiling boil.  Liberally salt the water - yup, it is the only chance you get to season the pasta - and add as much pasta as you need to feed your family or friends. Or both!  I did not use much as it was only me. Boil about twelve minutes, and check strands for doneness. The boxes say to cook till "al dente", almost done, but I want it cooked through.  


Tear some of the basil and add it to the skillet as the onion begin to soften and the tomatoes begin to pop.  The aroma will make you swoon!

When the pasta is done, strain but retain about a quarter cup of the starchy pasta water in a cup. Add three tabs of butter to the large pasta pot along with the rest of the garlic, reducing the heat to low. Nothing smells better than garlic and butter, right?  Add the swordfish now along with the reserved pasta water, the tomato, onion and herb saute, all of it, to the pot. Pour the pasta atop the swordfish and veg herb saute and toss with the butter and garlic thoroughly. The heat from the pasta water, the hot moist pasta and the veg mixture will finish the swordfish through and provide added flavor. The moisture will dissipate as you toss it over medium-low heat for three or four minutes. 

Garnish with fresh basil and thyme. 

Serve family style or singularly or even in a bowl.  No need for sides with this, if you do not want!  It pretty much has a great serving of vegetables and healthy protein with a sauceless pasta.  For an even healthier dish, use rice pasta instead of semolina pasta. 


You can see the crust on the swordfish cubes. That is true flavor, and the fish absorbs the flavors of the tomatoes, onion and garlic and herbs, just as the pasta will.  The butter adds a lovely sheen to the dish and the flavors it picks up as you toss it.  


As always, my friends, Thank You for your time and consideration!  I hope you try this dish and send me your thoughts!  Make it your own!  Add, take away, make it your own! That is the fun of cooking and following a recipe. You can do what you wish with it!

With that, NOW, Go Cook For Someone You Love!

~Martin
In-House Cook


One Skillet Hoisin Chicken Stir Fry Over Noodles

  One Skillet Hoisin Chicken Stir Fry      Over Noodles This is one of those "people who know me Know I am obsessed over Chinese food&q...