Saturday, July 23, 2016


Caprese Burger

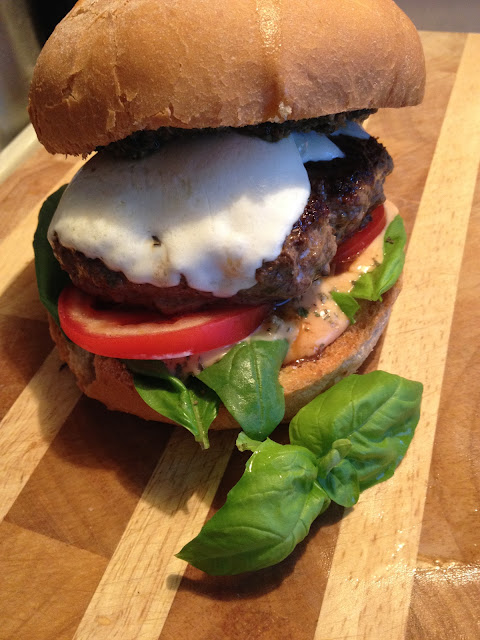
It is certainly no secret how much I love Caprese, an Italian salad conmprised of tomato, basil and mozzarella on a pool of extra virgin olive oil and balsamic vinegar. I have served it cubed, tossed in an evoo (extra virgin olive oil) balsamic vinaigrette, marinated cubed Caprese and served it in a melted parmesan cup and I have served it on bruschetta, to name just a few, but never in a burger.  So, Introducing!  My Caprese Burger!

This is flavorful and simple and feeds four to six.  Six if you make burgers mini-slider sized, like my mother likes, four for heartier appetites. Here is my easy list of ingredients for my Caprese pesto:

6-8 fresh basil leaves
pinch salt and pepper
1 level tablespoon grated parmesan cheese
1 tablespoon balsamic vinegar
2 tablespoons extra virgin olive oil
Pulse in a food processor (I have a little one for small jobs like this one), taste for flavor balance, adjust, if needed, more evoo or salt and pepper, spatula into a bowl and set aside to let the flavors marry. 

Burgers Ingredients:

1 pound lean ground beef
1/2 to 1 pound ground chuck
1 rounded tablespoon Italian seasoning
salt and pepper
2 sloppy tablespoons balsamic vinegar
1 splash of Worcestershire sauce
Fresh basil leaves (3 per burger), whole
fresh mozzarella, sliced, 2 slices per burger
tomato, thinly sliced into discs

Special sauce:

3 tablespoons mayonnaise or plan Greek yogurt
1.5 teaspoons dry Italian seasoning
pinch salt and pepper
1.5 teaspoon smoked sweet paprika
2 fresh basil leaves, finely chopped
1 clove garlic, grated
1 rounded teaspoon tomato paste
1 teaspoon balsamic vinegar

Stir the special sauce ingredients together to form a spread. 

In a large bowl, add the meat. Add all of the ingredients to the meat and use your best kitchen utensils, your hands, and mix the seasonings, balsamic and Worcestershire sauce into the meat. I find it funny that chefs tell us "do not overwork the meat".  How long or how much is overworking the meat?  I find that a few good "swooshings" of your hands through the meat like beaters on a mixer works everything together quite efficiently. 

Form the burgers to the desired size and put a thumb hole in the center.  I followed Bobby Flay's advice about that and it works, in that the burger does not poof up and the juices remain in the burger, not squished out of it because the burger rounded.  I also gently season both sides of the burgers with salt and pepper. 

After about four or five minutes on the first side, flip the burgers and place the mozzarella slices atop the burger. If the burgers are large, let it cook six or seven minutes before flipping. Create a foil tent and place it over the burgers if you are frying them to help the cheese soften and melt over the sides. 

Now would be a great time to toast the buns. I drizzle the buns with evoo and add a little garlic powder to them.  That is just my preference. Do not burn them under the broiler like I often do!  Keep an eye on it and do not start fires.  

When the buns have toasted and the mozzarella has started oozing over the rounded edges of the burgers, add the Caprese spread to the bun. I put it on the top, and the special sauce on the bottom. I added the three large basil leaves to the bottom, atop the special sauce, thinly sliced tomatoes, burger and place the top bun atop the burger. 


It's all about the Caprese spread and special sauce!  


This was one of my best burgers ever. 

Two more views?  Sure!
In the meantime, Thank You for your time and readership!  Now, Go Cook For Someone You Love!


Thursday, July 21, 2016


Simple Summer Sangria

It has been heating up here, in sunny California, and after long days at work, I felt it was time for a cool down with a fun pitcher of homemade sangria. Here is what I did; a little different from the norm, but I love these flavor combinations. The great thing about sangria is that you can have whatever flavor combinations you like. 

This is what I put together:

1  ruby grapefruit, peeled with a knife and sliced into discs

1 peach, cut around the pit and sliced

1 lemon, ends removed, sliced into discs

1/3 cup red seedless grapes, halved

1 tablespoon agave nectar

1 1/2 cups pink lemonade

1 cup spritzer water

1 bottle Rose sparkling wine

4 fresh basil leaves, chiffonade

Mix together thoroughly.  It is best to allow the flavors to marry a couple of hours - or longer - in the refrigerator prior to serving. 


Ready to serve?  Chill a glass in the freezer and gently pour.  Then, simply enjoy. 


I hope you enjoy this simple summer sangria!  

Please remember, drink responsibly!!!!!

Tuesday, July 12, 2016


Basted Ribeye Steak with Chimichurri and Cajun Spiced Oven Roasted Potatoes


Whenever I start a blog post by saying "This one will be short and sweet" I end up lying, so, while I will not say that this time, don't count that expression out. 

I like to treat myself to a nice dinner now and then, particularly at payday, and splurge just once a month. I especially love being asked to cook this type of dinner for a group of people as it has a rustic elegance about it. 

People have any number of ways to treat their steaks prior to grilling or searing.  Some rub it with an elaborate rub, some simply season with salt and pepper, some do not season it at all, but allows the cooking process to bring out the natural flavors of the meat. I prefer to season with salt and pepper. 


I allow the steak to come to room temperature for about thirty minutes or so before cooking.  In the meantime, I sliced baby Yukon Gold potatoes into thick discs and generously seasoned them with a store-bought Cajun spice blend. I drizzled them with extra virgin olive oil and let them sit for bit in the seasoned oil with fresh sliced garlic in a baking pan while the oven came up to temperature at 400-degrees. I start oven roasted potatoes first, of course, because they take longer to cook than the steak. The potatotes will take about twenty minutes. 

At ten minutes till the potatoes are ready, fire up your grill or place your skillet over high heat.  If you are using a cast iron skillet as I have, shown above, there is no need to add oil.  If you place a drop of water in the skillet and it sizzles, you are ready to sear the steak!  Place it in the center of the skillet and allow it to sear for about four minutes before turning it.  Allowing the steak, at room temperature, to sear on high heat allows the sugars to break down and the steak will release easily.  IF it does not release readily, freely, give it a little more time; the meat will release when it is ready. When you do flip the steak, allow it to sear for two minutes, reduce the heat to medium, and add two or three tabs of butter, along with a crushed garlic clove and herbs, whatever you have on hand.  Baste the steak for the next four minutes, allowing the herb infused butter under the steak, as well.  The aroma will make you light-headed!


Garlic and sage in butter for basting. 

Next, the chimichurri, to be drizzled atop the steak.  This can certainly be made well ahead of time and left in the refrigerator, even overnight. You can make a chimichurri (though mine is more of a pesto because I addeed cheese) out of any greens you like.  I used scallion greens and cilantro. Place the greens into a blender or food processor along with 3 tablespoons of extra virgin olive oil, salt and pepper. Add the cheese and scrape down the sides of the processor or blender with a spatula. If the chimichurri is thick, add a little more evoo until it is a bit more loose.  Cover with saran wrap and place in the frig until ready to use. 


Add the chimichurri atop the steak and plate the Cajun spiced potatoes. 

I garnished with basil chiffonade.  
What a delicious way to treat yourself and those you love.  With that, Thank You so much for your visit!  Now, get inspired and go cook for someone you love!  But ask them to do the dishes.  :)
  

Monday, July 11, 2016


A Tale of Two Dinners

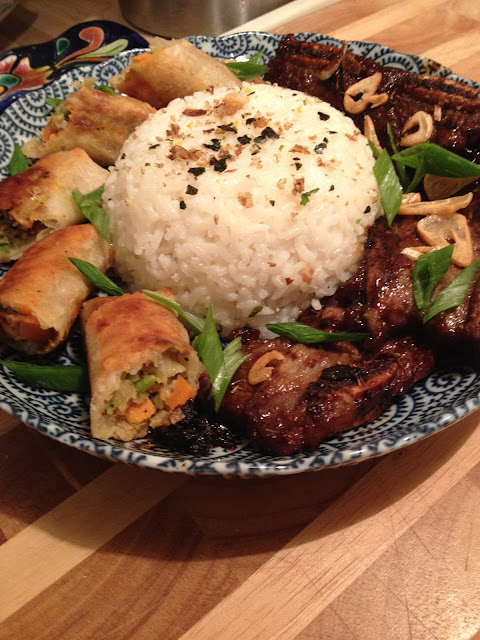
Over a period of two days, I created two Asian inspired dinners. Sometimes I just get a craving and I enjoy the creative process.  Two of my favorites of Asian-Polynesian foods is my mother-in-law's fried rice and Korean BBQ ribs. In addition, I am obsessed with lumpia, which, while not too difficult to prep, is time consuming.  I keep threatening to make it, but the proper time needed keeps eluding me. Curses!  Some day!  In the meantime, this is the tale of two dinners.  To start with, the feast of lumpia, sweet mirin rice and Korean BBQ Ribs.

Let's get started!

1+ cups of white rice (depending on how many you are feeding) in a bowl or rice cooker.  I like to use the white sticky rice for this dish. Cover the rice with one inch of water and let sit for an hour.  Rinse the rice afterward and cover with water again with about one inch of water.  The actual ratio is one cup rice to two cups water.  Half an inch above the rice is about two cups water. 

Next, slice and marinate the Korean style ribs. The packages I purchase have strips with four bones, so I slice them in the middle, two bones per slice. The marinate is as follows:

1/4 cup grape seed oil
1/3 cup Hoisin sauce
1/4 cup shoyu (soy sauce)
2 tablespoons Ponzu (citrus or chili flavored soy sauce; I use citrus)
1/4 cup mirin (sweet rice wine)
2 tablespoons apple cider vinegar
1 teaspoon toasted cumin and coriander seed
1 teaspoon crushed red pepper flakes or a teaspoon of chili sauce or sriracha
1 teaspoon black pepper
3 cloves garlic, grated or crushed
1 shallot, diced

I like to place the part of the marinade in a gallon-sized zip-lock bag, add the meat to it, pour the rest of the marinade atop that, zip the top tight and squish the bag so all of the meat gets coated as best as possible with the sauce.  After a couple of hours, I pour it all into a pan. 


Marinating the beef ribs. 


While the ribs are marinating, start the rice cooker or, bring the rice to a boil.  Stir thoroughly to prevent sticking and burning on the bottom and reduce the heat to low simmer, covered completely.  Most white rice takes about 20 minutes to cook, thirty for one cup, at the most. 

Next, fire up the grill or heat up a grill plate or grill pan, and using tongs, add rib strips onto the grill.  This only takes a few minutes to grill.  Three minutes per side, only.  Remove, place them on a slotted rack and place in the oven at 200-degrees until the rice is done.  This will keep the ribs warm but not overcook them. 

In the meantime, the rice should be about done.  When it is, remove the rice and spread it out on a freshly washed towel or in a clean baking pan.  Spinkle with mirin, a sweet rice wine vinegar.  It now comes in several different flavors. I used garlic flavored, but it is a feint flavor. Allow the rice to cool.  By-the-way, I did not season all of the rice with mirin.  I saved about a fourth of it

I served lumpia with this dish, too, along with the ribs and mirin rice, so I added about 1/3 cup of canola oil to a skillet and starting at low heat, I gently warmed up the oil with several pieces of sliced garlic and continued to raise the heat every couple of minutes to season the oil. I added some of the lumpia when the oil began to ripple, meaning it was hot and ready, and fried the rolls until golden brown.  You can find lumpia now, not just egg rolls or spring rolls, at most grocery stores these days.  For more traditional lumpia, check with Siri as to your local Filipino grocer or specialty store.  In the next town south of mine, there are several stores in downtown, but also a restaurant that serves them, but who also sells them freshly wrapped.  Mine were store bought. 


To plate, I took small bowl, rubbed the interior with canola oil, stuffed the bowl with the rice, placed the bowl open end down onto a decorative plate and carefully removed the bowl. I halved at an angle the lumpia and placed them decoratively half way around the rice and the ribs, once removed from the oven, on the other half of the plate. 


I garnished the dish with scallion greens and the rice with a mix of toasted sesame seeds and nori, flavored seaweed. (I love it!). 

Here are a few more photos.  Enjoy!


I also garnished the ribs with sliced garlic I had used in the marinade which I'd fried up. 

Now!  On to dinner two!  


**********


Since completing dinner one last evening, circumstances have changed, and I found myself in a rather heartbreaking situation today. For those who know me well, or who follow my Facebook account, I love animals and when a family animal meets their end, it rather tears me up inside.  That happened today.  I have been pretty melancholy this afternoon and I decided I needed to be productive rather than dwell on it.  I find joy in writing.  Therefore, I want to finish this Tale of Two Dinners and try to find some solace in this accomplishment. 

Once upon a time, I was married, I have two boys, well, two men, as they are both well into their adulthood.  Their grandmother is Japanese-American, whom I have mentioned before, particularly in my earliest blogs fro,m 2012-2013. I have enjoyed a lot of Japanese restaurant food in my time, but none outshines Grandma U's Japanese food.  One of my dishes I am most fondest of is her fried rice.  There was (and is) always rice on the table, and rice she could not use for one dish she used for another, if not fried rice.  Whatever veg or meats she had left over she used, always with an egg (of which I tend to go overboard on, making my rice more sticky than loose) and always scallions.  Using the leftover rice that I did not sweeten with mirin, I made fried rice with. I had a little pork belly left over from a previous burger dish in the freezer, and I had Korean bbq rib meet left over from the previous dish, so I diced up the meats, sliced two scallions, separating the greens from the whites.  I sauteed the meat in a tablespoon of shoyu (again, soy sauce) and a tablespoon of Hoisin sauce, black pepper and a little crushed red pepper flakes. I removed the meat to a bowl. 

In the meantime, I did a little prep work. I cracked and whisked three eggs with two tablespoons of shoyu in a bowl and set that aside.  I placed the scallions on a plate, separated, as I mentioned above, ready to use. 


I added three tablespoons of vegetable oil (canola or grape seed oil are my favorites to use) to the same non-stick skillet over medium-high heat I'd sauteed the meat bits in.  When the oil rippled, I added the rice and began breaking it up, absorbing all of that incredibly aromatic sauteed and saucy meat flavor.  Next, I added the meat and thoroughly incorporated the meat throughout the rice.  Afterward, I added the whites of the scallions and the egg, pouring it all round the skillet and over the rice. I allowed it to sit for a couple of minutes to allow the egg to set. I continued to break up the rice, turning it over and over to allow the egg to set, only to be broken up again.  But, as I use three eggs, it does not break up entirely like the fried rice you'd get at a Chinese restaurant. I also added half of the scallion greens to incorporate at the end of cooking.  I plated on a familiar plate to frequent viewers, a gift from a dear friend, made in Japan, garnished with scallion greens. 


As a salad, I shaved cucumber and red onion and marinated it for several hours in a mirin vinaigrette.  It paired very well with the fried rice.  I did not exactly do Grandma U's fried rice justice, but it was quite flavorful and filling in its own right.  


Tsukemono type of salad marinated in mirin and whole grain mustard vinaigrette.  


As always, I am truly grateful for your visit!  Please say hello or look up my humble blog's Facebook page at In-House Cook and say hello there!  Much appreciation!  Now, go cook for someone you love!  


Saturday, July 9, 2016


Grilled Chicken Breast with Herb Pearl Couscous and Nectarine Caprese

This was a lovely dinner and while I wish I could claim rights to the nectarine Caprese, alas, I cannot, but I can claim how delicious it is! The sweet crunch of the nectarine adds a wealth of flavor. I love it. As you may recall, I have also created a citrus Caprese; it is not a true Caprese, of course, but it does have the balsamic, basil and mozzarella foundation. I digress, however. As I mentioned in my previous post, I had been away for seven days and had not cooked a thing, and I could not wait to get into my kitchen. Last Sunday, I made a simple pork shoulder steak dinner for my mother and those beauteous brown sugar crumble stuffed grilled peaches. I made this meal two days later and enjoyed every moment of it. My inspiration was the Caprese, but the center piece of the dish, to me, was my craving for couscous stuffed and baked bell peppers. I wanted to build a dish where these two luscious veg and pasta healthy"sides" could geld with a protein.  Chicken seemed the perfect idea. 

I used my simple spice mix:
2 tablespoons smoked paprika
1 teaspoon ground coriander
1 teaspoon cumin seed
1 teaspoon dried thyme leaves
1 teaspoon dried oregano (crushed between the palms)
1 teaspoon ground dried rosemary leaves
salt and pepper
1/2 teaspoon ground cloves

I wanted to add the ground cloves to the spice blend to give it an added perfume or aroma to calm and alleviate the smoke paprika and cumin aromas (which I love tremendously, mind you). 

I rubbed the chicken breasts on both sides with the spice mix and allowed them to come to room temperature. 


In the meantime, I sliced the tomatoes, cheese and cored the nectarines and, using my mandolin, I shaved all of the veg and sliced the cheese with my cheese knife. I arranged the tomatoes, basil, nectarine and cheese on the dish over a layer of fine extra virgin olive oil and aged balsamic. I also drizzled evoo and balsamic over the Caprese. 

A view of the dish, Caprese on the left. 

I grilled the chicken breasts, four minutes per side over medium-high heat, and oven finished at 375-degrees for ten minutes. They turned out flavorful and moist internally. After resting the chicken, I sliced it to serve; I'd done the same thing with my mom's dinner a couple of days prior. Now for the star of the meal, the couscous stuffed bell peppers.  


I have to admit, I made couscous from a box.  There is no shame in it. (Smile) I added fresh herbs to it, followed the directions on the box, which made for a very swift operation. 


Pearl couscous with fresh herbs.  I never use the packet of flavoring that comes with it in the box. I always add my own fresh ingredients. 

After the couscous is done, which takes only a few short minutes, prep the washed bell peppers.  Slice a sliver off the bottom of the pepper so it stand up in a pan sturdily.  Remove the ribbing and seeds.  Be sure to save the top, if you wish.  It is flavorful and decorative. Add a little finely grated parmesan cheese to the bottom of the pepper and stuff the rest of the pepper, rounding above the pepper's rim, and top with more parmesan cheese, just for the fun and flavor of it!  Cap the pepper with the top, if you want. I put the cap on the first fifteen minutes then remove it the last five.  I cap it so the moisture remains in the pepper and the couscous and uncap it to thoroughly melt the cheese.  

Oven ready!  Bake for fifteen to eighteen minutes, pending the size of the peppers.  

Remove the pepper lid for the last five or so minutes to thoroughly melt the parmesan. 

Bake the peppers at 375-degrees for fifteen eighteen minutes, depending on the size of the pepper.  Fist size, fifteen, larger, eighteen.  Five minutes before it'd be done, remove the pepper lid and bake another five minutes. Remove and let them cool and set for a few minutes. Meanwhile, slice the chicken, if you have not done so already and plate as you wish. 


Garnish as you wish and serve!  Healthy, flavorful and pretty!  
Thank You, gentle viewers, for your time and consideration. As always, I am grateful for your visit!  Now, go cook something for someone you love!


Thursday, July 7, 2016


All NEW Episode of....
What I Have Been Up To In My Kitchen!

Summer has sprung and I have enjoyed being busy in my kitchen the last week trying different versions of old favorites.  I began with blue corn tortilla chip nachos with dry rubbed and then marinated carne asada.  Prior to this, however, a little more than a week ago, I went on a meaty carnivoric binge and made a pizza with all-meat that I wanted to share.  Finally, I made a little peachy dessert for my mom last night for OMC dinner which was a first for me.  More soon.....

Very simple, very easy, warm, fiery and tangy Mexican flavors in every chip or bite, my revamped Carne Asada Blue Corn Chip Nachos will please the entire family, or, just you!]
I started by toasting my spices:  paprika, coriander and cumin seeds, thyme, oregano, pasilla powder, dried, minced garlic and onion, chipotle powder and salt.  I ground them in my spice grinder and set aside.  While six thin carne asada beef steaks came to room temperature, I made my marinade.  That simply included 1/2  cup grape seed oil, the juice of two limes (mine were small and not very juicy, to begin with, ergo two limes which only yielded about a tablespoon), pinch of salt and a teaspoon of pepper, teaspoon of fresh thyme and fresh oregano and a tablespoons of apple cider vinegar, and, to top it off, a tablespoon of my Mexican spice blend. I whisked it all together and let it sit at room, temperature for about fifteen minutes.  After rubbing each of the steaks with my spice blend, I let the meat sit for about thirty minutes before adding the marinade. 


If you do not have the time, then rub the steaks and just pour the marinade atop them, flip the steaks with a pair of tongs and let them sit for about thirty minutes.  If you can, however, let them marinate for thirty minutes to an hour.  The acid will begin to work on the connective tissues and soften up the meat.  The next issue is:  slice and dice before or After you sear the meat?  I have to tell you, I have done this in both manners, and it did not matter; turned out just fine.  

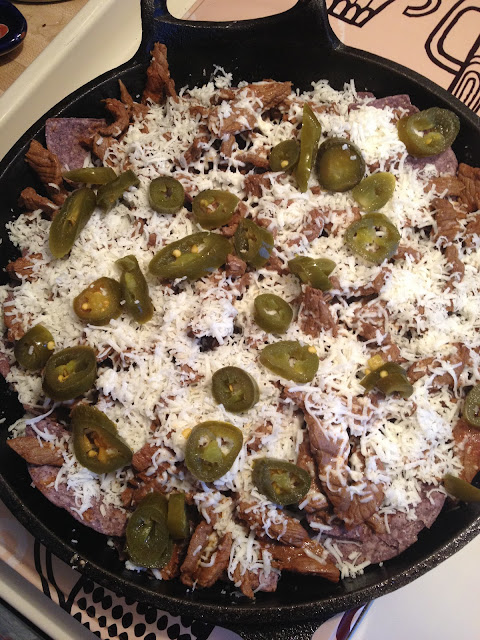
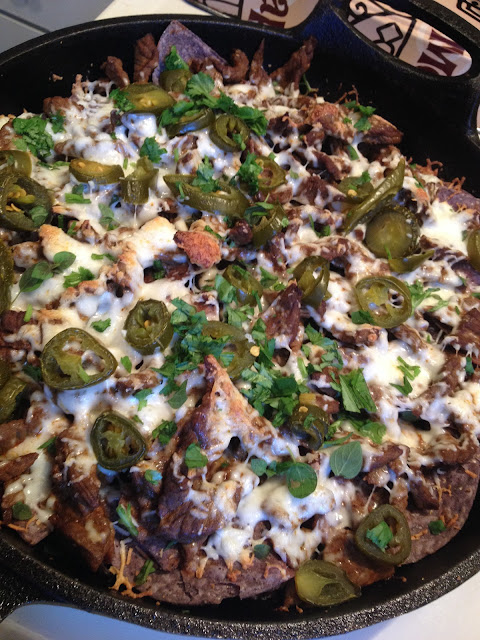
Enough prepping.  Time to get busy! Add blue corn tortilla chips to your cast iron skillet or a baking pan (might line a pan with foil for easy clean up) and add a thin layer of cheese.  After you have seared up the meat (I dice the meat into small bits, 1/4 inch max, and sear them up with just a little bit of pink left) add that generously atop the chips.  Add another, but more generous layer of cheese atop the carne asada.  I used Queso Anejo and Oaxaca, and top the cheese with dried and fresh oregano (I know, I'm obsessed with oregano), pickled Jalapenos and bake in the oven at 375-degrees for twenty minutes.  The Queso Anejo takes a bit of time to melt, and in doing so, the meat finishes cooking. Afterward, garnish with fresh chopped cilantro and let the cast iron skillet cool for several minutes before serving. Top with your favorite sauce or provide salsa in a bowl.  


Blue Corn Chip Carne Asada Nachos Oven Ready!

Garnish is fresh cilantro and fresh oregano after baking and serve with your favorite salsa or sauce!


Now, on to dessert!


Each weekend, I attend to my mom's needs.  I call it "OMC", or "OhMommaCare".  Once a week I make my mom dinner and sometimes dessert.  As we all know, I am not a baker, but I sometimes surprise even myself.  Grilling fruit, such as halved and cored peaches and stuffed with a brown sugar crumble and baked - and having it turn out well - was quite a feat for me!  


My crumble was a half cup of Bisquik  (TM), half cup of brown sugar, half a stick of ice cubed butter, cut into small cubes worked together into a ball.  Using a spoon, I scooped a good spoon full of the crumble into the peach. 


After baking at 375-degrees for eighteen minutes, the peach softened but retained its shape.  I am happy to share that my mom enjoyed it very much and called me later to tell me she ate a second one after I'd left!  Success is Miiiiiinnnne!!!  


Thank You, gentle readers, for your time and consideration.  I have decided to keep this episode short and sweet as possible.  I hope you have enjoyed this episode of "What I Have Been Up To In My Kitchen".  Thank You for your visit!

My Waaayyy Overstuffed Baked Potatoes

  My Waaayyy Overstuffed Baked Potato Last Thursday my spouse and I went out to run errands and we ended up eating at a local eatery. As we ...